RichardNeill.org |
|
Installing Mandriva 2006 (Linux-Mandrake 11.0) on an IBM Thinkpad A22p
| Permanent URL: http://richardneill.org/a22p-mdk11-0.php | Last updated 2009-10-28 |
Introduction
This is my page dedicated to Mandrake/Mandriva GNU/Linux on an IBM Thinkpad A22p. This version covers Mandrake 11.0 (also known as Mandriva 2006), but there are earlier pages about Mandrake 8.0/8.1 and 9.1. This information has been drawn from many sources: thanks to all of you! Any feedback on this page would be welcome. Copying is permitted: see below. In addition, this page led to the computing course I wrote for my students, introducing Linux, which is here.
This Thinkpad is actually very Linux-compatible. Although I haven't documented it here, I've run 8.0,8.1,8.2,9.0,9.1,and 10.2 on it (and Knoppix). Basically, everything works well, therefore,
this is partly a quick run through the installer, partly a list of things I think are important/useful to change on a GNU/Linux system, and partly a memo-to-self about my preferences for the next
install. I also have a desktop system, so there is a lot of general Mandrake information here. Lastly, I've included some useful scripts, binaries and config files. I have denoted
commands and files like this.
It is worth mentioning also: Linux-Laptop.net and TuxMobil.org (Linux on laptops), Linux-Thinkpad.org (Linux on Thinkpads, and the mailing list), ThinkWiki, the Linux on Thinkpads webring and the Knoppix bootable Linux demo/rescue CD. This is also a good place to warn about lm-sensors: do not install it, since it can destroy some thinkpads. Lastly, don't forget to subscribe to the security announcement mailing list.
Contents
Hardware
This is an IBM A22p, model TA2USUK, with 15" 1600x1200 display, PIII 1 GHz, and CD-RW. The RAM was upgraded from 128 MB to the maximum supported 512 MB. (Crucial RAM is cheaper than IBM and seems fine; 128 MB is rather marginal for intensive use under Linux). Everything works (although I never tested the S-video in/out.) The interesting challenges are: encryption, trackpoint sensitivity, making suspend work reliably and the modem driver.
The hardware maintenance manual for the A22p is here. Spare parts can be purchased from IBM's online parts store, or from laptopbits. Parts are identified by their FRU ("Field Replacement Unit") number, for example, spare trackpoint caps are: 84G6536.
I also purchased a Port Replicator ($10 on eBay), which is extremely useful: it saves frequently plugging/unplugging many cables, and it acts as a stand to tilt the keyboard. Everything works, except the DVI connector. Lastly, the ugly 'Designed for Windows98' sticker was removed, and the top of the lid adorned with a 40mm-high tux.
Pre-Installation
- Download the ISOs (Yes, I joined MandrivaClub). Burn to CD using cdrecord. Test using
dd if=/dev/cdrom | md5sumYou can also buy the CDs cheaply from for example The Linux Emporium. Sometimes, a perfectly good CD will not verify correctly because of padding. I downloaded the set of 6 CDs available as Mandrake Club Silver Edition, however if you download just the 3 Free GPL CDs, and then add all the urpmi sources, then install non free packages (java,realplayer,flash,acroread) you will end up with the same result. - Read the release notes and the Errata.
- Backup everything (especially /home, including hidden files within /home) on an external disk, or over the network (
rsyncviassh). Check it usingdiff -r. It's also worth keeping the old /etc. If there is anything useful in /var, remember to keep that too (eg Postgres databases, html, logfiles, crontab, mailspool). If the IP address is static, write it down and the other network settings. This is true for updates as well as fresh installs. - Power off...take deep breath, get coffee...
- In the BIOS, make sure that all the devices are configured to be enabled, and that the hardware clock is set to GMT. Set the boot order to CD-ROM, then HDD. Set the HDD password, but not the poweron password. Set the lid-close button to be inactive, not to suspend (this prevents a race-condition).
- Have a copy of Knoppix handy, and also note that the Installer Disk 1 is a recovery CD (especially useful if you destroy the bootloader)
Plan Encryption and security
Please note, I am not an authority on this - and I am only documenting what I did. Corrections would be welcome!
Consider: How important is security here? Given that it is a laptop, it might well be stolen, and in this case, the data would be compromised. Is encryption useful? Is it worth the performance penalty and hassle? I decided to do the following, however, you may decide otherwise. Here is a helpful "threat model". The worst thing, of course, is a false sense of security. "Nothing is guaranteed to be safe. Security means adding several layers which makes it more difficult to attack. The more layers you add, the more inconvenience you'll get until it actually stops you of getting any work done. You have to find the right balance looking at how important your data is, how much effort and resources your attacker will/can put into getting at the data, and how much inconvenience you're comfortable with in taking measures against a possible attack."
- I set the Hard Disk password in the BIOS. This is fairly impenetrable, (IBM certainly won't get it back for you),
but it is probably circumventable by a talented data thief. Don't forget it!! [It also means that the laptop cannot boot up unattended.]
I didn't set a BIOS password, since the HDD password is sufficient (and stronger than the BIOS password anyway).
From the Linux-thinkpad mailing list:
"[The Hard Disk password] is pretty secure. The protection is provided by the drive itself: one needs to disassemble the drive, separate the drive platters from its internal IDE controller and replace this controller to get to the data.
One important thing to know about Thinkpads is that if you also set a poweron password in the BIOS, the harddrive password gets copied to an EPROM on the motherboard. As a consequence, not setting a poweron password and only a harddrive password decreases the risk of an attacker to get to the data." - Most systems (given an attacker with physical access) can be booted up, either using Knoppix, or by pressing Escape while Lilo is starting, and then typing
linux single. So the login password alone is no protection at all! Even if CD-ROM boot is prevented by a BIOS password, and Lilo single-user boot is disabled, the Hard disk can still be read by placing it in another machine, - Encrypt:
/home, since it contains my data. - Encrypt
/var, since it contains all sorts of things: logs, slocate.db, postgres database...etc. - Encrypt
swap, because anything could end up there (and in the clear). Swap is the easiest to encrypt, and most transparent, so I'd recommend to encrypt that, even if nothing else. - Not encrypted:
/(the root directory), because it's all open source anyway! Furthermore, this is quite a complex operation, especially if trying to install there! And the performance hit would be most significant if the applications were encrypted. Yes, there is a little information which could leak out via/etc, but for me, this isn't important - besides which, my email address is written on the bottom of the laptop! - Not encrypted:
/boot, because this would be impossible! [If worried about a trojaned kernel being installed here, boot only off a USB-key, and keep the key in your sight at all times!] - I decided to use losetup rather than dm-crypt, since losetup is more established, and at least partially supported by a (broken) Mandrake rc.sysinit script. dm-crypt might actually work OK with Mandriva 2006, but it certainly didn't when I originally set this up under 10.2.
- Using losetup means that suspend-to-disk is dangerous, since the RAM will be in clear on the disk! But I only ever want suspend-to-RAM anyway. dm-crypt would allow cryptographic suspend-to-disk. Also, "newer versions of suspend2 also have native encryption support via the crypto-API of the Linux kernel." [But Mandriva doesn't seem to use suspend2.]
- Firewire can be dangerous. IEEE1394 devices can, by design, snoop on the host's memory. This is useful for debugging, but can be considered harmful. The laptop has no inbuilt 1394 device, but a PCMCIA card would be helpfully hotplugged by Mandrake! So prevent the modules from loading.
- The implication of the setup which I have chosen is that:
- When the system is switched off, if someone tries to access the hard disk, we are protected by encryption.
- When the system has booted up, all the encrypted partitions are mounted. We are now protected by the kernel, the login program, file permissions, and a strong password.
- When the system is left running, but unattended, xscreensaver is used to lock the display. We now are protected by xscreensaver. (And sshd, if on a network)
- Obviously, choose a strong password and passphrases. Also, there are some useful articles on data-hygiene published by The Register, on internet anonymity and data security.
- Here are some other encryption resources which may be of interest. Note that losetup is older than dm-crypt.
- Loopback AES Readme
- Linux device-mapper cryptography (dm-crypt) and the dm-crypt wiki
- How to encrypt the entire hard disk
- Linux Journal article: Implementing Encrypted Home Directories (but slightly old, not referring to dm-crypt)
- Disk and email encryption in Linux (covers Open PGP and Mandrake 9.1)
- Encrypting the whole disk using Gentoo and losetup. (Not really relevant here)
- Cryptoloop howto (Mounting an encrypted file instead of a partition)
- EncFS (doing everything in userspace. Uses Fuse. Easier, but less efficient)
- GPG: Encrypting file-at-a-time. (Useful for emails)
- StegFS (plausible deniability by having multiple layers of encryption).
- Other "attacks" include listening to the sound of the keyboard, listening to the sound of the CPU, and sampling diffuse visible light from the monitor.
- Tom's Hardware intro (LUKS).
- Other considerations:
- Can the encrypted home partition be locked without unmounting it? Eg before invoking the screensaver, or suspending, somehow forget the key, without first having to close all the applications and unmount /home. I can't see why this shouldn't be possible, but it would appear to need a kernel modification.
- Can we trust the login program? Yes, probably (provided the password is good enough). Thus, when the system is running, we are protected by the passwords. The encryption protects against someone with physical access to the machine, who can remove the hard disk (or use a bootable CD).
- Can we trust xscreensaver to do the locking? Yes, probably, provided that the password is sufficiently strong, and that there are no root logins on the virtual consoles, which xscreensaver cannot protect. Xscreensaver uses PAM, so it is as good as login. Disabling Ctrl-Alt-Backspace would be a good idea. If there were some way to crash X (or xscreensaver) without logging out, this would leave /home exposed.
- What about the daemons? Could sshd or apache compromise things? Make sure that permissions are not world-readable! What about ~/public_html? Obviously, we need to run a fully up-to-date system, with no known local-root exploits.
- What about the risk of a dictionary attack on /etc/shadow? Obviously, I use a password which is not a dictionary word! But a really sophisticated attacker could perhaps surreptitiously "borrow" the unattended laptop, copy /etc, run some crack against /etc/shadow, return the laptop, wait for me to log in, then steal it. "A possible improvement is adapting your pam configuration to replace the standard unix authentication (pam_unix.so) with pam_ssh.so (use your ssh passphrase to log in) or pam_usb.so (use a usb-stick to log in)" But obviously, losing a usb-stick is very easily done!
- Can we use PAM to automate any of this, to reduce the number of times the passphrase needs to by typed. Is there any reason why root password, my user password, and SSH passphrase should be different?
- Can the SysRQ key do anything bad? It appears not, according to the documentation in /usr/src/linux-xxx/Documentation/sysrq.txt
- We are still vulnerable to a brute-force attack with sufficient computing power; to theft of the laptop while unlocked; or to theft while locked, but powered on, and with sufficiently clever electronic probing of the motherboard (or via firewire).
- Newer thinkpads, with 'biometric fingerprint sensors' should not rely on these. The sensors do not reliably discriminate between users, and are very easy to fool. Furthermore, one's fingerprints can easily be retrieved...from the laptop!
- If any of this is wrong, please tell me!
Installation
If you want to have an encrypted system, first initialise the HDD by filling it up with random data. This will destroy any previous information there, so be
warned! Either boot knoppix, or run this from the current system, and run:
dd if=/dev/urandom of=/dev/hda bs=1M
This will take about 5 hours for a 32GB disk. /dev/random is better cryptographically, but would take a year!
- The new Mandrake installer is very slick, and just works. "expert" mode has gone away. There is a very useful rescue mode on the first CD, in case you mess up the system.
- It did prompt me to upgrade from 9.1, which would probably have worked fine. However, I decided to do a full reinstall, and re-partition.
- Accept license. Read release notes. British English. UK keyboard.
- Security=high (don't choose paranoid - you can make your system almost unusable!). Security admin = rjn (this is the person who gets the email from msec etc).
- Mouse = any PS/2 or USB (the default).
- Partitions. If you are not using encryption (or just encrypting swap), I would recommend something simple, eg:
However, I decided that I wanted to encrypt /var, and hence the partition scheme is slightly more complex. Diskdrake has an "encryption" option, which doesn't work well. Don't use it - and install everything unencrypted for now. Thus:Partition Size Mount point Filesystem hda1 7 GB / ReiserFS hda5 550 MB (slightly larger than RAM) swap swap hda6 1 GB /spare ReiserFS hda7 21 GB /home ReiserFS Partition Size Mount point Filesystem hda1 200 MB /boot ReiserFS hda5 6.5 GB / ResierFS hda6 550 MB (slightly larger than RAM) swap swap hda7 1024 MB /var ReiserFS hda8 1024 MB /spare ReiserFS hda9 20 GB /home ReiserFS - Package Selection: it is usually easier to install a small system, then add urpmi sources, and select more packages once it is done. So I just accepted the default groups.
NOTE: DO NOT install lm_sensors (it can destroy some thinkpads - see linux-thinkpad.org). Mandrake do not include it by default, and lm_sensors should now safely exit before damaging vulnerable machines, but it's worth making sure. This also means avoiding glms, ksensors, and not running sensors-detect. - Define a root password, a user (rjn) and password.
- Put the Lilo bootloader on the MBR (Master Boot Record)
- At "Summary", I went through all the config options:
- Timezone -> London, Hardware Clock = GMT, Use NTP
- Printers -> configure after install.
- GUI -> Generic Flat Panel Display, 1600x1200, Rage 128 Mobility, Xorg 6.8.2 with hardware acceleration, 16 bit per pixel.
Note: It is necessary to choose 16 bit/pixel and not 24 bpp in order to have hardware acceleration working.glxgearsgives 787 FPS at 16 bit, but only 158 FPS at 24 bit. - Network -> LAN: set eth0 to DHCP. Do NOT assign host name from DHCP address. Do not set "DHCP hostname". Choose start at boot. Get DNS servers from DHCP. Hostname="toffee-pecan.baddiant.org.uk". Zeroconf hostname=blank. Note: Unlike earlier versions, 10.2 will background the DHCP request to allow boot to proceed faster. However, you can also set a timeout.
- Firewall off all but SSH, and ping.
- Bootloader -> 5 second delay. Clean /tmp at boot. No need to specify precise RAM size. ACPI is now supported, so allow it. (Previously, I used APM).
Add "
splash=verbose panic=60" to the bootloader options (respectively: make bootsplash verbose, so that the boot messages are visible; reboot after a kernel panic rather than hang.) - Services -> deactivated many of these. In particular, unless you need them, deactivate anything to do with NFS (netfs,nfslock,portmap) and Zeroconf (mdadm, mDNSResponder,nifd).
Here is what I am running on my laptop. Note that some of these choices may not suit everyone. [I don't have a printer on the laptop, (no cups); I do web-development (postgresql,httpd), and
I have internet connection sharing enabled for use when travelling (dhcpd,squid,named). ACPI is now supported, (although APM works too). I have no bluetooth hardware, and I never change the ultrabay.
Irda causes crashes, and anacron causes the disk to thrash (rpmv,msec) for 20 minutes!]
- These are running:
alsa, acpi, acpid, atd, cpufreq, crond, dhcpd, dm, haldaemon, harddrake, hotplug, httpd, keytable, kheader, messagebus, named, network, ntpd,
		   partmon, pcmcia, postfix, postgresql, shorewall, smartd, sound, squid, sshd, syslog, udev, xfs
- These are not running:
anacron, apmd, apmiser, bluetooth, cups, cpufreq, cpufreqd, dund, hidd, iptables, irda, laptop-mode, mDNSResponder, mdadm, netfs, netplugd, nfslock, nifd, oki4daemon, pand, pcscd,
		rawdevices, ultrabayd, vncserver
- These are running:
- Reboot.
Post Installation
The system booted straight up - all seems well. Nevertheless, there is a lot left to do. This being Linux, there is a huge amount that can be configured....
In particular, before trying to do any further setup, I'd recommend configuring sudo, and urpmi and then installing bash-completion.
[1] Quick tests
- check hard disk performance: Is DMA enabled (it should be):
hdparm -tT /dev/hda. Test data rate:hdparm -tT /dev/hda[I get 287 MB/s, 19 MB/sec respectively]. - check memory status:
free -m[more info] - check disk space:
df -h, and what is mounted where:mount - is swapenabled?
swapon -s - check which kernel is running:
uname -a - check 3D acceleration:
glxgears[I get 787 FPS] - check which processes are running:
top;ps aux | less;chkconfig --list;service --status-all - check network:
ifconfig -a - check for system error messages:
dmesg;/var/log/boot.log;/var/log/messages;/var/log/kernel/*
[2] Configuring lilo
/usr/src/linux/Documentation/kernel-parameters.txt. I use the following:splash=verbose-> so that the boot-up messages are visible. Mandrake defaults to hiding them withsplash=silent. The old way (just text) issplash=none.panic=60-> so that, if there is a crash, the system will try to reboot after 60 seconds. Useful if unattended. (We could also install the watchdog).acpi=offinotify-> so that inotify is enabled, which allows KDE's volume manager to detect changed media (eg CDROMs or USB-keys.)vga=794-> so that the console uses a much higher resolution, which makes it far more pleasant. (To see which modes are possible, runhwinfo --framebuffer, then convert it using this table.)
image=/boot/vmlinuz-2.6.12-12mdk-i586-up-1GB
        label="2612i586up1GB-12"
        root=/dev/hda5
        initrd=/boot/initrd-2.6.12-12mdk-i586-up-1GB.img
        append="resume=/dev/hda6 splash=verbose panic=60 inotify"
vga=794timeout from 50 to 30. Then, remember to run /sbin/lilo so the changes take effect!
[3] Configuring Modprobe.preload
/etc/modprobe.preload so that these modules are automatically loaded on bootup:pcspkr
e100The e100 module is loaded here to force it to be loaded instead of eepro100 and before pcmcia starts (see the network section for why).
Configuring sudo
# User privilege specification
root    ALL=(ALL) ALL
rjn ALL=(ALL) NOPASSWD:ALLalias "sud"="sudo su".
So, you can now become root by simply typing "sud". [More information here.]
sudo su does not usually set up X authentication, so if you then try to run a GUI application (eg xclock), it fails with the error message: Xlib: connection to ":0.0" refused by server.
The solutions are any of:- Permit the root user to access your normal xsession: run (as yourself)
xhost local:root - Invoke the GUI application directly:
sudo xclock - Use the
suxwrapper script instead ofsu, to transfer the X credentials.
Configuring urpmi sources
[1] Introduction
Urpmi ("user RPM install") is the Mandriva package manager. It is a delight to use: once configured, simply urpmi PACKAGENAME and it will
download and install it for you. However, first you must set up some software sources ("urpmi media"). Virtually every package that you will ever need is
available via an urpmi source, and it is important to choose the correct sources! Also, you should never bypass or force RPM. When
installing from source, I recommend using checkinstall, so that RPM is always correctly aware of the system status.
[There is a graphical interface to urpmi, which is rpmdrake.]
For more urpmi information, see the Advanced uses of Urpmi section.
[2] Systems and Sources
- Official - this is the "stable" release. Recommended for servers.
- Devel = Community - this is the slightly more bugfixed and updated system (and is required by some PLF packages). Recommended for desktops.
- Cooker = Bleeding edge, and usually broken! Recommended only for Mandriva developers.
To set up the urpmi sources, it is possible to use urpmi.setup, but probably easier to visit: Easy Urpmi, or the Mandriva Club Mirror Finder.
urpmi.removemedia -a. Then, set up the following sources via EasyUrpmi: - Main = the 3-6 CDs you download. (Core distribution).
- Contrib = packages built by other volunteers - over 2GB of useful stuff, but not officially in the main distribution.
- PLF = "Penguin Liberation Front" - packages that might cause legal headaches in some countries, mainly multimedia. PLF is split into plf-free and plf-nonfree. [Note: PLF is designed to work with Community, not Official.]
- Updates = updated packages fixing bugs and security problems. [Only official has an updates source; for devel or cooker, updates are subsumed into the other media.]
- Club Open source packages = updated packages available to MandrakeClub members. You may wish to pick and choose these rather than adding the urpmi source: if so, browse the mirror with lftp.
- Club Commercial = non-free, binary packages such as Java and Flash. These are available as RPMS from MandrivaClub; if you prefer, you can download these directly from Sun,Macromedia etc.
- 2006 RPMS - updates for many and various packages, built for Mandriva 2006.
- KDE 3.5 RPMS - packages for KDE 3.5
[3] Applying updates and adding packages
Now, apply the updates, using: urpmi.update updates; urpmi --auto-select. Also, install the latest kernel, from the updates source, using:
urpmi kernel-i686-up-4GB-2.6.12.12mdk and then remember to edit lilo.conf and run lilo.
Now, if desired, you can add any other package. I'd recommend adding the following:
gnome-alsamixer, anacron, abiword, antiword, bash-completion, catdoc, checkinstall, dos2unix, faces-penguin, gscanbus, lyx, nc, nano, sane, openssh-clients,
unix2dos, mandriva_doc-en, shorewall, units, xfig, X11R6-Contrib
.
[4] My Urpmi Configuration
- main_community (ftp://anorien.csc.warwick.ac.uk/Mandrakelinux/devel/2006.0/i586/media/main)
- contrib_community (ftp://anorien.csc.warwick.ac.uk/Mandrakelinux/devel/2006.0/i586/media/contrib)
- plf-free and plf-nonfree (ftp://ftp.free.fr/pub/Distributions_Linux/plf/mandrake/free/2006.0 and mandrake/non-free/2006.0)
- SoS-KDE (http://seerofsouls.com/KDE-3.5)
- mandriva_club [Only temporarily configured, to download Java,Flash,OpenOffice2; then removed]
Configuring bash
The Bash shell is extremely versatile, and can be customised by editing ~/.bashrc.
Bash completion (sophisticated tab-completion)
bash-completion package is incredibly useful: it makes tab-completion far more pervasive. For example,
it will complete on urpmi packagename; killall processname ; ssh hostname; and it will suggest completions in
KDE's "run command" dialog (Alt-F2). Under Mandriva 2006, the installation of bash-completion has changed, and if you already are an existing user on the system, it won't "just work".
These are the steps:urpmi bash-completion- Pick one of:
cp /etc/skel/.bash_completion $HOME. /etc/bash_completionin your ~/.bashrc- edit the file:
/etc/sysconfig/bash_completion
touch test_file; mkdir test_dir. Then type cd test_[TAB].If bash-completion is installed, it will know that cd can only apply to a directory, and will complete the command to
cd test_dir. Otherwise, it will print
both options.
Lastly, bash-completion will occasionally refuse to complete a command which you know is valid. Use Alt-/ to force filename completion.
Optimising tab-completion
- In all distributions , if the word is unambiguous, pressing [Tab] once will complete it.
- In Mandrake, if the word is ambiguous, pressing [Tab] once will print a list of options. (with no beep).
- In most other distributions, if the word is ambiguous, pressing [Tab] once will just beep at you. You have to press [Tab] twice to get the completion options. This rapidly gets irritating, and causes lots of beeping!
/etc/inputrc or ~/.inputrc, and add these lines:
# Show all if ambiguous.
set show-all-if-ambiguous onMore Bash tips
- Typing 'help' will give a guide to the bash builtins. 'info bash' or 'man bash' are extremely useful; reading the man page in konqueror ('man:/bash') is easier.
- Here is a useful reference: the Advanced Bash Scripting Guide. (Also, a list of special characters and string functions )
- Mandrake defines a lot of helpful aliases, such as 'cd..' and 's'. Type 'alias' to list them.
- Keyboard shortcuts in bash/readline are described in
info bash "Command Line Editing"orman readline. There are very many: here are some of the most useful:Shortcut key Function Ctrl-a,Ctrl-e Move to start,end of line Ctrl-b,Ctrl-f Move back/forward one character Alt-b,f Move back/forward one word TAB Smart completion (within uniqueness) of command or filename Alt-/ Force completion on filename (override smart completion). Ctrl-u,k Cut ("kill") from cursor to start/end of line Ctrl-w,Alt-d Cut from cursor to previous whitespace,end of word Ctrl-y Paste ("yank") previous cut text Ctrl-_ Undo previous edit Ctrl-l Clear screen (except for current line) Ctrl-r Reverse-search through history - Quoting.
- Single quoted phrases in bash are literal. Within sinqle quotes, you may never use another single-quote, not even with a preceeding backslash (\'). See QUOTING in the bash manpage
- Double-quoted phrases in bash treat $, `(backtick), and \(backslash) specially. Double-quoted doublequotes may be escaped by \". Beware of ! characters within interactive shells:
echo "Oops!"will cause an error. - Conatenation is allowed:
TEXT="What's your name?\n"'My name is "Richard"'; echo -e $TEXT - Without quoting, filename globbing takes place. *, ? and [...] have special meanings: see PATTERN MATCHING in the manpage.
- Globbing is the process by which special characters are expanded to match filenames. For example
ls *.jpglists all files ending in .jpg. But consider what happens when there are no matches. By default, bash falls back to a literal '*'.shopt -s failglobmakes it throw an error;shopt -s nullglobmakes it result in the empty string. All choices are problematic - consider:i=0; for file in *ZZZ; do let i++; done; echo "There are $i files matching '*.ZZZ'"when there are no relevant files. Without failglob/nullglob, this will give the answer '1' when it should be zero. nullglob is best.ls *ZZZ. The default (neither nullglob nor failglob) results in "ls: *ZZZ: No such file or directory". However, with nullglob, it becomes justls, listing the entire directory.
- $IFS is the input field separator. By default, it is <space><tab><newline>. Any of these characters are treated as delimiters when tokenising input. For example:
set `echo "first second"` ; echo "\$1 is '$1' and \$2 is '$2'"results in $1 is 'first' and $2 is 'second', whereas
IFS=':'; set `echo "first second:third"` ; echo "\$1 is '$1' and \$2 is '$2'"results in $1 is 'first second' and $2 is 'third'.
My .bashrc
export EDITOR=/usr/bin/nano             #Use nano as the default editor (not vi !)
COMP_SCP_REMOTE=true			#Enable tab-completion for scp on remote hosts.

HISTIGNORE=l:ls:ll:la:cd:pwd		#Don't clog up .bash_history with useless commands<br>

alias nanw="nano -w"                    #Word wrap in nano
alias sud="sudo su"                     #Become root (see /etc/sudoers)
alias grep="grep --color=auto"          #Turn on color in grep
alias l.='ls -d .*'                     #Show ONLY hidden files.
alias lx="ls -X"                        #ls, sort by extension
alias duh="du -h --max-depth=1"         #Total size of this directory
alias x11vnc0="x11vnc -display :0"      #Run x11vnc on the existing X display

					#Konsole tab-name for database session (timpani).
alias timpani='echo -ne "\033]30;DB_timpani \a\033]0;\a"; psql -U timpani'

#Set up a helpful session name in Konsole, making the tabs much more useful. Include username@hostname for remote logins (where $DISPLAY != :0).
#The first part:  \[\e]30;XXXX\a\] sets the session name to XXXX
#The second part:   \[\e]0;\a\]   sets the window title to "" (to which the session name is then appended anyway)

if test "$DISPLAY"; then
        if [ "$DISPLAY" == ":0"  -o "$DISPLAY" == ":0.0" ];then
                 export PS1=$PS1"\[\e]30;\W/ \a\]\[\e]0;\a\]"
        else
                export PS1=$PS1"\[\e]30;\u@\h:\W/ \a\]\[\e]0;\a\]"
        fi
fiRoot's .bashrc
alias urpmiupdate="nice -n 19 urpmi.update updates ; nice -n 19 urpmi --auto-select"

#Bash prompt (the word 'root' is in red)
export PS1="[\[\033[0;31m\]\u\[\033[0m\]@\h \W]# "

#Set up a useful shell name in Konsole. Use * for root, and include hostname for remote logins (where $DISPLAY != :0)
if test "$DISPLAY"; then
        if [ "$DISPLAY" == ":0" -o "$DISPLAY" == ":0.0" ];then
                export PS1=$PS1"\[\e]30;*\W/ \a\]\[\e]0;\a\]"
        else
                export PS1=$PS1"\[\e]30;*\h:\W/ \a\]\[\e]0;\a\]"
        fi
fiSetting Up Encryption
Now that we have a system installed, it is time to encrypt it. It is possible to encrypt partitions on-the-fly, and it is maybe even possible to install to an encrypted disk. But the following is the easy (well, easiest!) way.
Note that you aren't really supposed to put a journalled file system on a loopback device: you may need to use reiserfsck --rebuild-tree if you are unlucky!
[1] Encrypt Swap
Encrypted swap is the easiest thing to set up, and potentially the most useful: since you never know what gets swapped out, you can never be sure what is on the
swap file! Try reading it using cat /dev/[swap-partition] | strings and you may be surprised!
(If you have *lots* of RAM, you might consider disabling swap altogether). Even better, encrypted swap is all automatic, and you never need
to set a password. It adds no significant overhead to the system. See man swapon for more details.
| Command | Explanation | |
su | Become root | |
init 3 | Change to runlevel 3 (non-graphical) | |
swapoff -a | Turn off swap | |
dd if=/dev/urandom of=/dev/hda6 bs=1M | Fill up the swap partition with junk (if you didn't already do this to the entire drive) | |
modprobe cryptoloop | Load the cryptoloop module if necessary | |
Modify the relevant line in /etc/fstab:/dev/hda6 swap swap defaults,loop=/dev/loop0,encryption=AES256 0 0 | This tells swapon to use encryption. Unlike the other partitions, it is required to specify a particular loop device /dev/loopX | |
swapon -av | re-enable swap | |
swapon -s | Check that swap is enabled | |
losetup -a | Check that the loopback device is enabled. |
In the 2006.0, I find that there is an error message at bootup: "Activating swap: unable to open device /dev/loop0". This arises because the
symlink /dev/loop0 -> /dev/loop/0 doesn't get created fast enough. (It's OK on faster machines.) Also, when rebooting after a kernel panic, the loopback device itself
doesn't get created, and we need to 'encourage' udev a bit.
/etc/rc.sysinit to include the 2nd paragraph below:
if egrep -q "[[:space:]]swap[[:space:]].*encryption=" /etc/fstab; then
    modprobe loop 2> /dev/null
    modprobe aes 2> /dev/null
    modprobe cryptoloop 2> /dev/null
fi
# /MiB

#BEGIN EXTRA SECTION
#/dev/loop* should appear as a result of modprobing loop. However, it sometimes takes a while,
#and if we are rebooting after a crash, it is sometimes necessary to give udev a prod with udevstart.
if [ ! -b /dev/loop0 ] ;then     #If /dev/loop0 not there, sleep 2.
        action "Sleeping for 2 seconds, to allow /dev/loop* to appear: " sleep 2
        if [ ! -b /dev/loop0 ] ;then #If still not there, prod udev and sleep 2.
                action "/dev/loop0 still not ready. Poking udev with sharp stick: " udevstart
                sleep 2
                if [ ! -b /dev/loop0 ] ;then #If *still* not there, we are in trouble.
                        action "Bother! /dev/loop0 still not found - we have a problem. " /bin/false
                fi
        fi
fi
#END EXTRA SECTION

action "Activating swap partitions: " swapon -a -e
rc_splash swap 5
If you wish to undo the encrypted swap (eg to use suspend-to-disk), you will have to re-create a normal swap partition with mkswap: mkswap /dev/hda6.
[2] Encrypt other partitions: /spare, /home and /var. Using losetup
This is the easier way to do it on Mandrake, since the init-scripts sort-of understand. Here is how it works: losetup creates an encrypted loopback device, such
that /dev/loopX is unencrypted (and can have a filesystem mounted on it), but connects to a matching hard disk partition (/dev/hdaX) which is encrypted.
The first time, losetup will require a passphrase: I use at least 30 characters, and have all 3 partitions with the same passphrase. The mount options in /etc/fstab
are loop (use loopback device), encryption=aes256 (type of encryption) and encrypted (used by rc.sysinit to know that it is
encrypted). When mounting, if you get an error about a bad superblock, it means you used the wrong passphrase. It is possible to encrypt a partition leaving the
data in place, but it is easier to back it up. The partition should be prepared by filling it up with random noise.
[2.1] Encrypt partition /dev/hda8, mounted as /spare:
| Command | Explanation | |
umount /spare | Unmount it, before encrypting. | |
dd if=/dev/urandom of=/dev/hda8 bs=1M | Fill up the partition with junk (if you didn't already do this to the entire drive) | |
losetup -Tv -e aes512 /dev/loop1 /dev/hda8 | Set up an encrypted loop device. Type the passphrase twice | |
mkreiserfs /dev/loop1 | Put a filesystem on the new device | |
losetup -d /dev/loop1 | Detach the loop device | |
Modify the relevant line in etc/fstab:/dev/hda8 /spare reiserfs loop,encryption=aes512,encrypted,notail,noatime 1 2 | Unlike swap, if a particular loop device, such as loop=/dev/loopX is not specified, a spare one will be chosen. | |
mount /spare | Check you can mount it - and type the passphrase as required. If mount complains about errors, you probably mistyped the passphrase. |
[2.2] Encrypt partition /dev/hda9, mounted as /home:
Do exactly the same as above, but substitute /dev/loop2, /dev/hda9. Back up the files in /home (or alternatively, just re-create the user). Thus:
cp -a /home /spare | Back up /home | |
umount /home | unmount | |
dd if=/dev/urandom of=/dev/hda9 bs=1M | Fill up the partition with junk (if you didn't already do this to the entire drive) | |
losetup -Tv -e aes512 /dev/loop2 /dev/hda9 | (Note, /dev/loop1 is still in use). Type the passphrase twice | |
mkreiserfs /dev/loop2 | Create filesystem | |
losetup -d /dev/loop2 | Detach loop device | |
Modify the relevant line in /etc/fstab:/dev/hda9 /home reiserfs loop,encryption=aes512,encrypted,notail,noatime 1 2 | (The 3 options: loop, encryption=aes512,encrypted are the relevant ones to change) | |
mount /home | Check you can mount it - and type the passphrase as required. | |
mv /spare/home/* /home | restore contents of /home | |
rmdir /spare/home | remove backup directory |
[2.3] Encrypt partition /dev/hda7, mounted as /var:
Do exactly the same as above, but substitute /dev/loop3, /dev/hda7. We need to back up /var, and it is also difficult to unmount
init 1 | Switch to runlevel 1, so we can unmount /var. | |
cp -a /var /spare | Back up /var | |
umount /var | unmount | |
dd if=/dev/urandom of=/dev/hda7 bs=1M | Fill up the partition with junk (if you didn't already do this to the entire drive) | |
losetup -Tv -e aes512 /dev/loop3 /dev/hda7 | (Note, /dev/loop1,2 are still in use). | |
mkreiserfs /dev/loop3 | Create filesystem | |
losetup -d /dev/loop3 | Detach loop device | |
Modify the relevant line in /etc/fstab:/dev/hda7 /var reiserfs loop,encryption=aes512,encrypted,notail,noatime 1 2 | ||
mount /var | Check you can mount it - and type the passphrase as required. | |
mv /spare/var/* /var | restore contents of /var | |
rmdir /spare/var | remove backup directory |
[2.4] Make sure that the partitions will mount at bootup.
So far, so good. We've done the hard part, BUT there will be problems when we reboot. When we boot, we want to always mount the encrypted partitions. However
the init script /etc/rc.d/rc.sysinit will give only one chance to mount, and if you mistype the passphrase, it will just skip it. This will cause
serious difficulties, since the system cannot properly boot without /var, and you cannot start kde without /home.
Edit /etc/sysconfig/autofsck and change the line to: AUTOFSCK_CRYPTO_TIMEOUT=600.
This should mean that instead of timing out after 15 seconds, the computer will wait 10 minutes for a user to enter a passphrase before it continues to boot.
However, this setting only applies in the case where the filesystem is unclean, and the normal setting is hardcoded in rc.sysinit. (!)
cp /etc/rc.d/rc.sysinit /rc.d/rc.sysinit.OLD. Now, edit it...- [2.4.1] Fix the timeout for mounting encrypted filesystems on boot-up. It should wait a long time.
Edit the line just above the comment:#Mounting Encrypted filesystem
and change the timeout to 600. The correct line reads:
[[ -z $AUTOFSCK_CRYPTO_TIMEOUT ]] && AUTOFSCK_CRYPTO_TIMEOUT=600 - [2.4.2] Fix rc.sysinit so that, if you get the passphrase wrong, it asks you again...and again (10 times).
Edit the section which begins:#Mounting Encrypted filesystem
Replace this part of the script:
echo "We have discovered Encrypted filesystems, do you want to mount them now ?" MSG=`gprintf "Press Y within %%d seconds to mount your encrypted filesystems..."` KEYS=`gprintf "yY"` if /sbin/getkey -c $AUTOFSCK_CRYPTO_TIMEOUT -m "$MSG" "$KEYS"; then echo -e '\n' for i in ${encrypted};do echo -n "${i} "; mount ${i} done else echo -e '\n' fi[download]
with this new version:
echo "We have discovered Encrypted filesystems, do you want to mount them now ?" MSG=`gprintf "Press Y within %%d seconds to mount your encrypted filesystems..."` KEYS=`gprintf "yY"` if /sbin/getkey -c $AUTOFSCK_CRYPTO_TIMEOUT -m "$MSG" "$KEYS"; then echo -e '\n' #We *really* don't want to boot up without this mounting successfully, so give #10 chances for the user to type the passphrase. If there is more than one #encrypted partition, try the same passphrase before making the user re-type it. unset crypto_passphrase for i in ${encrypted}; do failcount=0 while [ $failcount -lt 10 ] ;do if [ -z "$crypto_passphrase" ];then read -s -p "Enter passphrase for encrypted partition(s) ${i}: " crypto_passphrase echo -e '\n' else echo "Trying the same passphrase for encrypted partition ${i}" fi echo "$crypto_passphrase" | mount -p0 ${i} ; result=$? if [ $result == 0 ];then echo "Successfully mounted encrypted partition ${i}" break else let failcount++ echo "Failed to mount ${i}; used $failcount attempt(s) out of 10 allowed." fi unset crypto_passphrase done done unset crypto_passphrase else echo -e '\n' fi[download] - [2.4.3] Fix the section beginning with:
Check loopback filesystems, so that it doesn't check filesystems which are both loopback AND encrypted.
It should read:
# (pixel) Check loopback filesystems if [ ! -f /fastboot ]; then modprobe loop gprintf "Checking loopback filesystems" #Fsck -T -R -A -a -t opts=loop $fsckoptions Fsck -T -R -A -a -t opts=loop,noopts=encrypted $fsckoptions fi[download] - [2.4.4] Side effect:
service udev statusis untruthful
udev is started very early byrc.sysinit, before /var is mounted.service udev starttries to save the status by touching/var/lock/subsys/udev. This failure is harmless, but it will mean thatservice udev statuswrongly claims that udev is stopped when it isn't. To check the truth, usepgrep udevdinstead. If desired, add this torc.sysinitimmediately after mounting /var (in section 2.4.2 above):
#Udev has already been started, but the lockfile hasn't been created, because /var wasn't mounted at that time. [[ -d /var/lock/subsys/ ]] && pgrep udevd >/dev/null 2>&1 && touch /var/lock/subsys/udev 2>/dev/null[download]
[3] Other considerations
Set the hard disk password in the BIOS. See above.
/etc/modprobe.conf:
#We don't want to risk host memory snooping. Kill off firewire.
install raw1394 /bin/true
install ieee1394  /bin/true
install ohci1394 /bin/true[4] Conclusions:
- This now works. Test it by comparing the result of
cat /dev/hda9 | stringswith what you would usually see. It is gobbledegook! - Don't use diskdrake to set up encryption: it won't work, and it won't allow you to encrypt /var anyway.
- As a consequence of /var being on a separate partition, and the need not to waste disk space, postgresql may need to live in /home rather than /var/lib/pgsql/.
- Remember to lock the screen if you use a screensaver!
- See note below on suspend to RAM.
- Keep a copy of your new /etc/rc.d/rc.sysinit, because if you upgrade or update with urpmi, it will be overwritten by the defaults. In order to prevent this occuring, add this
to
/etc/urpmi/skip.list:#Keep modified rc.sysinit for mounting encrypted partitions at boot. initscripts[download]
[5] An aside on dm-crypt/cryptsetup
Actually, dm-crypt is the most promising way, but it involves too much fighting with Mandrake's init-scripts. Also, diskdrake doesn't understand, and I would guess that drakupdate_fstab won't. There is no need to use it (loop-AES is fine), but since I attempted it, here are some brief notes.
init 3 | ||
umount /home | ||
modprobe dm-crypt | ||
cryptsetup -yv -c aes -s 256 create hda9-aes /dev/hda9 | #hda9 = /home. Passphrase = usually 256 = max key size. | |
dd if=/dev/hda9 of=/dev/mapper/hda9-aes bs=64k | #this should encrypt the data in place. | |
reiserfsck /dev/mapper/hda9-aes | #check the filesystem. | |
Modify /etc/fstab:/dev/mapper/hda9-aes /home reiserfs notail,noatime 1 2 | ||
Create/edit /etc/crypttab and add the line:hda9-aes /dev/hda9 | ||
mount /home | #It works - but it won't work on reboot yet. |
To make it automatically mount on reboot, we need to get the cryptdisks init script. Download it from here, save
in /etc/init.d/ with mode 700, and comment out the line which reads "set -x".
ln -s usr/bin/cryptsetup /sbin/cryptsetup (since the Mandrake package puts cryptsetup in usr/bin and the script expects it in /sbin).
service udev start, put:#Start the device-mapper for the encrypted partitions using dm-crypt.
#Prompt for the passphrases as required.
#Do NOT boot until the correct passphrases have been supplied.
modprobe dm-crypt >/dev/null 2>&1
service cryptdisks start
This will work, provided that we fix the cryptdisks script so that it keeps prompting for a passphrase if the wrong one is entered. It might be possible
to make udev do this. However, cryptsetup create returns 0, whether or not it succeeded! This makes it hard to distinguish success from failure
in a script!
Note that, unlike losetup, umounting a mapped-device does not cause the encryption key to be forgotten. This may, or may not, be a good thing.
(You can forget the key with cryptsetup remove).
Configuring X and the Trackpoint
Most of this works just fine as installed. But, we can do better. Note: to make a change take effect, it is necessary to restart X. Logging out is not
sufficient (if using kdm). Restart the display manager from the console with service dm restart.
[0] Upgrading the version of Xorg to 6.9.0
- Find out which xorg packages are installed:
rpm -qa | grep -E 'xorg|X11R6'. I had the following:xorg-x11-6.9-1.cvs20050915.2mdk xorg-x11-server-6.9-1.cvs20050915.2mdk libxorg-x11-6.9-1.cvs20050915.2mdk libxorg-x11-devel-6.9-1.cvs20050915.2mdk xorg-x11-xfs-6.9-1.cvs20050915.2mdk xorg-x11-100dpi-fonts-6.9-1.cvs20050915.2mdk xorg-x11-75dpi-fonts-6.9-1.cvs20050915.2mdk xorg-x11-xauth-6.9-1.cvs20050915.2mdk xorg-x11-Xprt-6.9-1.cvs20050915.2mdk X11R6-contrib-6.9-1.cvs20050915.2mdk.i586
Download these fromhttp://seerofsouls.com/RPMS-2006/. I didn't set this as an urpmi source because I don't want to pull in all the upgrades from here.Install the packages with urpmi:urpmi ./xorg-x11-6.9.0-1.2006.SoS.i586.rpm ./xorg-x11-server-6.9.0-1.2006.SoS.i586.rpm ./libxorg-x11-6.9.0-1.2006.SoS.i586.rpm ./libxorg-x11-devel-6.9.0-1.2006.SoS.i586.rpm ./xorg-x11-xfs-6.9.0-1.2006.SoS.i586.rpm ./xorg-x11-100dpi-fonts-6.9.0-1.2006.SoS.i586.rpm ./xorg-x11-75dpi-fonts-6.9.0-1.2006.SoS.i586.rpm ./xorg-x11-xauth-6.9.0-1.2006.SoS.i586.rpm ./xorg-x11-Xprt-6.9.0-1.2006.SoS.i586.rpm ./X11R6-contrib-6.9.0-1.2006.SoS.i586.rpm- Get the updated packages from the community mirror.
urpmi.update -a; urpmi --auto-select - Log out. Then restart X:
service dm stop; service xfs restart; service dm start
[1] Graphics Driver and 3D
The graphics card is an "ATI Rage 128 Mobility". This used to use the r128 driver. But now, use the ati driver. [This is correctly
detected by Mandriva, and the driver is both free and stable]. In case of difficulty, the vesa driver works universally.
3D acceleration just works on this ThinkPad under Mandrake, without any need to install binary drivers from ATI. [ATI drivers only started being binary-only (ugh!) for 3D in
their later cards]. However, it is necessary to set the graphics to 16 bit colour, as there is insufficient memory for DRI at 24 bit color. You can test
3D acceleration by running glxgears: I get about 780 frames/sec at 16-bit. The performance is good enough to enjoy tuxracer, or helios.
[In case of 3D problems, see below.]
xrandr or xvidtune. - xrandr is invoked:
xrandr -s [NUMBER]and allows you to re-size the entire desktop. (xrandr is "X rotate and resize") - krandrtray is invoked:
krandrtrayand is a KDE system-tray GUI for xrandr. - arandr is a graphical version of xrandr, that runs on various desktop environments.
- xvidtune is invoked:
xvidtune -nextand changes the "viewport" onto the desktop. For example, an 800x600 viewport which can be panned around on top of a 1600x1200 desktop.
31.5-90 and 60 are fine.]
The resolution at the virtual terminals may be increased by using vga=794.
Aside for X22 laptop: install driconf, and run driconf as normal user. (No need to restart X afterwards). This allows you to enable
HyperZ which improves glxgears performance from 400fps to 970fps.
[This option isn't relevant for the A22p.]
[2] External Display
The external display is normally a copy of the LCD (although it can be used as a dual-head setup - I've seen this in W98, and believe that it can be done using
Xinerama). The BIOS uses Fn-F7 to cycle between {Internal LCD only, External CRT/Projector only, Both}, and it takes about 3 seconds for the display
to initialise.
- Make sure that the mode (such as 1024x768 or 800x600) is working on the internal LCD.
- Plug in the projector, and use Fn-F7. If both LCD + Projector are enabled, then with some projectors, there may be problems with timing errors. (The symptoms are: Distortion/Flickering; LCD monitor may complain about timing frequencies; Projector may fail to display anything, or mis-sync giving a "sliced" image). If so, use Fn-F7 again to have only the projector: of course, this means that there is no 'Autocue', so have a printout of the slides available!
- Use
xrandr -s 800x600to resize the desktop as necessary to fit onto the projector. - Give the presentation. NB: practice in advance; text not too small; test projector in advance; have printout of notes; check timing; speak slowly; be calm.
BiosHotKeys
in the Device section of xorg.conf:
Section "Device"
   ...
   Option "BiosHotKeys" "on"      #Enable Fn-F7 for switching between CRT,LCD,Both.
EndSection[3] S-video ports
The A22p has S-video input and output ports. I've never had occasion to use them, but atitvout -f may help.
[4] Font Sizes
- Add the
DisplaySizeline to/etc/X11/xorg.conf:Section "Monitor" Identifier "monitor1" VendorName "Generic" ModelName "Flat Panel 1600x1200" HorizSync 31.5-90 VertRefresh 60 DisplaySize 304 228 # <-- Added by rjn to sort out tiny fonts - these are width, height in mm .... EndSection[download] - Change the dpi line in
/etc/X11/Xresourcesto:where 133 is the value ofXft.dpi: 133xdpyinfo | grep resolution. - Unfortunately, the
gnome-font-propertiesprogram (which configures GTK applications) does not respect the value from the X-server. Start gnome-font-properties, click 'details', and manually change the resolution from 96 dpi to 133 dpi.
[5] Mouse
[5.1] Mouse device
/dev/input/mouseX but the value of X may vary depending on what is plugged in. The solution is to use udev to create a symlink to the correct
device:- We can discover which mouse we want by doing
cat < /dev/input/mouseXand wiggling the mouse. In this case, it happens to be /dev/input/mouse0 - We want to create a udev rule to symlink
/dev/input/trackpoint -> /dev/input/mouse0 - Find out about the device with udevinfo:
udevinfo -a -p /sys/class/input/mouse0 - Add the following to
/etc/udev/rules.d/10-local.rules:#Symlink the relevant /dev/input/mouseX by /dev/input/trackpoint: BUS=="serio", kernel=="mouse*", SYSFS{description}=="i8042 Aux Port", NAME="input/%k", SYMLINK="input/trackpoint"[download] - Modify xorg.conf to refer to
/dev/input/trackpointrather than/dev/input/mice - Reboot (since the PS/2 port doesn't like hotplugging)
- If multiple mice are now needed, the ServerLayout section should have one "CorePointer" and the others to "SendCoreEvents".
- For the A22p, it is also valid to use
/dev/psauxfor the trackpoint device. - Note: we don't want
/dev/input/eventXnor do we want/dev/input/tsX, since these can cause subtle errors. - If the Xserver fails to start, Mdk will 'helpfully' re-detect the mice, and over-write your carefully constructed file. So keep a copy!
[5.2] Mouse buttons
- Button 1 = ordinary Left-click
- Button 3 = ordinary Right-click
- Button "X" = ordinary Middle-click (i.e. paste.) [Button X is achieved by pressing btn1 and btn3 together]
- Button 2 + move trackpoint = Vertical AND Horizontal scroll
- Emulate3Buttons on: this means that (Button 1 + Button 3) => emulated middle button.
- EmulateWheel on: this means that Button 2 + move mouse => emulated scroll wheel
- EmulateWheelTimeout = 0: this means that Button 2 does not generate middle-clicks. Only Button X does.
- YAxisMapping = "6 7": Vertical scroll generates a series of button 4,5 events, which the application treats as a vertical scroll.
- XAxisMapping = "4 5": Horizontall scroll generates a series of button 6,7 events, which most applications treat as a horizontal scroll.
- No, that's not a mistake: it cancels another bug, namely the existence of /etc/X11/xinit.d/mouse_buttons which swaps buttons 4<=>6 and 5<=>7
- Horizontal scrolling is misinterpreted as forward/back in Mozilla. See below for fix.
- Newer Thinkpads have 3 buttons in a row. As of Xorg-6.9, they can use EmulateWheelTimeout, to allow Button 2 to be *both* scroll and middle-click.
This works extremely well, except for a few applications (
xfig,pcb) which use middle-button drag, so cannot coexist with EmulateWheel. [For older versions of X, see here for alternatives.] - The mouse options are documented in
man (4) mouse. [But there is sometimes another mouse manual page of the same name documenting the electronic protocol for mice. To get the right man page, use:man /usr/X11R6/man/man4/mouse.4x.bz2] - For testing, use
xevto identify button presses andxmodmap -ppto show the button mapping.
- The X and Y axes were switched (i.e Option "YAxisMapping" "4 5" Option "XAxisMapping" "6 7") because /etc/X11/xinit.d/mouse_buttons didn't work.
- EmulateWheelTimeout had no effect. It was stuck on the default 200ms.
- The ZAxis mapping to some non-existent buttons was needed.
[5.3] Cursor Theme
The cursor theme can be selected by running choose_cursor or from kcontrol->Peripherals->Mouse. I like the crystal cursors theme.
[5.4] xorg.conf (mouse)
Section "InputDevice"

#Mandrake's defaults.
#    Identifier "Mouse1"
#    Driver "mouse"
#    Option "Protocol" "ExplorerPS/2"
#    Option "Device" "/dev/mouse"		#symlink to /dev/input/mice
#    Option "ZAxisMapping" "6 7"

#My settings
    Identifier "Mouse1"
    Driver "mouse"
    Option "Protocol" "PS/2"
    #Option "Device" "/dev/psaux"
    Option "Device" "/dev/input/trackpoint"    #with udev symlink

    Option "Emulate3Buttons" "on"       #Button 1+3 =>t; emulated middle button
    Option "Emulate3Timeout" "50"
    Option "EmulateWheel" "on"          #Button 2 =>; emulated scroll wheel.
    Option "EmulateWheelButton" "2"

    Option "EmulateWheelTimeout" "0"    #If button 2 is pressed for less than this time, then the original button-2 press will pass
                                        #through. Otherwise, we get emulated scroll. Set to 0 to disable. [Default timeout: 200]

    Option "YAxisMapping" "6 7"         #EmulatedWheel vertical/horizontal pointer motion causes fake button 4,5 or 6,7 presses.
    Option "XAxisMapping" "4 5"         #Map these fake presses to vertical and horizontal scroll respectively.
    #Option "ZAxisMapping" "10 11"      #Previously necessary to map this out of the way, to prevent the default (6,7) breaking emulated scroll.
                                        #Note: there is a stupid bug: /etc/X11/xinit.d/mouse_buttons swaps 4<=>6 and 5<=>7
EndSection[6] Trackpoint sensitivity
The trackpoint can be set to have a very light touch, which I prefer. The old way, using the excellent tp4d is described here, but it doesn't work with Mandriva 2006, preferring a 2.4 kernel with apm and XFree86. There is now a driver in the kernel, but it requires either a patch and recompile, or a kernel 2.6.14 or later. See below for the kernel upgrade.
echo -n 255 > /sys/devices/platform/i8042/serio0/sensitivity. Once adjusted to taste, add to ~/.kde/Autostart/kde-startup.sh:#Set trackpoint sensitivity to highest.
#Requires kernel >= 2.6.14
if [ -f /sys/devices/platform/i8042/serio0/sensitivity ];then
echo "Making trackpoint more sensitive..."
sudo sh -c "echo -n 255 > /sys/devices/platform/i8042/serio0/sensitivity" #Makes it a very light touch. Default: 128
sudo sh -c "echo -n 100 > /sys/devices/platform/i8042/serio0/speed" #Not much effect.
sudo sh -c "echo -n 3 > /sys/devices/platform/i8042/serio0/inertia" #Negative inertia. Default: 6
else
echo "Cannot adjust trackpoint; /sys/devices/platform/i8042/serio0/sensitivity not found"
fiThe result is a very light sensitivity for the trackpoint. Note: don't rest your finger on the trackpoint; if it starts to "drift", take your finger off it for a second to allow it to re-calibrate; this is normal behaviour, especially at high sensitivity. "Negative inertia" is explained by IBM.
Lastly, set up the Xorg mouse acceleration in kcontrol->Peripherals->Mouse->Advanced. I use Pointer acceleration=2.0x; Pointer threshold = 4 pixels; Mouse wheel scrolls by = 5 lines.
[7] Keyboard
- Either use xmodmap, by including this in
~/.kde/Autostart/kde-startup.sh:#Get rid of Caps Lock and make it into an additional Control Key. xmodmap -e "remove Lock = Caps_Lock" \ -e "keysym Caps_Lock = Control_L" \ -e "add Control = Control_L"[download] - Or: use the KDE control center: Accessibility->Keyboard Layout->Xkb Options->Make CapsLock an additonal Control
Special and Accented Characters can be entered using the AltGr key. For example, the μ symbol is entered with AltGr-M. To get accented characters, such as é ç ö use AltGr and one of ;'#[] followed by the character to accent (Alt-Gr is 'sticky' in this context). Alternatively, GTK applications support entering Unicode characters directly: to enter U+00B5 (the "μ" symbol), type Ctrl-Shift-U, B, 5 (the leading 0s are optional).
"ServerFlags" section of /etc/X11/xorg.conf:
DontZap # disable <Crtl><Alt><BS> (server abort)- Meta is (roughly) Emacs-speak for Alt. Sun keyboards have Meta, whereas PC keyboards have Alt.
- AltGr (Right_Alt) is AlternateGraphic for other characters such as μ, which is entered as AltGr + m.
- Compose is an alternative way to get composite characters. Eg © is entered with the sequence Compose, o, c. However, (unless using Unicode), it only duplicates the functionality of AltGr and isn't really required.
- Super is often mapped to the Windows-key [which isn't present on ThinkPads], and is usually used for extra Window-manager functions and custom global program-shortcuts.
- Hyper is also sometimes, but uncommonly used. It may be mapped to the Menu key [not present on ThinkPads].
- Mod1 - Mod4 are the internal names used by the X-server for the modifiers: up to 4 are allowed. Usually, Mod1 = Alt/Meta; Mod2 = NumLock; Mod3 = AltGr (= KDE 3rd level), and Mod4 is free.
- Space Cadet Keyboards have all of the above, and can enter 8000 characters! Of course, this leads more to parody than to usabilty!
Note that many Linux programs still only understand ASCII (7-bit, 128 characters max, see man ascii), or if you are lucky, they understand one of the extended
upper-half character sets such as Latin-1 (8-bit, 256 characters). The right way to do it is Unicode with UTF-8.
See below to fix the GTK keyboard shortcuts.
[8] Miscellaneous
- Fn-F7 switches between LCD, LCD+CRT, CRT. But if you are in a virtual console, the LCD is blank in LCD+CRT mode. Under X, the LCD works as expected.
- Switch on screen expansion in the BIOS. Otherwise, 800x600 will only use the central quarter of the screen!
- LCDs look horrible at non-native resolution. But it's much better for games since it reduces the CPU-load, and allows a higher frame-rate. Eg tux-racer at 640x480.
- There was (in 9.1) a bug in the r128 driver which caused occasional lockups with 3D GL things. This appears to have been fixed, but for reference, here is the information.
- The
xev(XEvent) program is very useful to see what is going on - it prints keycodes/keysyms/button-press diagnostics to the screen. xmodmapallows you to change particular keyboard and mouse-button mappings.setxkbmap gballows you to set default keyboard mappings. Useful if you did something stupid with xmodmap!xbindkeysallows you to define key-combinations to launch programs.xclipcopies and pastes from stdin/out to/from the clipboard.xmacrolets scripts generate key/mouse events. (eg:echo -e "KeyStr Z\n" | xmacroplay :0)- For the PC-speaker, or Bell see sound.
[9] Mouse Emulation
- Shift-Numlock: turn mouse emulation on or off.
- 82,46,7913: move mouse pointer up,down,left,right,diagonally.
- 5: press the mouse button.
- ÷, ×, −: select which mouse button is emulated by pressing 5 (respectively: left,middle,right).
- +, 0: double-click, click-and-drag
[10] xorg.conf
Note 1: when restarting the X-server, it is necessary to restart the dm service. Logging out is insufficient.
Note 2: Make sure to keep a copy of xorg.conf, since Mandriva "helpfully" re-writes it whenever anything goes wrong.
Unfortunately, making the file non-writeable doesn't help, because processes running as root don't respect file-permissions. However, we can set the file attributes to be
immutable using chattr. Immutable files cannot be altered by anything without first unsetting the immutable flag. So, as root, do:
chattr +i /etc/X11/xorg.conf. (See also lsattr.)
Note 3: This is also a good time to introduce RCS version control. Use ci -l /etc/X11/xorg.conf to "check-in the latest revision" of the file, and generate an RCS file, (with a
,v extension), xorg.conf,v. The -l makes ci check out the file again immediately. (See also co).
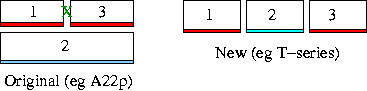
[11] Aside: EmulateWheelTimeout for X- and T- series
- Get the latest xorg .src.rpm from the SRPMS/ directory on the mirrors. I used the one from SeerOfSouls: xorg-x11-6.9.0-11.1.20060.SoS.src.rpm.
- Install with
rpm -i. - Get this patch (attached to comment #8 on the xorg Bugzilla).
- Apply it to the source:
cd /usr/src/RPM/SOURCES/ mkdir TMP; cp X11R6.9.0-src.tar.bz2 TMP/; cd TMP tar xvzf X11R6.9.0-src.tar.bz2 cd xc/programs/Xserver patch --verbose -p0 < /home/rjn/xorg-hack/mousepatch.4318.patch cd ../../.. tar cvfz X11R6.9.0-src.tar.bz2 xc mv cvfz X11R6.9.0-src.tar.bz2 .. ; cd .. - Now build the RPM:
cd /usr/src/RPM/SPECS; rpmbuild -bb xorg-x11.spec - Finally, the RPMS will be in
/usr/src/RPM/RPMS/i586: install the packages as desired. - Now, clean up or there will be over a GB of wasted disk space! When the rpm tool installs a
.src.rpm, it merely unpacks its source into the/usr/src/RPM/SOURCESdirectory. Thereafter, it isn't listed byrpm -qa, and cannot be removed withrpm -e. So, some judicious use ofrm -rfin the directories/usr/src/RPM/SOURCESand/usr/src/RPM/BUILDis required.
Fonts
[1] Font sizes
First, sort out the font-sizes by configuring X correctly: see above. This is necessary, since the 1600x1200 screen has a much higher DPI than normal.
[2] Font Types (bitmap,truetype,antialiased,hinted) - Introduction
There are several types of fonts:
- Bitmap fonts. (75dpi, 100dpi). These are the old-style X fonts, and cannot be scaled. They also cannot be printed. However, they look excellent on screen, iff they are displayed at their native size. Only certain point-sizes are available, and these fonts cannot be anti-aliased. (Eg Helvetica 8,9,13pt look excellent; 11pt looks poor, 10,12pt are unavailable)
- True-type (scalable) fonts. These fonts are the "modern", resizable ones, which look curvy. The outlines are generated from vectors, and mapped onto
a pixel-grid. However, how exactly should the fonts be scaled to match the pixels?
- Scale, but don't anti-alias. Each pixel is either black or white. This means that the font is sharp, and easy to focus on, but the coarse pixellation usually results in a horrid, "spidery" effect with jagged outlines. This is the well-known "bad Arial fonts on Linux" problem. Here's a sample comparison: left = {non-antialised, hinted font, good}; right = {non-antialised, non-hinted font, bad}.
- Scale and anti-alias. "Fudge" the curves by setting the intermediate pixels to varying shades of grey. This blurs
the edges of the font, creating a smooth outline which is (on average) faithful to the original vector. For very large fonts (in headlines), and fonts used in images, it looks
good. But for normal text, it is a matter of taste. Some people like the smooth edges, but I personally find them
blurry, and "out of focus" - and they give me eye strain!
(It's not quite so bad on this wonderful 133dpi monitor of the ThinkPad, but dreadful anywhere else).
Sub-pixel rendering is a possible solution: it uses the 3 coloured pixels of the LCD to triple the horizontal resolution of
the anti-aliasing. But the result is colour-fringing of the fonts. If you look at the result using
xmag/kmag, you will see what I mean! However, some people do really like this smoothing effect. The Bitstream Vera (or DejaVu) fonts are the best for this. - Use properly "Hinted" fonts and don't anti-alias. Hinting means that when the font is scaled, instead of keeping its shape perfectly the same, it is carefully distorted to fit better over the pixels. The result is that the font face looks slightly different, but it is always sharp, and free from ugly artifacts. (For example, the letter "e" sacrifices its "Times-New-Roman-nature" in favour of clarity.) These correctly hinted fonts do not need anti-aliasing (and anti-aliasing often makes them worse at small sizes). The Microsoft fonts are best for this. [For interest, here's a comparison of Microsoft's and Apple's different approaches to smoothing.]
- Lastly, when the font is very large (eg > 15 pt or used in an image), anti-aliasing makes the edges less jagged, without harming readability.
Here are some images of the different fonts. Try enlarging it with xmag/kmag to see the details [not firefox-zoom, which will antialias]. More examples are here (scroll down). Bitmapped:
(clear, but un-scaleable)<- For terminals True Type, non-antialiased:
("spidery")<- The problem True Type, antialiased:
(correct average shape,
but blurred)<- The standard solution True Type, hinted:
(slightly distorted shape,
but it is clear)<- My preference TTF, hinted, antialiased:
(not quite so good)<- Combination


- Install the Microsoft corefonts (which are free-as-in-beer). These are very well hinted.
- Install the plf version of libfreetype6.
- Set up the applications to use the new fonts.
- No half-measures: a compromise will be much worse than either extreme!
[3] Configuring Freetype, installing well-hinted fonts
- Take a screenshot of how things look now (with
ksnapshot) for later comparison. - Install the Microsoft Core Fonts. Before I wiped out Win98, I kept a tarball of
C:\Windows\fonts\. Install the .ttf files, (but not the .fon files) using either the Mandrake Font Installer (in Mandrake Control Center), or KDE's font installer (KDE->kcontrol->System->Font Installer). Alternatively, there are the Microsoft webfonts which are free (as in beer), which can be downloaded from sourceforge.
Tahoma isn't necessarily included in corefonts, but it is available for download here:#Install Tahoma. Download directly from Microsoft, as it isn't in msttcorefonts. mkdir -p ~/.fonts ; cd ~/fonts wget http://download.microsoft.com/download/ie6sp1/finrel/6_sp1/W98NT42KMeXP/EN-US/IELPKTH.CAB && cabextract -F 'tahoma*ttf' IELPKTH.CAB && chmod 644 tahoma* && fc-cache -v && rm -f IELPKTH.CAB && echo "Installed Tahoma"[download] - Installing a version of libfreetype with support for the Bytecode interpreter (hinting):
- First, download the penguin-liberation-front packages for libfreetype6 (and -devel):
libfreetype6-2.1.10-8plf.i586.rpmandlibfreetype6-devel-2.1.10-8plf.i586.rpm - Then, install them instead of the Mandriva packages. However, urpmi won't upgrade them since the replacement version is in fact slightly earlier.
If you use urpme to remove the Mandriva packages before installing the PLF ones, you'll end up uninstalling your entire system! This is one of those
rare occasions when using rpm with --nodeps is justified. Find the names of the packages which are installed:
rpm -qa | grep libfreetype
- Forcibly uninstall them, without removing packages which depend on them:
rpm -e --nodeps libfreetype6-2.1.10-9.1.20060mdk libfreetype6-devel-2.1.10-9.1.20060mdk
- Install the PLF packages:
urpmi ./libfreetype6-2.1.10-8plf.i586.rpm ./libfreetype6-devel-2.1.10-8plf.i586.rpm
- Prevent
urpmi --auto-selectfrom re-installing the mandriva packages. Add this to/etc/urpmi/skip.list#Don't mess up the libfreetype: keep the PLF packages. libfreetype6 libfreetype6-devel libfreetype6-static-devel[download] - Restart X (logout, service dm restart)
- First, download the penguin-liberation-front packages for libfreetype6 (and -devel):
[4] Font settings for applications
Application Font
(Thinkpad A22p, resolution: 133dpi)Font
(Desktop, resolution: 99dpi)kcontrol -> LookNFeel -> Fonts: - General: Tahoma (8) Tahoma (10) - Fixed Width: Courier New (10) Lucida Typewriter (10) - Toolbar: Tahoma (8) Tahoma (10, bold) - Menu: Tahoma (8) Tahoma (10) - Window title: Arial (10) Terminal [DEC] (11, bold) - Taskbar: Tahoma (6) Helvetica (8) - Desktop: Tahoma (8) Tahoma (10) - Use Antialiasing for fonts: yes
- Use sub-pixel hinting: no
- Hinting style: medium.Exlude range 0-14pt (inclusive) Exlude range 0-14pt (inclusive) Konqueror as file manager
(kcontrol -> Components -> File Manager):Tahoma (8) Tahoma (10) Konqueror as web browser
(kcontrol -> WebBrowsing -> Fonts):- Minimum fontsize: 6 7 - Medium fontsize: 8 12 - Standard font: Verdana Verdana - Fixed font: Courier New Courier New - Serif font: Times New Roman Times New Roman - Sans serif font: Arial Arial Unicode MS - Cursive font: Perpetua Park Avenue - Fantasy font: Blue Highway Blue Highway Kwrite: Fixed [Misc] (8) Courier New (11) Konsole: Fixed [Misc] (8) "Unicode". Or Fixed [Misc] (12). Or Terminus 11 Settings for most GTK applications
(gnome-font-properties):- Application font: Tahoma (8) Tahoma (10) - Desktop font: Tahoma (8) Tahoma (10) - Window title font: Arial (10) Terminal (11,bold) - Terminal font: Courier New (10) Terminal (10) - Font Rendering: Monochrome Monochrome Gnumeric -> Format -> Preferences -> Font: Tahoma (7) Tahoma (10) OpenOffice 2.0: - Tools -> Options -> OpenOffice.org -> View: Screen font antialiasing: from 25 pixels (≈14 pt) Screen font antialiasing: from 20 pixels (≈14 pt) Optionally, to change U.I. font (probably already Tahoma via KDE/Ooo integration), uncheck "Use system font for user interface". - Tools -> Options -> OpenOffice.org -> Font: If changing U.I. font, select "Apply replacement table" and replace "Andale Sans UI" (which is not listed) with Tahoma. Select "Always". Mozilla (suite)
[Version from Mozilla.org, GTK1]
(Uses the 100dpi fonts. Very clear):- Proportional: [not tried this] Sans Serif (14 pixels) - Serif: n/a adobe-times-iso8859-1 - Sans-serif: n/a adobe-helvetica-iso8859-1 - Cursive: n/a adobe-courier-iso8859-1 - Fantasy: n/a adobe-courier-iso8859-1 - Monospace: n/a adobe-courier-iso8859-1 (14 pixels) - Minimum font size: n/a 10 pixels - Display resolution: n/a 99 dpi Mozilla (suite)
[Version from Mandriva, GTK2]
(Uses the TTF fonts):- Proportional: Sans Serif (14 pixels) [not tried this] - Serif: Times New Roman n/a - Sans-serif: Verdana n/a - Cursive: Perpetua n/a - Fantasy: Blue Highway n/a - Monospace: Courier New (16 pixels) n/a - Minimum font size: 11 pixels n/a - Display resolution: 133 dpi n/a Firefox - Proportional: Sans Serif (14 pixels) Sans Serif (13 pixels) - Serif: Times New Roman Times New Roman - Sans-serif: Verdana Verdana - Monospace: Courier New (16 pixels) Courier New (16 pixels) - Minimum font size: 11 pixels 10 pixels - Display resolution: 133 dpi 99 dpi Thunderbird - Proportional: Sans Serif (14 pixels) Sans Serif (14 pixels) - Serif: Times New Roman Times New Roman - Sans-serif: Tahoma Tahoma - Monospace: Courier New (16 pixels) Courier New (16 pixels) - Minimum font size: 11 pixels 10 pixels - Display resolution: 133 dpi 99 dpi
font-family property. Note that you can configure the browser as to precisely what font it should show for the various families, as well as allowing/disallowing the use of web-page specified fonts. Here are the various families, so you can see what they look like in
your browser:- This is your chosen "serif" font: abcdefghijklmnopqrstuvwxyz ABCDEFGHIJKLMNOPQRSTUVWXYZ italic text
- This is your chosen "sans-serif" font: abcdefghijklmnopqrstuvwxyz ABCDEFGHIJKLMNOPQRSTUVWXYZ italic text
- This is your chosen "cursive" font: abcdefghijklmnopqrstuvwxyz ABCDEFGHIJKLMNOPQRSTUVWXYZ italic text
- This is your chosen "fantasy" font: abcdefghijklmnopqrstuvwxyz ABCDEFGHIJKLMNOPQRSTUVWXYZ italic text
- This is your chosen "monospace" font: abcdefghijklmnopqrstuvwxyz ABCDEFGHIJKLMNOPQRSTUVWXYZ italic text
- This is what you get for the "times" (named) font: abcdefghijklmnopqrstuvwxyz ABCDEFGHIJKLMNOPQRSTUVWXYZ italic text
[5] Fix GTK weirdness
gnome-settings-daemon. This could also be achieved by
starting and stopping gnome-font-properties. Note that the side effect is to start xscreensaver and the gnome-accessibility stuff (key repeats). Unfortunately, there doesn't seem
to be a simple workaroud in the (complicated) ~/.gtkrc-2.0.
Thus, I append this to the end of my kde-startup script:
#Fix GTK fonts. GTK applications don't use the right fonts unless gnome-settings-daemon is running.
#Side effect: xscreensaver is also started, as is the gnome-accessibility stuff (key repeats) and gnome-volume-manager

sleep 5	 #Allow KDE to finish starting.
/usr/lib/gnome-settings-daemon &[6] Test
[7] A few (more) notes on fonts
- Selecting fonts:
xfontselis useful. A font is unambiguously described by both foundry and name (and size,style...) eg:adobe-times-iso8859-1However, in KDE, fonts are known just by their name when unambiguous e.g.Bitstream Vera Sansand with the foundry in brackets when it is required, e.g.Fixed [Misc]orFixed [Sony]. Also, note thatTimes(=adobe-times-iso8859-1) andTimes New Roman(= Microsoft TTF) are quite different fonts! It's also possible to use fontconfig to make substitutions, for example, so that whenever an application asks for "Arial", it actuallly gets "Tahoma". After updating the font configuration, it's often necessary to update fontconfig's cache:fc-cache -v. - For desktop users, with antialiased fonts and LCD monitors without DVI: LCD monitors auto-adjust by aligning their clock with vertical lines in the image. But, if all the fonts are antialiased, there are no hard edges to crunch on, and the monitor calibration is often poor. Here is a 1280x1024 chessboard: view it at 100% size, then press audo-adjust on the monitor.
- The point is a unit of length, defined as 1 point = 1/72.27 inch; in computing, it is usually redefined to 1/72 instead. A 10-point font means that that the full height of a row of text is 10 points. The "em" is the height of an 'M' or the width of an 'm' in that font. [For example: at 96dpi, 12pt = 16 px; at 133dpi, 10pt = 18px]
- The GIMP freefonts are good, and may be downloaded from here. Also, myfonts.com have a large number of fonts available for preview.
- Summary: it's all about personal choice. If you get used to AA, then switching back to non-AA feels a bit weird for a while. Likewise, vice-versa.
Xscreensaver
[1] Introduction
xscreensaver-demo. The really slick screensavers and fireflies are also great! Install the following packages:
xscreensaver,xscreensaver-gl,xscreensaver-extrusion,xscreensaver-matrix,rss_glx,fireflies,rss_glx-matrixview.Configure xscreensaver (xscreensaver-demo) to lock the screen (and when suspending the laptop), or there is no use having an encrypted laptop! To start xscreensaver automatically, first disable the KDE screensaver, then add the following into
~/.kde/Autostart/startup.sh:
kstart xscreensaver -nosplash 2>/dev/null &
[xpenguins -a -b and xearth are also fun - but you need to enable "Programs in desktop window" in KDE->Control Centre->Look and Feel->Behaviour.]
[2] r128/ati Workaround
- Revert to "core" (X-default) cursor-theme, or
- De-select the GL screensavers in xscreensaver-demo, or
- Kill and restart xscreensaver every time it unblanks.
~/bin/xscreensaver_monitor.sh and start it in ~/.kde/Autostart/startup.sh instead
of directly running xscreensaver. Note this must be started before gnome-settings-daemon:
#!/bin/bash
#Xscreensaver on Rage128 Mobility card with any cursor-theme other than core messes up the cursor. It is borked
#if last xscreensaver process was a GL one. So kill/restart xscreensaver every time it unblanks.

while : ; do
        echo "Starting xscreensaver; monitoring for unblank..."

	#Watch the xscreensaver status. When unblanking, the line will begin 'UNBLANK'
        xscreensaver -verbose -no-capture-stderr -no-splash 2>&1 | while read LINE; do
                if echo $LINE | grep 'unblanking screen at' &>/dev/null 2>&1 ; then

			echo "Unblank detected. Killing xscreensaver..."
                        killall xscreensaver
                        break;
                fi
        done
doneSound
[1] Sound configuration (ALSA)
snd-cs46xx modules are correctly detected for ALSA, and even better, ALSA now has dmix enabled
by default. Previously, sound applications required an exclusive lock on /dev/dsp and would not share it. Sound servers such as Artsd were a partial solution, but the
latency was a problem: and not every application had an arts-output capability. Artswrapper/soundwrapper didn't always work. However, with dmix, all is happy!
Multiple applications can output sounds to the sound card simultaneously, provided that they use ALSA output rather than OSS (i.e. /dev/dsp):- Most applications (eg mplayer, amarok, vlc) can do this: simply set the output plugin to be alsa.
- Even the KDE sound server can output to Alsa. (But see below).
- Some applications only understand OSS. (eg /usr/bin/play). In these cases, use
aossto intercept the call to /dev/dsp and redirect it to ALSA. egaoss /usr/bin/play Beethoven5.ogg[Actually, play itself is just a script, and can be edited to include the aoss anyway.] - QEMU doesn't work with aoss, so it has to have the sound card to itself.
- CD playback can be done digitally, via alsa (eg by alsaplayer,kscd,vlc) or directly through the sound card.
aplay -l, amixer -c 0 scontrols and look in /proc/asound. For example, default:1,0 means "use the default alsa-interface to the second soundcard, on
the first channel"; dmix:1,0 explicitly forces alsa to use dmix, whereas hw:1,0 usually prevents dmix from working.
[2] Arts
- kcontrol->LookNFeel->System Notifications->Player Settings->Use external player.
- External player is
sox_aplay.sh - In
~/bin/, I have the following script named sox_aplay.sh:#!/bin/bash #Play audio file immediately (avoid arts startup delay). Volume decreased to 0.4 sox "$1" -t wav -v 0.4 - | aplay #Note: in newer versions of sox, the argument order is different; use this instead: #sox "$1" -t wav - vol 0.4 | aplay[download]
[3] System bell
To get the system bell to work, it is necessary to load the pcspkr module. See above. Then, in kcontrol->Sound->system Bell, make sure "Use system bell instead of system notification" is checked, and set the beep to 440 Hz (Concert A!) and duration 30ms.
Make sure Konsole is set to use it by choosing: Settings->Bell->System Bell. Then, test by pressing Ctrl-G, and you should be instantly greeted by a short, friendly beep.
For use in scripts: echo -e "\a". Or install gnubeep, and try: for ((i=200;i<=400;i=i*10611/10000)); do sudo gnubeep -f $i -l 100000; done
[4] Sound Mixer
The mixer volumes are changed with kmix (or gnome-alsamixer alsamixergui), and if required, can be manually saved/restored
with alsactl. [aumix is obsolete, and doesn't support all the mixer-controls.] To reduce hiss, keep all volumes below 90%, and ensure that the Mic
channel is muted. As with all internal soundcards, one can hear some interference from the CPU.
The Thinkpad has some buttons for Volume up/down/mute. These are in "series" with the mixer. If desired, their state can be displayed on-screen by
using tpb.
amixer is a very useful non-interactive command-line mixer control (usable in scripts etc).
speaker-test is helpful for identifying which channel is connected where, and emitting a test sine-wave.
[5] Microphone
On my Thinkpad, the internal Mic is broken. However, the Mic input is fine. This input provides a bias voltage, capable of powering an electret microphone. A pair of headphones will work as a quasi moving-coil microphone, however I have been extremely impressed by the Microphonics microphones: tiny, high-quality electret condensers built into a stereo 3.5mm jack plug and costing a mere £7 ($10). It is also necessary to enable the +20dB Mic Boost in the mixer.
- Start
gnome-alsamixer - Make sure that all 3 of the
MicandADCandCapturecontrols are set to Record. - Mute the
Micinput (the speaker icon should be greyed out). This prevents feedback (unless you are using headphones) - Optionally, enable the
Mic boost (+20dB). This gives much greater sensitivity at the expense of some extra hiss. - It should now work. Try using the command:
record -i micand you should be able to see the left and right levels move up and down. If so, it's working! - An alternative is to use the alsa program
arecordthus:arecord -f cd -t wav -D front outfile.wav - amixer can be used to turn on the required mixers:
amixer sset 'Mic Boost (+20dB)' on #Enable the Mic boost amixer sset 'Mic' mute #Mute the Mic amixer sset 'Mic' cap #Set the Recording source to Mic amixer sset 'Capture' cap #Set the Capture device to record amixer sset 'ADC' cap #Set the ADC to record[download]
Note1: the record program is part of the xawtv-misc package.
Note2: Audacity disables the 'Capture' input - and you need to re-enable it.
Note3: Gtkguitune is an oscilloscope/frequency counter - useful for tuning instruments!
[6] MIDI
MIDI is a way to synthesise music by sequencing samples of various instruments. Midi files are a very highly compressed way to store
music, or musical notation.
Despite the existence of /dev/sequencer, this machine doesn't have support for Hardware MIDI synthesis; however excellent results can be obtained by using the
software synthesiser, TiMidity. It's also necessary to install a patch set (i.e. some samples), such as timidity-patch-freepats.
Mandrake also provides a timidity service. This doesn't work well; it seems necessary to run the timidity daemon as a normal user, and not via the timidity service.
[However, my suspend script above doesn't account for this, and must be modified to kill/restart timidity on suspend. Otherwise, sound will not come back on resume.]
An excellent article about MIDI is provided by the Linux Journal: Part 1, Part 2,
Part 3, Part 4. Music composition (score-editing) tools include
rosegarden and hydrogen.
Note that the KDE control centre's "Test Midi" button doesn't work - and in fact has never worked!
[7] Multimedia Applications
- Mplayer - plays practically everything. Run it from the command-line, or use gmplayer for the GUI, or mplayer-plugin from mozilla.
- VLC (videolan client) - also plays virtually everything. Probably the best for DVDs.
- Amarok - excellent program for enjoying .ogg and .mp3 files. [Use the xine back-end.]
- JuK - similar to Amarok; some prefer it.
- XMMS - somewhat venerable, but rapid startup, and very good for audio.
- Kmidi (GUI) and TiMidity (CLI) - for playing MIDI files.
- Alsaplayer - for playing music, and CDs. A key feature is adjustable speed playback (even reverse!)
- KsCD - CD Audio playback.
- /usr/bin/play - a wrapper for sox, which plays sound files.
- festival, espeak, mbrola - speech synthesis programs.
- play,rec,cdp,cdplay,ogg123,mpg123,sox,aplay - useful command-line programs.
[8] Audio Streaming
- To set up your own audio (or video) stream, use VLC/ It's surprisingly easy; here's the howto.
- To listen to a real-audio stream, use mplayer or realplayer. See below.
- Here is how to record from internet audio streams.
- It is also worth mentioning last.fm (personalised radio), which requires the latest version (1.4.1) of Amarok.
- Another collaborative filtering system is iRate.
[9] Multiply opened /dev/dsp
for i in `seq 1 32`; do (play -d /dev/dsp RimskyKorsakov-TheFlightofTheBumbleBee.ogg &); sleep 0.05; done
[10] Soundcard distortion: CPU whine and Hiss
The CPU causes a very quiet "whine" to be heard over the soundcard. It isn't really noticeable, except with an external amplifier, or headphones. It is caused by the CPU power state
switching back and forth between idle and active. A test, is to force the CPU to always run at full
speed: nice -n 19 yes > /dev/null. This doesn't harm performance, but it's too ugly to use as a proper fix; besides which, it eats battery, and will make the CPU fan come on.
A slightly less ugly solution is modprobe -r thermal processor. The best solution would be the Dynamic Tick patch, from
here.
gnome-alsermixer):- Ensure that no level is set to maximum. This includes the hardware volume control (from the volume buttons). 90% is fine.
- Mute every unneeded control. (Mic, IEC958Input).
- Set 3Dcontrol-switch to ON, but the sliders to 0. No idea why this helps!
- Increase signal-noise ratio by keeping the software mixers high (90%) and controlling the sound level with the hardware volume control.
There is also a slight pulsed buzzing (about 0.5 seconds, every 2 seconds) which occurs when any USB removable storage device is present.
[11] External USB soundcard
When playing back music through an external amplifier, it's worth buying an inexpensive external USB soundcard, such as the Creative MP3+, or Behringer UCA202. These provide dramatically better quality, because they don't pick up interference from the other signals inside the computer case. (Thinkpads are much better in this regard than most, but not ideal). It's also a simple way to make sure that when music is played loudly, system sounds and beeps are not excessively amplified!
[12] Soundcard troubleshooting
lspcidrake -v | fgrep -i AUDIOwill tell you which driver your card uses by default.grep sound-slot /etc/modprobe.confwill tell you what driver it currently uses./sbin/lsmodwill enable you to check if its module (driver) is loaded or not./sbin/chkconfig --list soundand/sbin/chkconfig --list alsawill tell you if sound and alsa services are configured to be run in this level.aumix -qwill tell you if the sound volume is muted or not./sbin/fuser -v /dev/dsp(as root, if necessary) will tell which program uses the sound card (in OSS-mode). Programs which access the soundcard via ALSA (rather than by writing to /dev/dsp) will not show up here./sbin/fuser -v /dev/snd/*(as root, if necessary) will tell you which programs are currently outputting sound to ALSA.- Don't forget to check whether sound is also muted in hardware (use the volume buttons), or in the application itself.
Modem
[1] Lucent WinModem driver
- Ensure you have the source for your current kernel installed. (see below).
- Download and run the scanModem for information.
- Download the source package: ltmodem-8.31b1.tar.gz.
- Untar, and change into the directory:
tar xvzf ltmodem-8.31b1.tar.gz; cd ltmodem-8.31b1 - Become root.
./build_moduleto compile the module. [don't try ./build_RPM, since it has specfile problems.] Repeatedly press Enter. This results in the modules:ltmodem.koandltserial.ko../ltinst2to install the modules. (This fails to complete the first time; don't worry, it will succeed in a moment)cd source; make mdk_install; cd ..This succesfully installs the modules in the destination../ltinst2Finish the installation../autoloadMake the modules load automatically at boot time. (Adds ltserial to modprobe.preload)./checkoutFinish./dev/modemis now a symlink to/dev/ttyLTM0Test it by querying the modem withkppp.
Note: it is necessary to repeat the above (./build_module; ./ltinst2; cd source; make mdk_install; cd ..; ./ltinst2) every time a new kernel is installed.
[2] The Mars driver - for kernels 2.6.15 and above
- Download martian240206.tar.gz.
- Untar. Read the README.
- In the
driver/directory, domake clean; make; make install. - Add
martian_drvto/etc/modprobe.preload. - In the
helper/directory, domake; make install. - Run
/usr/sbin/martian_helper /dev/MODEMNAME. This creates /dev/MODEMNAME, which talks to martian_drv, which in turn talks to the modem. - Add this to
/etc/rc.local:echo "Starting martian_helper on /dev/modem (unless ltserial is loaded)" /sbin/lsmod | grep -q ltserial || /usr/sbin/martian_helper /dev/modem >/var/log/martian_helper 2>&1 &[download]
Note: it is necessary to repeat the above (make clean; make; make install) every time a new kernel is installed.
[3] Configuring kppp (modem dialer)
- Use /dev/modem
- Use Dynamic IP. Do NOT "Auto-configure hostnamefrom this IP"
- Default gateway. Assign the default route to this gateway
- Disable existing DNS servers during connection
- BUG: Kppp fails to actually assign the default route during the connection. So, in Accounts->Execute, add:
- Before connect:
sudo ifdown eth0; sudo mv /etc/resolv.conf /etc/resolv.conf.kppsave; sudo touch /etc/resolv.conf - Upon disconnect:
sudo ifup eth0
- Before connect:
- Define the modem network interface for the firewall: add ppp0 to
/etc/shorewall/interfaces:net ppp0
[4] ISP
For occasional use, macunlimited.net has provided good service. Or, try adial.co.uk, for which no signup is required - just use it.
PCMCIA
PCMCIA just works. Make sure that the pcmcia service is running, and that pcmcia-cs is installed. Always eject cards in software with
cardctl eject before physically unplugging them! (Otherwise, the kernel will probably panic). You must also eject cards before suspending to RAM.
To find information on a PCMCIA card, use cardctl ident.
IrDA - Infrared
The Thinkpad has a 4 Mbit/sec FIR (Fast IR) port, although it can also do SIR (Standard IR, 115 kbps).
IrDA basically works straight off once the right device is set. Edit /etc/sysconfig/irda and change the device from
/dev/ttyS2 to /dev/ttyS1. The IR should also be enabled in the BIOS if necessary. Then, restart irda: service irda restart
and switch it on permanently chkconfig --add irda.
The irda service will also handle kernel module loading, and starting irattach. You should also see the network device irda0 which shows up
in ifconfig. (Don't forget to firewall off the irda0 interface!). Some extra entries in /dev/ will be created if the correct modules are loaded.
Eg modprobe irnet creates /dev/irnet and modprobe ircomm-tty creates /dev/ircommX
To test IrDa, as root, run irdadump - this shows the raw packets, and should show up reflections from the thinkpad's own transmissions.
Also, cat /proc/net/irda/discovery should show up other devices, and give addresses. You can ping other devices using:
irdaping <daddr> where <daddr> is the value such as 0x0d7357f2 from grep daddr /proc/net/irda/discovery. This may take a few seconds to respond.
You can also see IR light directly using a CCD videocamera, or a phototransistor.
Other things to be investigated: IR networking, file transfer, IR-remote control via lircd, IR modem connection to mobile phone.
See also the Infrared-HOWTO.
chkconfig --add irda doesn't work. This is easily fixed: edit /etc/init.d/irda and change the line:
# chkconfig - 45 24# chkconfig 345 45 24UPDATE: 2006-08-03: this bug is now fixed upstream. It now works perfectly in the 2.6.17.7 kernel (from kernel.org).
Network (LAN and WiFi)
[1] Internal ethernet (Intel Ethernet Pro 100)
eepro100 module; however it should now use the e100 module.
Otherwise, random dropouts occur.
(The eepro100 module is obsolete: it hasn't been revised since 2000, whereas the e100 is maintained, and works with kernel 2.6.
See here and here for
more details.)
However, by default, the kernel loads the eepro100 module. To make sure that the correct module is used, add (or modify) this line in /etc/modules.conf:
alias eth0 e100It also seems necessary to prevent the eepro100 driver from loading. Add this to
/etc/modprobe.conf:
#We don't want the old eepro100 driver to load.
install eepro100 /bin/true
Configuration with Mandriva's configuration tool (mcc) just works. Remember that, if using DHCP, it is not necessary to configure the "DHCP hostname", (it is different
to the hostname), and that zeroconf should not be used. ifplugd will bring up, and shut down the interface as and when it is plugged in.
Note: this port is not auto-sensing, so you will need a crossover cable to connect it directly to another laptop.
[2] WiFi PCMCIA card
This card is a Netgear WG511. (version1, 54Mbit/sec). It is supported under Linux using the prism54 module, but the card also requires that its firmware should be
loaded from the host pc every time it is powered on. This firmware is not GPL, and isn't included with Mandriva; however it is free to download.
Without the firmware, iwconfig reports "NOT READY!"; dmesg reports "could not upload firmware ('isl3890')".
- Download
1.0.4.3.arm - Rename it to
isl3890 - Move it to the directory
/usr/lib/hotplug/firmware/ - Eject the card
cardctl eject, then physically remove and re-insert the card. - Now enjoy! configure with
ifconfig,iwconfig, ormcc(Mandrake control center) as desired.
Useful wireless tools are: iwconfig, iwlist, kwifimanager and net_applet.
See also the Linux wireless LAN howto.
In order to suspend the computer, it is essential to eject the card (at least in software, if not physically). Otherwise, suspend will crash.
Use cardctl eject to do so. On resume, physically re-insert the card, and then do service network restart or just ifup wlan.
Then run dhclient wlan if necessary to obtain an IP address.
This card reports 2 different MAC addresses, depending on its state of initialisation. But the network interface scripts identify the interface by its MAC address: as a result, the interface can only be brought up once after boot or insertion! Subsequent restarts of the interface will fail, since the second mac address will not be recognised. The simple workaround is to do cardctl eject, and then physically remove/reinsert the card every time. For more explanation of this difficult bug and its solution, read on.
ifconfig -a or udevinfo -a -p /sys/class/net/wlan/) varies between 2 states:- When uninitialised (before the firmware is loaded), it has the bogus value 00:30:B4:00:00:00. This is not unique between cards, and it belongs to Intersil, the chipset manufacturer. [The first 3 pairs of MAC adddreses are uniquely allocated to the manufacturer; the final 3 pairs are allocated by the manufacturer to each card]
- When initialised (after the firmware is loaded), the card reports its true, unique mac address (mine is 00:09:5B:C1:3A:B1), which which is printed on the card - and belongs to Netgear, the wireless card manufacturer.
- The true mac address persists until the card is powered down or ejected, (even if the network is restarted).
- This is because the real mac address is unknown to the card until the firmware is loaded (probably, it cannot read its own mac address out of its EEPROM), /usr/src/linux-2.6.14/drivers/net/wireless/prism54/islpci_dev.c. [Credit is due to Mauro Maroni for putting me on the right track by noticing the MAC range owner - thanks.]
The problem is that Mandriva loads the firmware too late: it should be loaded as soon as the
card is detected, but, it isn't actually loaded until the network interface is brought up. Loading the firmware is eventually done by
/sbin/firmware_helper, invoked by a udev rule (in 50-mdk.rules) which is triggered on bringing up the interface.
Note: enabling logging is very helpful: set udev_log="info" in /etc/udev/udev.conf, and then run tail -f /var/log/messages.
To make udev aware of new rules, run udevstart.
But interfaces are identified by their mac address! Thus we must have the bogus mac address in /etc/iftab and
/etc/sysconfig/network-scripts/ifcfg-wlan to get the interface to come up the first time. Once up, the mac address changes. So subsequently
restarting the interface will fail: ifup wlan exits with the error "interface 'wlan' not found Device wlan has different MAC address
than expected, ignoring." [A possible workaround to this might be to modify /sbin/ifup to allow 2 alternative HWADDR=XX lines in ifcfg-wlan.]
- Try to invoke
firmware_helperin the right place with a udev rule. Unfortunately, firmware_helper is undocumented. Reading the source of udev-78/extras/firmware/firmware_helper.c provides some enligtenment: the arguments must be supplied as environment variables, but it isn't clear what the values ought to be (especially DEVPATH). - Write a udev rule to change the MAC address to the correct one. Use a
RUN=key to execute/sbin/ifconfig wlan hw ether 00:09:5B:C1:3A:B1as soon as the device is detected. Unfortunately ifconfig refuses to do this without the firmware! - Bring the interface up and then down again (without assigning an IP) as soon as the device is detected. This causes the firmware to be loaded, and is the best solution. We can easily do this by 'piggybacking' on the udev rule to name the wlan interface.
- The udev rules (in /etc/udev/rules.d/10-network.rules) [Note that the RUN="" command must be the full path.]:
#PCMCIA WLAN card. This is the dummy MAC address which is used before the firmware loads. #We then immediately trigger a firmware load by bringing the interface up and down. KERNEL=="eth*", SYSFS{address}=="00:30:b4:00:00:00", NAME="wlan", RUN="/usr/local/sbin/firmware_fudge" #This is the true MAC address. This should also match the same interface name. KERNEL=="eth*", SYSFS{address}=="00:09:5b:c1:3a:b1", NAME="wlan"[download] - The fudge which is executed: /usr/local/sbin/firmware_fudge (remember to make this executable):
#!/bin/bash echo "Fudge to load firmware: " /sbin/ifconfig wlan up echo "wlan interface brought up (without ip address assigned)" /sbin/ifconfig wlan down echo "wlan interface now down"[download] - Now, the real MAC addresses can go into
/etc/iftaband/etc/sysconfig/network-scripts/ifcfg-wlan.
udevstart to make this take effect and enjoy.
[2.1] Troubleshooting WiFi connection problems
- Failure to see any access point with
iwlist wlan0 scanningmeans either the hardware isn't working, the driver isn't loaded, or there is no radio signal in reach. - Failure to obtain an IP address with
dhclientis usually caused by firewalling issues. - Failure to reach the wider internet (usually, you can ping the access-point but no more) is usually caused by having the default-route assigned to the wired-ethernet device.
Check this by running
route. To stop eth0, doifconfig eth0 down. (Note:ifdown eth0won't necessarily remove the default route.) - This is a useful shell-alias to make everything work (assuming a WEP ASCII key):
alias connectmywifi="sudo sh -c 'ifconfig eth0 down && ifconfig wlan0 up && shorewall clear && iwconfig wlan0 essid MYESSID mode managed key s:ASCII_WEP_KEY ap auto freq auto && dhclient
wlan0 && iwconfig wlan0 && ifconfig wlan0'"
[3] WiFi with WEP
The setup so far only works with Open Wireless access points. Most public wifi doesn't use any encryption (they authenticate based only on MAC addresses, and, if not authenticated, hijack any HTTP connection to point to the login/payment page). Here is how to set up WEP. Note: WEP is less secure than WPA, but for the WG511, WPA isn't yet available. Also, WEP is far easier to set up, so I am using the combination of WEP + MAC-address restriction (on the access point) + SSH-tunneling.
/etc/sysconfig/network-scripts/ifcfg-wlan:
WIRELESS_MODE=Managed
WIRELESS_ESSID=YOURSSID
WIRELESS_ENC_KEY=01cf21369deca841230758fce
Throughput is about 1.6 Mbyte/sec for 802.11g. This is measured with the WiFi card right next to the access point, a strong signal with no interference, and it is not CPU-limited. Turning off encryption doesn't affect it. My general experience so far is that WiFi is at most only about 1/4 of the speed it claims to be.
[4] AdHoc WiFi for a direct connection between laptops
man iwconfig for more). The magic incantations are:- On this laptop:
iwconfig wlan0 essid "myessid" mode Ad-Hoc enc off ap 00:0e:1e:11:22:33 - On other laptops:
iwconfig wlan0 essid "myessid" mode Ad-Hoc
ap 00:0e:1e" sets a chosen access-point cell-identity (similar to MAC address, but not the same) in the privately assigned range; the 11:22:33 are a free choice.
This option is particularly helpful in hotels which charge extortionate rates for wifi, and you want to share it. To do so, set up internet connection-sharing with DrakGw as described below.
[5] USB Networking
A neat gadget to have in the laptop bag is a USB network adapter. I have a Sitecom LN-013 USB 1.1, 10/100 ethernet adapter.
This "just works" under Linux, using the rtl8150 kernel module. However, this really doesn't like being hot-unplugged, and will panic the kernel.
To unplug it, ifdown usblan, then rmmod rtl8150, and only then unplug it. Also, if the LN-013 is plugged in, when a suspend is attempted, the
laptop will crash.
[6] Firewire networking
Mandriva will very helpfully configure an ethernet over firewire (PCMCIA) device. Unfortunately, this gets the name ethX, and hence adds to confusion. So, unless we are going to use it,
it can be disabled by adding this to /etc/modules.conf:
#We don't want eth1394.
install eth1394 /bin/true
[7] Network device names
[7.1] The problem
- Hardware is initialised asynchronously. Module loading order isn't necessarily repeatable (although it usually is).
- PCMCIA and USB NICs may not be present - but load before motherboard's onboard adapter if they are.
- Interfaces are assigned consecutively by the kernel; one cannot reserve eth0 yet assign eth1.
- The wireless network above can get assigned 2 different interface names as its mac changes.
[7.2] Solution #1 - simple hack
Add e100 to modprobe.preload. This forces the e100 module to load before the hardware is scanned
for autodection, therefore eth0 is always the internal device.
[7.3] Solution #2 - temporarily fix the mess
Go into Mandriva control center (mcc) and delete all the network interfaces; then start again.
[7.4] Solution #3 - the old way: use ifrename
ifrename is designed to rename interfaces once they are detected, so that they are consistent. This is
done by using iftab and the MAC address (see man iftab and man ifrename). However, it is (supposedly) obsoleted by udev....
[7.5] Solution #4 - the Right Way: udev
- Create a udev rule to map the MAC address to the kernel's name.
The MAC addresses can be found by looking at the output from
cat sys/class/net/<INTERFACE>orifconfig -a. (or printed on the bottom of the laptop!) Note that the MAC addresses need to be in lowercase. Also, the wlan rules needs to cover both the *bogus* MAC address and the real one. Thus these are defined in/etc/udev/rules.d/10-network.rules:#Create a rule for each network interface, to set up sensible, persistent names. #Internal LAN, was eth0, with driver e100 KERNEL=="eth*", SYSFS{address}=="00:03:47:8d:da:e9", NAME="lan" #PCMCIA WLAN card. This is the dummy MAC address which is used before the firmware loads. #We then immediately trigger a firmware load by bringing the interface up and down. KERNEL=="eth*", SYSFS{address}=="00:30:b4:00:00:00", NAME="wlan", RUN="/usr/local/sbin/firmware_fudge" #This is the true MAC address. This should also match the same interface name. KERNEL=="eth*", SYSFS{address}=="00:09:5b:c1:3a:b1", NAME="wlan" #USB network adapter KERNEL=="eth*", SYSFS{address}=="00:10:60:DF:BF:81", NAME="usblan"[download] - Fix /etc/iftab (so that the device is recognised as already-existing): modify the names of devices in
/etc/iftabto reflect the new names. Check they are the right way round first! I chose to have lan and wlan, thus:[ Note: iftab is not used during normal network startup. It is, however used by MCC, the GUI tools, and by autoconfiguration of new interfaces.]usblan mac 00:10:60:df:bf:81 lan mac 00:03:47:8d:da:e9 wlan mac 00:09:5b:c1:3a:b1[download] - Edit /etc/modprobe.conf to pair the kernel modules to the devices. The interface names must match the kernel modules:
#The interface names match up with the kernel modules. alias lan e100 alias usbnet rtl8150 alias wlan prism54[download] - Edit ifcfg-foo so that ifconfig knows what the network settings are. For each network interface, the settings (see
man ifcfg) are stored as a series of KEY=VALUE lines in/etc/sysconfig/network-scripts/ifcfg-foowhere 'foo' is the name of the interface:- Rename the file. Eg:
mv ifcfg-eth0 ifcfg-lanetc. - Change the 'DEVICE=' entry. Eg:
DEVICE=lan - Make sure the MAC address is the right one. Eg:
HWADDR=00:03:47:8d:da:e9
- Rename the file. Eg:
- If using static IP addresses, edit
/etc/sysconfig/networkand changeGATEWAYDEV=ethXto the correct interface name. This isn't relevant for DHCP. - Change any other files which refer to the old-style interfaces:
- Shorewall: change the interface names in
/etc/shorewall/interfacesand/etc/shorewall/masq. - Ifplugd: if used, modify
/etc/ifplugd/ifplugd.conf - Change the reference to eth0 used in kppp config above.
- Just in case:
grep -inr --exclude=/etc/httpd/* eth[0123] /etc/
- Shorewall: change the interface names in
- Reboot to check. [It may suffice to stop the network, rmmod all the modules, and run udevstart.]
[8] Hostname and /etc/hosts
The /etc/hosts file is used to permanently map IP addresses to hostnames. It must include localhost, and should also include the hostname of the
machine. If these are missing, all sorts of weirdness and timeouts may occur. The hostname of the machine itself should never change, although a temporary hostname can
be defined for each interface.
127.0.0.1               localhost toffee-pecan.baddiant.org.uk toffee-pecan
131.111.193.203         rn214.trin.cam.ac.uk rn214
By default, Mandriva will set network interfaces to DHCP, and enable Assign hostname from DHCP address. I think this is a bug: I've already chosen a hostname, and I'd prefer to keep it, thank you very much! DHCP can provide an IP address for the specific network interface, but the hostname belongs to the whole machine, and I don't think it should change. Besides which, changing the hostname without a reboot can cause all sorts of trouble.
- Uncheck the Assign hostname from DHCP address option in the Mandriva control center (mcc).
- Add the line:
NEEDHOSTNAME=noto the appropriate/etc/sysconfig/network-scripts/ifcfg-DEVICE - Hack the default to be off: it's defined in either
/usr/lib/libDrakX/network/network.pmor/usr/lib/libDrakX/network/netconnect.pm
TODO: Actually fix this.
[9] Firewall (Shorewall), and Internet Connection Sharing
Mandrake uses the Shorewall firewall, configured in /etc/shorewall, or by drakfirewall and drakgw. Drakfirewall simply lets you configure which ports should allow connections (usually SSH, Ping, and maybe HTTP). Drakgw sets up a "gateway" for internet conection sharing, and is a wonderful tool for setting up an entire network.
[9.1] Shorewall
- Various zones are defined in
/etc/shorewall/zones. These are typically net (the big, bad internet), fw (the firewall, this machine), and loc (the local zone, or intranet, i.e. "trusted" internal systems). For a client-only machine, use fw, not loc. - Each interface, such as eth0, eth1 and ppp0 is assigned to a zone, in
/etc/shorewall/interfaces. - General policies are defined in
/etc/shorewall/policy. Mandrake defaults to allowing all outgoing connections, but restricting inbound connections. - Specific rules are defined in
/etc/shorewall/rules. For example, to allow incoming SSH and Ping from the internet (net) to reach this machine (fw), add these lines:ACCEPT net fw tcp 22 - ACCEPT net fw icmp 8 - - IP masquerading (for internet connection sharing) is configured in
/etc/shorewall/masq. Note,/etc/shorewall/natis not unused.
To start, stop and clear shorewall, use service shorewall start/stop/clear. Note that the inverse of "start" is "clear", not "stop". stop will result in a completely closed firewall, whereas clear will result in a completely open firewall, as it was before shorewall was first started. In the stopped-state, shorewall is safe against intrusion, but also prevents any new connections (though existing ones won't die). The cleared-state is most useful for debugging suspected firewall-related connectivity issues.
[This is a change from previous Mandrake initscripts; it is now consistent with the shorewall upstream, but not with earlier versions of Mandrake, or some other distributions.]
A consequence of this is that you can lock yourself out of the machine by accident. The workaround is to re-enable ssh after shorewall has stopped - add this to /etc/shorewall/stopped:
#Ensure SSH (port 22) is never blocked.
run_iptables -I INPUT 1 -p tcp --dport 22 -j ACCEPT
To test the firewall, run a port scan. An excellent one is Gibson Research's "Shields Up". It's also helpful to
run netstat -lp --inet to list which local processes are doing what. I also recommend ssh-ing somewhere else, and testing that you can get back in!
Technical explanation: shorewall is actually a front-end to netfilter/iptables. iptables is what actually does the filtering in the kernel; shorewall just generates and executes
iptables commands. To see what is happening, run iptables -L. An alternative to shorewall is to write the iptables rules manually, then put these into
/etc/sysconfig/iptables and run the iptables service to apply them at boot. Don't run both the iptables and shorewall services simultaneously; they are alternatives.
- Remember to firewall off all the interfaces that you use, not just eth0. This probably includes irda0, ppp0 and wlan0.
- Once the shorewall rules are established and tested, run
shorewall save: this will cache the compiled rules, and it will then start up *much* faster at boot time. - The 'optional' interface option allows Shorewall to come up without that interface being present. But you will still generally need to 'shorewall restart' after the interface is up and configured.
- Note: Bug #16917 causes
/etc/shorewall/interfacesto be messed up each time a new interface is added. Remember to check and fix it if necessary.
[9.2] DrakGW
DrakGW is used to set up internet connection sharing. If this computer has two network ports, it can be used to share its internet access with other machines. The drakgw wizard sets up everything, including a dhcp server, named, squid, and IP masquerading ("masq", not "nat" in shorewall).
[10] Useful networking tools
- ifconfig - print information about, or configure a network interface. (example:
ifconfig -a,ifconfig eth0) - ifconfig eth0:1 - create a pseudo interface (eth0:1) on the same physical network connection. This can have a different IP address to eth0. Up to 9 pseudo-interfaces are supported.
- ifplugstatus - tells you whether the cable is plugged in and live. (example:
ifplugstatus) - ifup, ifdown - start and stop an interface, according to the network scripts. (example:
ifup eth0) - ethtool, (mii-tool, obsolete) - view or manipulate network interface status. Eg the link-status and speed-setting of an ethernet port. (example:
ethtool eth0) - dhclient - obtain a dynamic IP address for an interface. (example:
dhclient eth0) - ping - check whether another machine can be reached. (example:
ping www.google.com,ping 72.14.207.99) - route - which ranges of IP addresses should be routed via which device. (example:
route -n,route add default gw 192.168.0.1) - arp - display mapping between hostname/IP addresse and MAC address for devices on the local network. (example:
arp,arp 10.0.0.3) - netcat, nc, telnet - connect to (or listen to) another machine on some port. (example:
nc -l -p 1234,nc localhost 1234) - brctl - configure a network bridge, to make multiple physical interfaces act as one virtual interface. (example:
man brctl) - service network restart - restart the networking subsystem. (Also remember to restart shorewall))
- mcc - mandriva control center: GUI to configure networking.
- iwconfig - print information about, or configure a (WEP) wireless interface (example:
iwconfig,iwconfig wlan essid MYSSID enc off) - iwlist - list wireless access points (example:
iwlist wlan scanning) - traceroute - print the steps on the path from this machine to another (example:
traceroute www.google.com) - whois, nslookup, dig - find out the owner of a domain, name of an IP address, or DNS query (example:
whois www.google.com,nslookup 72.14.207.99,dig +tcp @8.8.8.8 www.bbc.co.uk) - tcpdump - (example:
tcpdump -vv -i eth1) - ethereal (now re-named wireshark) - very useful and flexible GUI for tcpdump. Allows you to view the contents of network packets. (example:
ethereal) - EtherApe - real-time network monitor GUI with impressive graphics. (example:
etherape) - fping, hping - scriptable ping, TCP/IP diagnostics. (example:
fping www.example.com www2.example.com) - iftop - network interface bandwidth monitor, like top, but for the network. (example:
sudo iftop) - netstat - list open connections and sockets on the computer. (example:
netstat --inet -lp) - nmap, nmapfe - map network, scan for open ports (example:
nmap -v 192.168.0.*) - xinetd - network-enable any program. xinetd connects stdin and stdout over TCP/IP on a defined port. (example: dinnerdogd)
- NPtcp - measure and diagnose network performance. (example: machine_1:
NPtcp(and open the firewall), machine_2:NPtcp -h machine_1) - airodump-ng - monitor (and sniff) Wifi. (example:
airodump-ng [-c channel] wlan0) - /etc/sysconfig/network - the hostname is defined here. (Also use the "hostname" command). Iff the IP addresses are static, this must also contain the
IP of the gateway (eg
GATEWAY=72.14.207.99) and the name of the network device connected to it (egGATEWAYDEV=eth0) - /etc/sysconfig/network-scripts/ifcfg-* - interface-specific settings are defined here. (Eg the IP address and netmask of eth0).
- /etc/resolv.conf - the DNS servers are defined here.
- /etc/hosts - some hostname --> IP mappings are defined here, (notably
127.0.0.1 MACHINE_NAME.DOMAIN localhost)
[11] MAC spoofing
- Temporary change:
ifconfig eth0 hw ether 00:01:02:03:04:08(where 00:01:02:03:04:08 is the mac address you want to have). This can only be done while the interface is down, so first doservice network stop(and restart the network when done). - Permanent change (persistent across reboots): add this line to the relevant
/etc/sysconfig/network-scripts/ifcfg-ethXfile:MACADDR=12:34:56:78:90:ab. (lower or uppercase is unimportant).
[12] Zeroconf
What is mDNSResponder?
This is the "Multicast DNS responder", designed to allow the operation of Zeroconf networking, This is also known as
Apple's "Bonjour" protocol, and has an alternative implementation by avahi. The principle is that devices should be able to discover each others' IP addresses, hostnames, and services (eg printing) on an ad-hoc without any pre-existing configured DNS. This is neat, if you like this sort of thing; personally I prefer to do it manually.
Power Management - ACPI (or APM)
This Thinkpad can use either APM or ACPI. Since ACPI is now maturely supported, it is the recommended choice. ACPI will be enabled by default, unless it is disabled in lilo.conf (see above), in which case APM will be activated instead. It is also important that, when booted, the mains should be plugged in. [Note: do not confuse ACPI with (the unrelated) APIC!]
[0] BIOS clockspeed - (always switch on with mains power connected)
Boot Power source Current power source Other condition
(/proc/cpuinfo)CPU Frequency
(/proc/cpuinfo)BogoMips Measured performance Battery Battery - 697 MHz 847 37 x 106 Battery Mains - 697 MHz 847 37 x 106 Mains Mains - 996 MHz 1993 47 x 106 Mains Battery - 996 MHz 1993 47 x 106 Mains Battery Throttled by 87% 996 MHz 1993 13 x 106 Mains Mains After sleep (to RAM) 996 MHz 1993 50 x 106
- BogoMips and CPU frequency are measured by the kernel at boot time, and so do not change with the current-power status.
- In my setup, the system is configured (in the BIOS) for "Automatic" power management while on battery, and "High performance" while on mains.
- Measured performance is the result of
(yes & sleep 10 ; killall yes) | wc -l, rounded to the nearest million.
[1] ACPI
[1.1] Introduction
ACPI allows system management: power control, buttons and lights, cpu, fan, battery monitor etc. The acpi and acpid system
services need to be enabled. See also this page at thinkwiki.
acpi -V or look at the information in /proc/acpi/. The files in /proc/acpi/ can be read with cat and modified
with echo -n. The /proc/acpi/ibm/ directory is particularly useful. For example: cat /proc/acpi/ibm/lightreturns the current status of the thinklight ("off") and the available commands ("on, off").echo -n on > /proc/acpi/ibm/lightturns the light on.
man acpid.
- To monitor what is happening,
tail -f /var/log/acpid /etc/acpi/events/contains short files linking the ACPI event egbutton/sleepto the script which is to be run./etc/acpi/actions/is the directory in which these scripts (usually) live.- To make the daemon aware of changes in /etc/acpi/, do:
killall -HUP acpid. - [Note that the function keys (Fn-Fx) do not generate acpi events until they are enabled with /proc/acpi/ibm/hotkey.]
[1.2] Devices (buttons and lights)
[1.2.1] On-screen display of events
tpb program produces a very helpful on-screen display of events, such as the volume level, screen brightness, and output to
LCD/CRT/both. It can be installed with urpmi, and is automatically started from /etc/X11/xinit.d. It also allows the otherwise non-useful ThinkPad button to
do something: edit /etc/tpbrc:
#Either start gnome-alsamixer, or kmix. (execute kmix twice so it doesn't vanish into the system tray.)
THINKPAD   /usr/bin/gnome-alsamixer
#THINKPAD /bin/sh -c "kmix ; kmix"[1.2.2] Toy example: flash the thinklight
#!/bin/bash
#Blink the thinklight 3 times.
DELAY=100000    	#microseconds.
cd /proc/acpi/ibm
sudo chmod 666 light
for ((i=0; i<3; i++)) ; do
	echo -n "on" > light ; usleep $DELAY ; echo -n "off" > light; usleep $DELAY
done[1.2.3] Using Fn-F3 to switch off the backlight
- Enable the hotkeys. Append this to
/etc/rc.local:echo "Enabling thinkpad hotkeys (Fn-Fx)" echo -n enable > /proc/acpi/ibm/hotkey[download] tail -f /var/log/acpidand observe what happens when Fn-F3 is pressed.- Create
/etc/acpi/events/fn-f3:event=ibm/hotkey HKEY 00000080 00001003 action=/home/rjn/bin/blink_thinklight.sh #as above, for diagnostics[download] killall -HUP acpid. See if it works. It does!!- Now, we need to actually switch off the backlight. This cannot be done with ACPI, but install
radeontool(with urpmi), and test:
radeontool light off ; sleep 2; radeontool light on. - The completed files:
/etc/acpi/events/fn-f3#Fn-F3 toggles the backlight. event=ibm/hotkey HKEY 00000080 00001003 action=/etc/acpi/actions/fn-f3.sh[download]/etc/acpi/actions/fn-f3.sh#!/bin/bash #Toggle the LCD backlight. #There is no way to read the LCD backlight status, so we must use a temporary file. if [ -f /etc/acpi/actions/lighton.state ]; then echo "Turning off LCD backlight" radeontool light off rm /etc/acpi/actions/lighton.state else echo "Turning on LCD backlight" radeontool light on touch /etc/acpi/actions/lighton.state fi[download]
- Make fn-f3.sh executable, restart acpid (killall -HUP acpid) and enjoy.
[1.2.4] Using other Fn-keys (F4,F7,F12)
Fn-F7 works fine without intervention, to toggle between video output on the external display and the LCD.
Fn-Home and Fn-End change the LCD brightness.
Fn-PgUp toggles the thinklight.
Fn-F4 and Fn-F12 are discussed below.
[1.3] Mandriva's scripts in /etc/acpi/event
/proc/acpi/event/lm_ac_adaptor- This is broken: it is never triggered./proc/acpi/event/lm_battery- this triggersactions/lm_battery.sh, which does some wizardry involving laptop_mode, but doesn't seem to do much./proc/acpi/event/lm_lid- this is never triggered. I prefer that that a lid-close should merely turn off the backlight (via the BIOS) anyway./proc/acpi/event/power- a 2 second press of the power button triggers this, and will cause a normal system shutdown with/sbin/poweroff. Pressing it for 4 seconds or more will force an instant poweroff (and reset) in the BIOS./proc/acpi/event/sleep- see below. This is never triggered, but would crash the machine if it were. See below.
Also, hald-addon-acpi is a client of acpid. This will notify KDE.
[1.4] CPU throttling
- To read the CPU speed, do
cat /proc/acpi/processor/CPU/throttling - To set the CPU speed, do
echo X > /proc/acpi/processor/CPU/throttlingwhere X is a number from 0 to 7. - State 0 represents no throttling, i.e. 100% of full speed, and is the default.
- State 7 represents maximal (87%) throttling, i.e. 13% of full speed. This is much slower, but has lower power consumption. It will also keep the fan inactive.
KLaptop can do all sorts of clever things. It is configured in kcontrol->Power control->Laptop Battery->Acpi Configuration. CPU throttling can also be varied by right-clicking on the battery icon in the systray. [It is necessary to run 'Setup Helper Application' from the ACPI Config tab.]
See also dynamic frequency scaling on thinkwiki.
[1.5] Fan speed control
TODO: FIXME
[2] APM
To use APM instead of ACPI, see the configuration in Mandrake 9.1. Note: it is important to use my suspend_AND_resume script and not directly to use
apm -s, or the machine will crash. The apmd service should be on, and the acpi and acpid services should be off.
Suspend to RAM
Introduction
- During suspend-to-ram, the machine enters a low-power state, stopping almost everything except the DRAM refresh. It can last this way for several days on battery. Resume occurs on re-opening the lid or by pressing Fn.
- In suspend-to-disk. the machine is totally powered off, and the state is saved to the swapfile. On he next boot, the kernel detects the presence of a previously running system, and does some clever gymnastics to switch into it.
[2] Suspend to RAM
- The user (or an ACPI event) invokes
/usr/bin/pmsuspend2 memory. (Invoke with-dfor debug). /usr/bin/pmsuspend2is a symlink to/usr/bin/consolehelper. consolehelper invokes/usr/sbin/pmsuspend2 memory. as root, on behalf of the non-root user, who is logged in locally.- This sources the configuration variables from
/etc/sysconfig/suspend. - It then executes
/etc/sysconfig/suspend-scripts/suspend.control memory. - suspend.control then iterates over all the files in
/etc/sysconfig/suspend-scripts/suspend.dinvoking them with the argument "suspend". This is where the system services are shutdown, xorg is chvt'd, and the network is stopped etc. - suspend.control then executes an ACPI suspend by doing
echo 3 > /proc/acpi/sleep.
- When testing suspend, it may well crash X or the kernel. Save your work! Run IceWM instead of KDE - it's much faster to restart. Also, a remote connection (via SSH) is very useful
for debugging! Lastly, set
debug=yesin/etc/sysconfig/suspend-scripts/suspend.control. - First test: is the kernel capable of suspending? Remove PCMCIA cards, then reboot. At the lilo prompt, press Esc, then boot it into runlevel 1 with
2.6.16.20 single. Now,echo 3 > /proc/acpi/sleep, and check that it goes to sleep (and the crescent lights up.) Then, wake it with Fn. Check you can do this more than once. If so, proceed; otherwise, give up now. Note: Neither 2.6.16.20 nor 2.6.17.7 can resume more than once: the second suspend cycle always fails! - Mandriva's own scripts in
/etc/sysconfig/suspend(invoked bypmsuspend2 memory) are insufficient, and a horrific mess of bugs. A crash is guaranteed. My sleep.sh is a wrapper around pmsuspend: the most important things arechvt 1, andcardctl eject. For security, xscreensaver is configured to lock the screen. - The
killall -STOP X...killall -CONT Xsteps are not strictly required (they used to be vital with apm), however, they are added for extra safety: there is no way the X-server can crash if suspended. However, while X is suspended, it can be crashed by e.g.- chvt 7
- xscreensaver-command (Mandriva's script starts xscreensaver in the background (with &) leading to a race-condition.)
- It is important to remove the script
/etc/sysconfig/suspend-scripts/suspend.d/xfree. (Unfortunately, just renaming it to xfree.mdk will not work; it has to be deleted, moved out of the directory, or have the first non-comment line replaced by "exit"). Preserve the changes by addingsuspend-scriptsto/etc/urpmi/skip.list. - [If sound does not return after suspend, then try restarting the
alsaservice. If alsa cannot be shutdown, then some process (possibly timidity) has a lock on the soundcard. Network applications should survive a restart of the network service, however, it seems necessary to restart it twice (pmsuspend already does it once), in order to keep a PCMCIA wireless card happy.] - The completed files are:
/etc/acpi/events/sleepevent=ibm/hotkey HKEY 00000080 00001004 action=/etc/acpi/actions/sleep.sh[download]/etc/acpi/actions/sleep.sh#!/bin/bash #This is RJN's suspend script. The most important thing is to chvt1, then SIGSTOP X before suspending. Otherwise, X won't resume! #The Mandriva scripts as supplied will cause X to hang. Note: the SIGSTOP-SIGCONT are just "belt and braces" (they were previously #essential using apm), however, if they *are* used, it is important to avoid race conditions. Avoid either starting the screensaver, #or chvt 7 during the time when the X-server is frozen: doing so would crash it. #This script does not co-exist with Mandriva's scripts, especially if using kill -STOP,CONT. Because suspend.control iterates over #suspend.d/*, it isn't safe to just rename xfree to xfree.old. It must be deleted, or modified to exit immediately. Test for this. for xfree in /etc/sysconfig/suspend-scripts/suspend.d/xfree*; do grep -vE '^#|^[[:space:]]*$|[[:space:]]*echo' $xfree | head -n 1 | grep -Eqv '^[[:space:]]*exit' if [ $? == 0 ];then #match if the script'sfirst instruction (lines other than whitespace,comments,echo) is not "exit". echo "Warning: a script /etc/sysconfig/suspend-scripts/suspend.d/xfree* exists and does not exit immediately. Please fix this." exit 1 #Stop, rather than risk a crash. fi done echo "Sleep button has been pressed." echo "Syncing Disks" sync echo "Ejecting PCMCIA cards (if present)" #This is harmless if none are present; if they are there, it is necessary to eject cardctl eject #them. Otherwise, the system will hang. echo -n "Locking display(s): " #For all users who are locally logged in, lock the display. who | while read line ; do #Use xscreensaver to do this; start it for them if necessary. RUSER=$(echo "$line" | awk '{print $1}') #Important: do NOT do this in the background (with &). Otherwise, a race condition RDISPLAY=$(echo "$line" | awk '{print $2}') #occurs between the xscreensaver-lock and the kill -STOP, which will crash X. if echo $RDISPLAY | grep -q ':' ; then echo "$RUSER on $RDISPLAY " su $RUSER -c "xscreensaver-command -display $RDISPLAY -lock || \ (xscreensaver -display $RDISPLAY -no-splash & sleep 1; xscreensaver-command -display $RDISPLAY -lock)" 2>&1 >/dev/null fi done echo "" echo "Switching to console 1 (chvt 1)" #Switch to console. This is very important! chvt 1 echo "Turning off backlight" #On X22, the backlight doesn't turn off. On A22p, this isn't required, but is harmless. radeontool light off echo "Pausing X server (kill -STOP)" #SIGSTOP X. Not always necessary, but gives extra certainty that X really can't crash. killall -STOP X if /etc/init.d/timidity status | grep -q running ; then #Must stop the Timidity service or ALSA will fail to shutdown. echo "Stopping Timidity" #If that happens, ALSA won't restart, so no sound on resume. service timidity stop TIMIDITY_RESTART=true fi echo -n "Now suspending to RAM... " #Actually do it. All the Mandriva suspend scripts (/etc/sysconfig/suspend) /usr/sbin/pmsuspend2 -d memory #get invoked here. The resume scripts get invoked on resume. (-d for debug) echo "resumed." #Time passses....we awake. [Press the "Fn" button, or close+open lid] echo "Turning on backlight" #Only needed on X22. radeontool light on echo "Continuing the X server" #Restart X. killall -CONT X sleep 0.5 #(just in case.) echo "Switching back to VT7 (chvt 7)" #Back to X. chvt 7 echo "Syncing disks" sync echo "Unblanking screensaver(s)" #Doesn't unlock the screen, but unblanks the screen and shows the password prompt. who | while read line ; do #Otherwise, you'd never know when you needed to wiggle the mouse! RUSER=$(echo "$line" | awk '{print $1}') RDISPLAY=$(echo "$line" | awk '{print $2}') if echo $RDISPLAY | grep -q ':' ; then su $RUSER -c "xscreensaver-command -display $RDISPLAY -deactivate" 2>&1 >/dev/null fi done if [ "$TIMIDITY_RESTART" == true ];then #If Timidity was running before, then start it up again. echo "Starting Timidity" sleep 2 #Sleep to allow ALSA to stabilise. service timidity start fi echo "Restarting the network" #Restart the network - or the wifi card won't work. service network restart #(It will appear ok in ifwconfig, but dhclient will silently fail) echo "Done" exit #Note: on the A22p, there is no need for any special fix for the mouse sensitivity. It remains where it was. #Otherwise, we'd need to do: sudo sh -c "echo -n 255 > /sys/devices/platform/i8042/serio0/sensitivity"[download]
- Make sleep.sh executable, restart acpid, press Fn-F4, and cross fingers!
- Set the BIOS to not automatically suspend on lid-close. Sometimes, it's useful to keep the machine running with the lid shut; also it prevents a possible race-condition between starting the suspend-script above, and triggering a BIOS suspend by closing the lid. ALSO, ensure that there is NO ACPI event defined to suspend on lid-close.
- You may also wish to configure klaptop to automatically suspend on low battery - but only if you trust suspend!.
- Note: the screensaver only protects the X-session. If there are any logins on the virtual consoles, this is not secure. See above.
[3] Suspend to Disc
Don't do it. Suspending to disk will cause all the memory to be written to disk in cleartext, thereby completely ruining any sort of security! Note: an encrypted suspend image doesn't do what you think it might. That said, suspend2 does do encrypted suspend, and might be promising...
If you want to use suspend to disk anyway (with swsusp), the instructions are in /usr/src/linux/Documentation/power/swsusp.txt. It's very easy to do, but it does
not co-exist with the encrypted swap space we set up earlier. Remove the encryption enty for swap in /etc/fstab, then regenerate the swapfile with mkswap.
With the default Mandriva 11.0 install, Fn-F12 doesn't do anything anyway. I've mapped it to blink the thinklight - as a reminder that something has happened, but it shouldn't be used. [Download fn-f12.sh]
Thinkpad-specific programs (tpctl, configure-thinkpad, configure-trackpoint, tp_smapi, hdaps)
configure-trackpoint is a graphical utility to set the trackpoint sensitivity. It can be installed with urpmi, but on my system, it doesn't work, even though the trackpoint driver itself does work. Never mind :-)
tpctl and configure-thinkpad are CLI and GUI utilities to change certain BIOS settings (most usefully, the wake-up alarm) for the thinkpad. They can be installed with urpmi, a
nd "just work". (Remember to modprobe thinkpad, or add it to modprobe.preload first). These utilities are crucial on some thinkpads (eg 600-series), which do not have a proper
configuration menu in the BIOS. However, they are not necessary on the A22p. [The utilities are obsolete for later thinkpads such as the X-series.]
tp_smapi aims to provide extra system management features via SMAPI (System Management Application Program Interface),
using tp_smapi. This should allow changing the optical drive speed, and manual control of charge/discharge. At the moment, (with tp_smapi-0.22),
the various interfaces are exposed in /sys, but it doesn't do anything useful on this machine. Also, much of the useful information is already exposed via ACPI: look at /proc/acpi/battery/BAT0/.
hdaps is the Hard Disk Active Protection System. The hdaps kernel module allows the accelerometer to be read, which has serious uses (parking the disk head) and frivolous ones ( joystick, or gyroscopic display stabilisation). [Note: one should not park the disk head too frequently, since it can cause unreliability. It should only be done if the laptop detects that it is falling.] Anyway, the hardware is not present on the A22p.
External Disks (usb-key,1394,camera,compact flash reader) with udev
[1] Why udev
When a mass-storage device (most digital cameras), usb-memory-key etc is plugged in, the kernel will recognise it, and assign it a SCSI device: /dev/sdX.
The individual partitions will be /dev/sda1, /dev/sda2 etc. The name of the device can be found in the kernel messages: dmesg. Then it can be mounted, usually
with mount /dev/sda1 /mnt/tmp, files are transferred, and it is then unmounted.
Mandriva 2006 + KDE 3.5 will automatically pop up a dialog box "Detected new device" when a new drive is plugged in, and give the option to "open in new window".
This is configured in kcontrol->system->storage media. [Note: it is much better in KDE 3.5 than in 3.4.x] After this, the device will be mounted at
some temporary mountpoint, and the permissions set up to allow the logged-in user full access. KDE allows drag-and-drop of files, so all is GUI happiness!
In order to unmount the drive, visit system:/media (or just media:/) in konqueror, then right click the "Removable Device" with the usb key logo, and choose
"safely remove". [Note: system:/media is a kioslave, and has only one slash]. Or, look in /etc/fstab for an entry with the mount-option "managed".
However, I prefer to have some more control. I use ext2 on memory keys, and reiserfs on hard disks, not vfat, and I prefer my jpegs non-executable. Also, it's faster to use the command-line. This means manually mounting and unmounting the device. But which device and which mountpoint? SCSI devices are assigned by the kernel in successive order. So, if a camera and a memory-key are both inserted, there is no way to detect which of them is /dev/sda and which is /dev/sdb. This means we can't specify the relevant options in /etc/fstab. The old way was a really ugly hack, but now we can use udev, and everything is wonderful!
/dev as and when the devices exist.
One of its great features is the ability to create symbolic links based on the system information for a device. So, we can have:- /dev/camera_e300 -> /dev/sdX1
- /dev/usbkey -> /dev/sdY1
[2] Writing and activating udev rules
man udev. These are the stages: - Find the relevant device. For example, use
dmesgto find the relevant device. In the case of USB storage, this would be /dev/sdX1 for the correct X. - Obtain the udev information on this device. Either find the entry in
/sysor use the entry in/dev. Use one of:udevinfo -a -p /sys/block/sda/sda1 #look up path in /sys udevinfo -a -n /dev/sda1 #look up device name in /dev - This will give several paragraphs; use the information from any one block. (You can also narrow it, by using one more block, by using plurals (eg "KERNELS"). We then create the udev rule, for example.
BUS=="usb", SYSFS{manufacturer}=="OLYMPUS", SYSFS{product}=="E-300", KERNEL=="sd?1", NAME="%k", SYMLINK="camera_e300" - Here, we have several key-value pairs. Those with "==" are comparisons, which must all be satisfied. The assignments (with "=") are the operations. So, this rule means: "If a new device is found on the USB bus, with manufacturer "OLYMPUS" and product "E-300", and the kernel would want to assign it device /dev/sdX1, then create the entry in /dev which the kernel would already have picked; also create the symlink /dev/camera_e300."
- Save the rule into
/etc/udev/rules.d/10-local.rules. - Now, make udevd aware of the new rule. For a recent kernel, using inotify, the rule will automatically be picked up.
Just unplug and replug the device. Alternatively, run
udevtrigger, or (less optimally),udevstart. If inotify is disabled, useudevcontrol reload_rules. [Note: Mandriva 2006 doesn't have udevtrigger, nor a recent udevcontrol.]
[3] Some examples: USB storage devices (memory key, camera, ogg/mp3-player)
[3.1] Olympus E300 digital camera (mass-storage device)
- Plug in the camera. Run
dmesgto find the device (/dev/sdX1), and then obtain the udev information on it withudevinfo -a -p /sys/block/sda/sda1. - Use the information in any one block to define the camera. This is my udev rule in
/etc/udev/rules.d/10-local.rules:BUS=="usb", SYSFS{manufacturer}=="OLYMPUS", SYSFS{product}=="E-300", KERNEL=="sd?1", NAME="%k", SYMLINK="camera_e300" - Make udevd aware of the new rule, then plug in the camera. When the camera is plugged in, /dev/camera_e300 is automatically created.
- Create the mountpoint
mkdir /mnt/e300and add this to/etc/fstab:/dev/camera_e300 /mnt/e300 vfat pamconsole,ro,noexec,noauto,iocharset=iso8859-15,noatime,dmask=0022,fmask=0133 0 0 - Some of the mount options are interesting: pamconsole means that the device is always owned by the physically logged-in user (so I don't need to become root to mount and unmount it); ro is because the computer should never modify the camera's file system; noauto prevents the filesystem from being mounted at boot time; dmask and fmask create sensible default permissions for the files (FAT doesn't have permissions at all, so the defaults are 777. But photographs really shouldn't be marked as executable!) Lastly, managed is not present. ("managed" denotes that an fstab entry was automatically created - and can be automatically removed.)
- Now, I can just plug in the camera, and
mount /dev/camera_e300without even needing to be root. - Note that KDE will no longer pop up a dialog box. See below or bug 126208.
[3.2] iPod nano
The iPod nano, (hugely enhanced by iPod Linux and/or RockBox) is actually quite a decent player. Rockbox also supports Ogg Vorbis :-) The iPod is a USB mass-storage device, but the iTunes database (used by the Apple firmware and iPodLinux) must be accessed via gtkpod. Rockbox can use either ID3 tags (iTunes format) with tagcache or a directory-hierachy for file-access.
/dev/ipod and/mnt/ipod. The udev rule is:
BUS=="scsi", SYSFS{model}=="iPod*", KERNEL=="sd?2", NAME="%k", SYMLINK="ipod"[3.3] USB Memory key
BUS=="usb", SYSFS{product}=="Cruzer Mini ", KERNEL=="sd?1", NAME="%k", SYMLINK="usb_key"/dev/usb_key /mnt/usbkey ext2 pamconsole,exec,noauto,noatime 0 0sync. As a result, make sure never to unplug without unmounting!
[4] Gnome Volume Manager
Although we are running KDE, some of the GNOME subsystems are also running. [This is a consequence of starting gnome-settings-daemon above].
Therefore, gnome-volume-manager is also running. By default, this will automount all removable media when they are plugged in. Personally, I'd rather
control it by hand, so run gnome-volume-properties and uncheck all the options.
[5] Firewire (1394) storage devices
I'm using a 20GB Evergreen Fireline Hotdrive firewire drive, with an Evergreen PCMCIA firewire card, and the internals of the drive have been upgraded to 120GB. Everything just works, and in a very similar way to USB devices: (1)Hotplug the drive; (2)Check dmesg for the relevant scsi disk; (3)Mount it; (4)Unmount it; (5)Unplug it.
It is no longer necessary to mess around with modprobe'ing and rmmod'ing sbp2, ohci1394 and
ieee1394 every time! The disk can be formatted using diskdrake, or just with mkfs.reiserfs /dev/sda1. Then, write
a udev rule for it. For diagnostics, use gscanbus. It is also possible to use a DV camcorder as a 10 GB tape drive.
But remember - we deliberately broke firewire support back in the encryption section: un-break it when needed.
[5] Compact Flash card reader
This is a SanDisk 6 in 1 USB reader, which I'm using for a 1 GB microdrive, or for SD cards. It just works. Use dmesg to discover which
(virtual) scsi device is the new one, then mount /dev/sdX1 /mnt/tmp. (Or write a udev rule, if desired).
Remember to unmount it before ejecting it, and that unmounting can take some considerable time if files need to be sync'd. Never remove the disk while it's mounted, or while the
light is flashing: this can kernel panic the laptop, or corrupt the filestem.
It is best to leave the card as FAT16, for compatibility with digital cameras, and use for re-flashing a Zaurus. This means no symlinks, and no file permissions. However, CF cards can be formatted with ext2, or even reiserfs (with care, avoid frequent writes), and then used as silent replacements for IDE drives.
Printer, Scanner, Fax, Digital Camera
[1] Printer
Having thrown away 3 Epsons in as many years, I purchased an HP Deskjet 5850. This is an excellent machine, and just works. Features: it's a network printer, has cancel-job button on the printer, has duplexer, auto-detection of paper-type, reliable, fast, good value ink. Since each ink cartridge contains a new print head, the printer cannot suffer an un-cloggable print head, which is what kills the Epsons if you don't print colour at least once a month. `
[1.1] Installation
- Connect printer to LAN. Find printer's default IP address. Configure eth0 temporarily to an IP in the same range. Log in to web-based printer control panel, and set a sensible static IP address for it. (Or it can use DHCP).
- Use Mandriva Control Center to add the printer. It's a network printer on port 9100. (This is standard). Use the recommended ghostscript+hpijs driver.
- Bookmark the printer's web interface - to check ink levels.
- Set CUPS not to look on the network for other printers, nor to broadcast this one. (This is the "
Browsing Off" setting in/etc/cups/cupsd.conf.) - Now, use KDE's excellent printer tool
kups(as root) to configure the printer settings. I created 6 different instances of the printer, for ease of use:- bw_draft - greyscale, fastest. Still very good. Default.
- bw_fine - greyscale, best quality.
- bw_draft_duplex, bw_fine_duplex - with duplexer.
- colour - colour
- colour_photo - colour, photo paper.
[1.2] Using the printer
kprinter,kupsandxppare GUI printing tools.lpandlprprint files from the CLI. They can print (at least) .txt, .pdf, .ps, .jpg and STDIN.cancelcancels a print job. (use with -a for all jobs).lpqto see printer queue status.lpstat -ato see printer status.lpadmin -p [printername] -Eto re-enable a printer which has decided to stop. (Note: the order of arguments is important)
[1.3] Troubleshooting
- If CUPS takes ages to start, this is a manifestation of the Broken HalDaemon problem below.
- If you experience long delays, check
/etc/hosts: see here. - Note - if a print job is cancelled at the GUI, it will usually finish printing the current page, and the next one. Use the kill-button on the printer instead!
- The CUPS web interface is on http://localhost:631/.
- For further information, see linuxprinting.org.
[1.3] Using postscript
- Viewers:
gv,kpdf,xpdf, - Editors:
lyx,tex, (andopenoffice, which has pdf export),xfig(output to .eps) - Printing:
lp,lpr,kprinter, - Conversion:
pdftotxt,pdf2ps,ps2ps,ps2pdf,pstops,psselect,psnup,convert,a2psetc..
[2] Scanner
Canon CanoScan N670U (USB) works perfectly. Plug it in, and use Kooka for scanning. gocr is reasonably good for optical-character recognition, provided
that it is scanning only a single column of text. (For newspaper articles, cut into strips using GIMP). xsane is also good for scanning, or the GIMP can scan directly.
[3] Fax
- To send and receive faxes, install
efax. Edit~/.efaxrc: set to answer after a single ring, and to use/tmpfor lockfiles. There is a GUI frontend:efax-gtk, and a CLI interfacefax. - To "print" directly, use
KDEPrintFaxas a virtual printer. - Don't use
ksendfax: it's redundant, obsolete, and it segfaults. Also, I don't recommendhylafaxhere: it's very sophisticated, but unnecessarily complicated for occasional use. - You can also use the excellent free email-fax gateway service from www.tpc.int. This is simple and reliable, but only supports outgoing faxes. A fax coversheet is prepended, which may include an advert from the operator.
[4] Digital Camera
- My Olympus E-300 is a usb mass storage device and works perfectly. (See above).
- It is worth mentioning that some digital cameras (mainly expensive Canon cameras) are not USB mass-storage devices. These can be accessed by using gphoto2.
- Gphoto2 also works with 'toy' digital cameras such as the 'Nisis Quickpix QP3'. Use
gphoto2 --auto-detectto identify it (as an Aiptek Pencam), then usegphoto2 -Pto download images. - There is a bewildering array of digital photography applications available on Linux! I personally like albumshaper. (GWenview, F-spot, DigiKam, Gthumb, Eye of Gnome, and qiv are also useful.)
- It is possible to extract RAW images (and obtain better quality post-processing) by using dcraw. Hugin allows many photos to be combined seamlessly into a panorama. There's also some support for HDR (High Dynamic Range) images, formed by superimposing different exposures.
- Most cameras (including the E-300) now have a gravity-sensor built in, so they save the orientation inside the EXIF tags in the JPEG. The photo can be automatically, losslessly rotated, and the orientation reset, by using Gwenview/kipi-plugins, or Gthumb, or exifautotran. [Also, unless this is done, different applications will display "portrait" photos in different orientations, since some ignore EXIF tags, and some do not.]
- Image editing and compositing applications include the Gimp, OpenOffice Draw, Xfig and Inkscape. Sadly, the potentially very promising, but not yet finished Xara Extreme project has effectively failed.
Mobile Phone (Samsung S300)
I'm using the excellent Samsung S300 mobile phone. This can use IrDA, but the phone comes with a serial data cable (very nice!). It is just a regular serial modem,
so it's simply a case of plugging in the serial cable and setting the modem device to /dev/ttyS0 in kppp. The same things apply (kppp,shorewall) as with the
internal modem.
A neat feature is that one can use extended AT commands to send and receive SMS messages. Here is a script to do this.
kppp is extremely useful here: it has a terminal for interfacing directly with the modem and typing AT commands. It's a lot easier to use
than minicom! It's buried 4 levels deep though: kppp->Configure->Modems->[Edit|New]->Modem->Terminal
KDE configuration [and GTK]
[1] KDE upgrade to 3.5
- Before starting, save a list of the currently installed packages:
rpm -qa > rpms_pre_upgrade.txt. You can revert to this if necessary. - Remove the KDE 3.5.1 urpmi source (if you have it), and then add the seer of souls KDE 3.5.2 repository:
urpmi.addmedia SoS-KDE-3.5.2 http://seerofsouls.com/mandriva/2006/i586/KDE-3.5.2/ with hdlist.cz - Warning #1: Bad Things will happen if you allow this upgrade to pull in upgrades to HAL and DBUS from the SoS 2006 repository. (see below for more details)
- Prevent k3b from being upgraded: add these lines to
/etc/urpmi/skip.list:#k3b because of libHal/DBUS k3b libk3b2 k3b-dvd - It is not necessary (despite these instructions) to completely remove the existing KDE packages.
- Download all the new KDE packages:
urpmi auto-select --test --force
Then, install the packages. If there are any error messages, make a note of them.urpmi auto-select - Logout, and restart X (
service dm restart) - You may find at this point that KDM doesn't work, and you cannot log in to KDE. The KDM config file is no longer valid: I didn't experiment to find the exact root cause,
but here is an (ugly) solution which worked:
- Forcibly uninstall kdm:
rpm -e --nodeps kdebase-kdm kdebase-kdm-config-file - Remove the kdmrc config files. This is
/etc/kde/kdm/kdmrc; also remove anything RPM has helpfully left behind:/etc/kde/kdm/kdmrc.rpmnew,/etc/kde/kdm/kdmrc.rpmsave. - Re-install kdm (and get a fresh, working config file):
urpmi kdm - Re-customise KDM from kcontrol if desired.
- Some enlightenment might perhaps be found in /etc/kde/kdm/README.
- Forcibly uninstall kdm:
- The splash screen and kmenu side-image still identify as KDE 3.4. Fix the splash screen by choosing another one from kcontrol->LookNFeel->Splash screen. Fix the menu side-image. Mandriva have hard-coded it to be /usr/share/apps/kicker/pics/kside_download.png when it ought to be /usr/share/apps/kicker/pics/kside.png. Copy the latter over the former.
[2] Un-breaking HAL and DBUS (important!)
[2.1] Explanation
hal, (haldaemon), and dbus (messagebus) are the damons which notify userspace about hotplug events (and other things). If you accidentally allowed urpmi to update them to the ones in the SoS-2006 (or KDE 3.5.0) repository, bad things will happen. Certain applications will be very very sluggish: cups, printer-configuration and vlc will take about 25 seconds to start up, and anything using the GTK filepicker (eg firefox) will appear to stall for 25 seconds before being able to save a file.
The reason is that the Mandriva 2006 applications were compiled against an earlier version of libhal/libdbus, (as shipped with 2006), and so cannot correctly use the newer one.
A quick test is to stop the messagebus and haldaemon services: if these timeouts go away, this is the cause of the problem. You can also use strace.
[2.2] Solution
- The packages concerned are the dbus and hal ones:
rpm -qa | grep -E 'dbus|hal'. The incorrect packages are those ending in .SoS, and the desired ones are those ending in mdk. We need to downgrade the packages to earlier versions. - Remove the unwanted SoS packages with rpm: use --nodeps, or half the system will come away with them!
rpm -e --nodeps dbus-0.50-1.2006.SoS dbus-x11-0.50-1.2006.SoS libdbus-1_1-0.50-1.2006.SoS libdbus-qt-1_0-0.50-1.2006.SoS libdbus-glib-1_1-0.50-1.2006.SoS libdbus-1_1-devel-0.50-1.2006.SoS hal-0.5.4-2.2006.SoS libhal1-0.5.4-2.2006.SoS libhal1-devel-0.5.4-2.2006.SoS - Download the Mandriva 2006 packages from the urpmi media source for main. Use
lftpand the medium listed in/etc/urpmi/urpmi.cfg. We needhal*.rpm,libhal*.rpm,dbus*.rpm, andlibdbus*.rpm, Then install them with urpmi:urpmi ./dbus-0.23.4-5.1.20060mdk.i586.rpm ./dbus-x11-0.23.4-5.1.20060mdk.i586.rpm ./libdbus-1_0-0.23.4-5mdk.i586.rpm ./libdbus-qt-1_0-0.23.4-5mdk.i586.rpm ./libdbus-qt-devel-1_0-0.23.4-5mdk.i586.rpm ./libdbus-glib-1_0-0.23.4-5mdk.i586.rpm ./hal-0.4.8-15.1.20060mdk.i586.rpm ./libhal0-0.4.8-15.1.2006mdk.i586.rpm ./libhal0-devel-0.4.8-15.1.2006mdk.i586.rpm - Restart the daemons:
service messagebus stop; service haldaemon restart; service messagebus start. - Remove the offending urpmi source, or, if necessary, block any further updates with
/etc/urpmi/skip.list.#Don't update HAL/DBUS from SoS hal libhal dbus libdbus dbus-x11[download] - The SoS versions of K3B have dependencies on the SoS libhal/libdbus. So, uninstall them, and re-install Mandriva's pacakges for:
k3b,k3b-dvd,libk3b2. Then, add this to/etc/urpmi/skip.list:#K3b (in the SoS KDE 3.5.x repository) depends on the WRONG version of hal/dbus. Keep Mandriva's version: k3b libk3b k3b-dvd[download] - Run
urpmi --auto-selectto repair any damage done by the rpm --nodeps above: there shouldn't be any. To double-check:rpm -Va | grep dependencies. - Consequence of the fix: KDE storage media will now claim "HAL backend: No support for HAL on this system". This doesn't seem to make much difference though.
[3] Kcontrol
- Accessibility:
- Keyboard Layout -> Xkb Options -> Make CapsLock an additonal Control
- Keyboard Shortcuts -> Application shortcuts: Set up the same bindings as Readline for Ctrl-A and Ctrl-E. "Select All" = no shortcut. "Beginning of Line" = Home and Ctrl-A. "End of Line" = End and Ctrl-E. "Text Completion" = no shortcut.
- Components:
- Component Chooser -> Email Client -> Use a different email client:
mozilla-mailto.sh "%t" "%s"Then create ~/bin/mozilla-mailto.sh:#!/bin/bash #Send email in thunderbird. First, try to connect to a running process; then start a new process if required. #Argument 1 is "To" and argument 2 is "Subject" if [ -n "$1" ]; then TO="$1" ; else TO="nobody@example.com" ; fi if [ -n "$2" ]; then SUBJECT="$2" ; else SUBJECT="" ; fi ( $HOME/bin/mozilla-thunderbird -remote "openurl(mailto:$TO?subject=$SUBJ)" || $HOME/bin/mozilla-thunderbird "mailto:$TO?subject=$SUBJ" ) & exit 0[download] - File Associations: set up sensible bindings for multimedia. In order of preference:
.ogg,.mp3,.m3u: Alsa Player, Xmms, amaroK, VLC media player.mpg,.mov,.wmv.avi: VLC media player, Mplayer
- Component Chooser -> Email Client -> Use a different email client:
- Information:
- Protocols contains a list of the KDE ioslaves. Eg fish:/ or media:/
- LookNFeel:
- Background: wallpapers as desired, same for each desktop (for best performance). Advanced: use solid black colour behind text OR enable shadow; 2 lines for icon text.
- Behaviour: allow programs in desktop window. (This permits xearth etc to run)
- Colours: to taste. I prefer to have "Title Blend" darker than "Title Bar" and "Inactive Title Bar/Blend" different from "Active Title Bar/Blend".
- Fonts: see fonts section.
- Icons: Connectiva Crystal - classic
- Launch feedback - disable busy cursor, enable taskbar notification for 5 seconds.
- Multiple desktops: 4.
- Panels: Show RH hiding button, no animation. Menu: name (Description). Show side image. QuickStart Menu items: show the 15 applications most recently used. Disable transparency; enable background image. Appearance->Advanced Options: Hide applet handles (after you have arranged them as desired!)
- Screensaver: none - we are using xscreensaver instead.
- Splash screen: Default (the Galaxy one still says KDE 3.4)
- Style: Keramik. Show icons on buttons. Disable animations. Toolbar text position: Icons Only.
- System Notifications: change the most annoying sounds: "KDE is starting up" = KDE_Startup_1.ogg. "A critical message is being shown" = KDE_Error_3.ogg.
- Taskbar: Group similar tasks: never. Appearance: Elegant.
- Window Decorations: Keramik; don't draw grab bars below windows, Add custom title-bar button for "keep above others".
- Peripherals:
- Mouse: Single click to open files and folders. (This isn't MS Windows!). Theme: crystalcursors. Mouse wheel scrolls by 5 lines.
- PowerControl:
- See section on ACPI
- Sound:
- See the section on sound for Arts/Alsa/Midi.
- System:
- KDE Performance: preload an instance of konqueror after KDE startup.
- Login Manager: Echo mode = 3 stars. Set wallpaper = "Spot the fish" (Download from kdelook.org with Blue (#21449c) background.) Set font = Tahoma, without antialiasing. Convenience: preselect previous user, focus password.. [If desired, Disable the existing theme in System->KDM Theme Manager.]
- Storage Media. see below.
- Paths: set Documents path to /home/rjn. This is KDE's default location for saving and opening files; it is only coincidentally equal to /home/rjn/Documents/.
[i.e. KDE should always default to /home/rjn, but I use ~/Documents for certain files (like the Windows "My Documents" folder).] - Window behaviour: Focus follows mouse; Titlebar double-click = Maximise; Don't display content in moving/re-sizing windows (for performance); Don't animate minimise and restore; Don't allow moving and resizing of maximised windows; Transparency is fun, but very slow (and needs the Composite extension to be enabled in xorg.conf).
- WebBrowsing:
- See the web browser section.
[3] KDE storage Media
dmesg).
Here is how to set it up:
- Configuration is in: kcontrol -> System -> Storage Media.
- Inotify must be enabled, [see above], otherwise
kdedwill constantly poll the disks. - Devices which are dynamically created (with udev rules above), but which have permanent entries in
/etc/fstabwill not trigger events. - Important: media will be automatically mounted, but will not be automatically unmounted. It isn't safe to just physically pull the device out! [Physically removing a device with a mounted, writeable filesystem can crash the kernel; also, writes are asynchronous, so saved files may not have been actually written to the device until it has been sync'd.] Remember to manually umount.
- This is available with a GUI in konqueror: visit the URL:
media:/(ordevices:/) to see mounted and umounted filesytems/devices. To unmount, right-click->"Safely Remove". [Note: the URLs must be typed exactly, with only one slash.] - The Gnome equivalent is Gnome volume manager, configured by
gnome-volume-properties, and may also be running (as a consequence of the GTK font workaround.)
- The actions are defined by KDE servicemenus. These apply to konqueror generally. System-wide ones are in
/usr/share/apps/konqueror/servicemenus/and user-specific ones are in~/.kde/share/apps/konqueror/servicemenus. - For CD burning, we need to have the %U or KDE Removable media complains about Bad URL. But we dont't want it or k3b will complain. Workaround: use this command:
echo %U ; k3b - Added a DVD playback option. gmplayer is most user-friendly. The command required is:
/usr/bin/gmplayer -quiet -fs dvd:// %U
[Note: the %U is a bug: it is required to prevent an erroneous error message] - Hack: to specify that CDs should be ripped in
Grip, not kaudiocreator, edit/usr/share/apps/konqueror/servicemenus/audiocd_extract.desktopand changeExec=kaudiocreator %utoExec=grip %u
[4] Other KDE settings, tweaks and tips
[4.1] Desktop
- Wallpaper may be obtained from kde-look.org or from PDphoto.org or khotnewstuff.
There are also some stunning (mainly commercial) wallpapers from DigitalBlasphemy.com. The background can also be set to a
slide-show, or a background program. Great fun can be had by enabling blending (eg hue-shift!). Saved wallpapers live in
~/.kde/share/wallpapers. - Icon-text background may be a solid colour, OR a drop-shadow. This option is hidden in Background->Advanced Options. [I recommend enabling 2-lines at about 130 columns for icon-text.]
- Icons can be aligned to grid, and then locked in place. (right-click desktop). Finally, as of KDE 3.5.0, the icons stop jumping around between logins!
However, it is broken in 3.5.2 and not fixed until 3.5.4. [Partial workaround: turn off Desktop Icons (right-click->behaviour),
then back on again. Or while not running KDE, delete/edit
.kde/share/apps/kdesktop/IconPositions.] - Create shortcuts on the desktop for system:/ and media:/.
- If desired, the KMenu icon (bottom left) can be reverted from the Mandriva star to the KDE default:
edit
~/.kde/share/config/kickerrc, find the section[KMenu](add it if needed), and then add below it:KmenuUseMdvIcon=false. Then restart kicker.
[4.2] Directory structure
- Mandriva already created a basic directory structure, some of which I don't like. Also, many of the icons on the desktop are special
.desktopfiles, and do not represent directories or symlinks: this means that they don't play nicely with the CLI. - Firstly, remove the Mandriva weirdness - this is actually quite tricky. Some (but not all) of it is described in the release notes.
- Remove any superfluous icons from the Desktop. Then remove any unneeeded files (including hidden files) from
~/.Desktop. - Remove unwanted folders in
/home/rjn/. Mandriva create Video,Music,Download (all with corresponding desktop icons). - Get rid of the weird icon for Documents: remove
~/Documents/.desktop. - Remove
~/.kde/DESKTOP_ENTRYand its contents. - The release-notes also suggest
touch ~/.mdk-no-desktop-launch. - Fix the icons in the quick-launch panel of the KDE File-open dialog (see below).
- Remove any superfluous icons from the Desktop. Then remove any unneeeded files (including hidden files) from
- Create a directory structure as desired. This is the one I use:
- Actual Directories
/home/rjn/ | archive/ #archived copies of files. bin/ #for shell scripts. This directory is already in $PATH. briefcase/ #files to move back and forth between computers. Desktop/ #The Desktop (used by KDE) Documents/ #Location for documents (most files). Equivalent to "My Documents". media/ #Multimedia video/, music/, photos/ public_html/ #Web development or files published on web. src/ #Program source code (mine, or downloaded) todo/ #Action lists tmp/ #Temp files (needed by system) - Symbolic links for convenience (ln -s)
/home/rjn/
	trash -> .local/share/Trash/files/	#The actual location of trash in the new KDE (and GNOME)

/home/rjn/Desktop/
	Documents -> ../Documents/		#For GUI convenience when starting on the desktop.
	music -> ../media/music/
	photos -> ../media/photos/
	PhD -> ../Documents/PhD/
	todo -> ../todo/
- Actual Directories
Incidentally, it is worth setting KDE's Documents path (kcontrol->System->Paths) to be /home/rjn rather than /home/rjn/Documents. This is KDE's default location for saving and opening files.
[4.3] Trash can / Wastebin
As of KDE 3.4, (and unlike previous KDEs), the Desktop Trash icon is a special file, not the literal directory where the trash lives. (It has also been renamed to Wastebin in UK!)
It is accessed via the KDE trash:/ ioslave. The actual files live in .local/share/Trash/files/.
You can still access it via the command line with kfmclient move "deleteme.txt" trash:/, but this is extremely slow. I wrote a bash script, cn
as a replacement for this. One should get into the habit of typing cn file[s] [directory[s]] rather than rm -rf, since it avoides the potential for a slip of the fingers, followed by
regret, and locating the backups!
[4.4] KDE File-open dialog
- It supports tab-completion
- It remembers how large it is. Open the dialog, make the window most of the screen size, then close it. Voila: much easier to see files!
- It has inline preview.
- Sort-order can be case-insensitive.
- Folders can be shown in a separate pane (Persistent setting, F12 to toggle)
- Hidden files can be turned on/off (F8)
- The quick access navigation panel on the left (F9) can contain certain frequently accessed directories - just right-click it to add them. (and these can be customised per-application)
[4.5] Klipper
- Select text and text is automatically copied ; Middle-click to paste.
- Ctrl-C to copy ; Ctrl-V to paste
- [In nano,emacs,bash,pico, there is also a 3rd kill-buffer using Ctrl-K, Ctrl-U/Ctrl-Y]
These buffers are usually synchronised, but not necessarily. I set Klipper to have 40 entries in the history, synchronise clipboard and selection, and pop-up the menu at mouse position. The shortcut is Ctrl-Alt-V. (Klipper can also store images, but the X-clipboard mainly works with text. Graphical applications (Gimp,OODraw etc) do their own thing, and use Ctrl-C,Ctrl-V.)
Here are a few utilities using dcop to use klipper with the CLI:
klipper_getcontents (pipe the output of a command to the clipboard); klipper_setcontents (print the contents of the clipboard); klipper_readfile (read file
into clipboard). (Alternative: install xclip .)
[4.6] Desktop Search (Kat,Beagle)
Kat and Beagle are the desktop-search engines for KDE and GNOME respectively. They are both promising,
but the versions supplied with Mandriva-2006 simply don't work. Kat, in particular is a dreadful resource-hog, yet it is started by default! To prevent kat from being launched automatically,
touch ~/.mdv-no_kat. Better yet, uninstall it!
The later versions of Beagle look extremely promising (but the install process is complex!). The current version of Kat (0.6.4) is still unusable.
The alternatives is to use locate, grep and find, together with descriptive filenames.
[4.7] File associations and service menus
KDE's file associations are configured in kcontrol->components->File Associations. This defines what application is launched when you click on a file. If several are listed in order of preference, these are listed as options for 'Open-with' when you right-click the file. Embedding is also defined here. (Eg konqueror should open PDFs in a separate window).
KDE Servicemenus allow you to define any action which goes in the context menu for a file-type. This is extremely powerful! There are many for download on KDE-look.org. Here is one I wrote to Eject/Unmount removeable media.
[4.8] KDE System monitor
kdeaddons package. Then, right-click the taskbar, and choose Add applet -> System monitor.
For greatest usefulness, set up colours as follows: - CPU: Kernel=dark_green; User=mid_green; Nice=pale_green; IOWait=yellow
- Memory: Kernel=dark_blue; Used=mid_blue; Buffers=light_blue; Cached=pale_blue
- Swap=purple.
[4.9] Other tips
- Sessions: If you leave some KDE-applications open when you log out, they will be re-started in the same state when you return. (Configured in kcontrol->Components->Session Manager)
- KDE Startup and shutdown scripts: Any scripts placed in the
.kde/Autostart/and.kde/shutdowndirectories are run automatically on starting and exiting KDE. [This is similar to ~/.bash_profile and ~/.bash_logout; note that .bash_logout is not run by default on exiting KDE.] - IOSlaves: These are KDE resources which allow all applications to do some clever things. For example, you can edit a remote document over ftp/ssh/http, you can use fish:/ to drag-and-drop remote files, and use man:/ and info:/ to view documentation in konqueror. (Some information is in kcontrol->information->protocols). There is also a KIOSlave FUSE module.
- Keyboard shotrcuts for kwrite: Alt-F and Alt-B can be bound to "move back/forward one word" in kwrite (settings->configure editor->shortcuts). [Ctrl-A,Ctrl-E are defined globally above.]
- Konqueror autoscroll: Press shift, then up/down arrow. Konqui will continue to scroll automatically.
- Scripting KDE: here is a useful presentation.
- Kstart: Start program with custom window options (eg window title, desktop number. skip-task-bar etc).
kstart --helpfor more. - Ksystraycmd: start program, put window into systemtray.
ksystraycmd --helpfor more. - Kommander: a way of doing "graphical shell scripting" with QT: Here is an introduction and a tutorial. The Kommander homepage has some more information. Also try out this toy word processor.
- Kdialog: KDE dialog box to interact with scripts. (Like xdialog). Eg:
kdialog --title "Fortune Cookie" --msgbox "`fortune`" - Scripting X: see this article, also wmctrl and devilspie.
[4.10] Show Desktop (bug)
Since KDE 3.4, the show-desktop button behaves in a most unintuitive way. It used to minimise all windows, then wait until you clicked it again, at which point it would restore them. Now, the desktop is exposed on the first click, but the windows automatically restore as soon as you have clicked one icon on the desktop. This is (allegedly) a feature, not a bug. However, I have written a workaround: kshowdesktop.sh.
This is a bash-script, which uses wmctrl and a hacked version of devilspie together with xprop in order to exactly replicate the old behaviour. Installation instructions are in the source of kshowdesktop.sh.
[5] GTK Configuration
- Font settings are configured with
gnome-font-properties: see above. - GTK-2 applications (eg firefox) are configured with
gnome-theme-manager. I like the Galaxy2 or GrandCanyon themes. - GTK-1 applications (xmms,mozilla), are configured from Menu->System->Configuration->Other->GTK Theme Switch
(
/usr/bin/switch) or by editing~/.gtkrc. I prefer 'Eazel-Blue' (to give easily visible scroll-bars) but with Kcontrol->colours set to "Apply colours to non-KDE applications", which makes it less dark-grey.
Web browser (Mozilla, Firefox, Konqueror) configuration
[1] Konqueror
- Settings->Configure Konqueror:
- Web Behaviour:
- Tabbed Browsing->Advanced Options: uncheck: 'Open new tab after current tab', uncheck 'Activate previous used tab when closing the current tab'.
- Underline links
- Java & Javascript: Enable globally; Javascript->open new windows = 'smart'.
- Web Shortcuts: these are extremely helpful, and many are already defined. However, only a few (such as wp: and gg: for wikipedia search, google search) are active by default.
- Adblock Filters: enable these, and add the same list as for mozilla below
- Browser Identification: can spoof user-agent as, for example, MSIE on NT5 on a per-site basis, if it is required to defeat stupid browser-sniffing.
- Plugins: Load plugins on demand only, CPU Priority for plugins: lowest. No more flash except when I click to start it, and no cpu-hogging either! :-)
[Konqueror will automatically scan for mozilla plugins at startup, and incorporate them automatically.] - Performance: Preload an instance after KDE startup.
- Web Behaviour:
- Settings->Configure Shortcuts:
- Reload: Ctrl-R (and F5).
- Homepage: Alt-Home (and Ctrl-Home)
- Leave Ctrl-L as it is: Clear Location Bar (which also focuses the location bar).
- Line-editing shortcuts (Ctrl-A,Ctrl-E etc) are already configured kde-wide above.
When .txt files are linked on the web, it's better to open them directly within konqueror rather than starting an external kwrite. Go to: kcontrol->components->file associations. Search for 'txt'. In the 'Embedding' tab, choose "Show file in embedded viewer", and uncheck "Ask whether to save to disk instead".
Konqueror's mailto: handling is configured above.
[2] Mozilla (suite)
Mozilla is all-in-one the Web + Email + Editor suite. It is the predecessor to Firefox + Thunderbird, and has now been officially retired. However, it is still developed by the SeaMonkey project: here is a comparison, and a Seamonkey review.
The advantage of separate programs is principally that they run in separate processes, and (individually) have (allegedly!) smaller RAM requirements. They are
also seeing very rapid development, and a vast number of extensions. However, the integrated suite is still easier to use, and better integrated.
Most of what follows, about Firefox also applies to Mozilla. However, there are a few Mozilla or SeaMonkey-specific details:
The latest version of the integrated suite can be downloaded from the SeaMonkey project. One particularly useful tip: Use Ctrl-L to focus the Location bar, then type a query, then press up_arrow and [enter] to search Google.
When opening URLs from another applications, and Mozilla is already running, we don't want to start another instance, particularly if it would create another profile by accident. Multiple instances will "fight" over accessing the profile, which is A Bad Thing, and results in lots of unwanted, and unsynchronisable profiles. If you ever see the "Profile Manager", quit and find the lock file; don't create a new profile. You cannot run more than one mozilla or firefox process at a time; to connect to an existing mozilla or firefox, use the mozilla -remote command. [The default set-up in Mandriva 2006 is *usually* smart enough to do this automatically.]
[3] Firefox
Latest versions
Download the latest versions, if desired. Before installing them, back up your profile (~/.mozilla,
~/.mozilla/firefox, or ~/.thunderbird) and then install them. I recommend installation in directories such as
$HOME/bin/mozilla.d/firefox/1.5.06/ with a symlink from $HOME/bin/firefox (which is in your path). The advantage (besides simplicity) is that
firefox can auto-update itself, since it has write access to its own binary. Then create a desktop shortcut to the symlink.
Don't do this stupid thing which I did during my early steps with Linux a few years ago!
Fix keyboard shortcuts
- Edit (or create if needed)
~/.gtkrc-2.0and add (or change) the line:gtk-key-theme-name = "Emacs" - Use
gconf-editor, and change the key:desktop->gnome->interface->gtk_key_themefrom 'Default' (MS Windows-like) to 'Emacs'. - Restart the browser.
Shortcut Key Action Note Ctrl-A Go to start of line in message-list, this does 'select-all' Ctrl-E Go to end of line Ctrl-K Cut to end of line Ctrl-U Cut whole line while reading content, this does 'view page source' Ctrl-C,X,V Copy,Cut,Paste Ctrl-Y Paste Pastes what was last selected, not the result of Ctrl-K/U Ctrl-L Go to Location Bar In mozilla-suite, press up_arrow to search google. Ctrl-J Go to Search Bar Firefox only Ctrl-R Reload page Esc Stop Loading Ctrl-N New browser window Ctrl-M Compose new mail Ctrl-1,2,5 Go to browser/mail/address windows Only in mozilla suite. Ctrl-T New Tab In mail, 'get new messages' Ctrl-W Close tab Ctrl-Q Quit (dangerous!) Ignored in firefox Ctrl-F Find in page (F3 = find next; Shift-F3 = find previous
Horizontal scrolling
about:config in the location bar. Then filter on "Horizontal". Change the following values:
mousewheel.horizscroll.withnokey.action  =  0             # Disables forward/back. Reverts to horizontal scroll.
mousewheel.horizscroll.withnokey.numlines  =  1           # Fixes the direction (and amount) of scrolling.
mousewheel.horizscroll.withnokey.sysnumlines  =  false    # Don't use system default, if defined.

mousewheel.horizscroll.withshiftkey.action  =  0          # When using shift, alt, or control with vertical-scroll
mousewheel.horizscroll.withshiftkey.numlines  =  0        # (for advanced functions), it is most likely that any
mousewheel.horizscroll.withaltkey.action  =  0            # simultaneous horizontal motion is unintended. To
mousewheel.horizscroll.withaltkey.numlines  =  0          # prevent unwanted consequences, set the action to 'scroll'
mousewheel.horizscroll.withcontrolkey.action  =  0        # but by zero lines. [The numbers 0,1,2,3 mean (respectively)
mousewheel.horizscroll.withcontrolkey.numlines  =  0      # scroll; page-up/down; back-forward; text-zoom]
mousewheel.horizscroll.withmetakey.action  =  0
mousewheel.horizscroll.withmetakey.numlines = 0Adblock (and prevent timeouts)
- It makes web browsing faster and less cluttered.
- It removes the very anti-social animated flash advertisments which hog a large amount of CPU, and which continue to do so even in background tabs.
- It prevents the most common occurrence of this bug, where the whole mozilla UI locks up for up to a minute - one cannot even close the tab, or the window, nor will the window re-paint. This seems to be caused by the server stalling mid-TCP connection; usually the overloaded server is a 3rd-party adserver. [netstat reports that the socket is sitting in 'CLOSE_WAIT'.] Wait 2 minutes, and mozilla will usually come back to life.
Alternatively, you can manually configure a list of advertising servers to block.
[I also block: spe.admt.com, *fastclick*, *.falkag.net, *.tribalfusion.com ]
Filterset.G provides a collaboratively edited (and rather long list!) of filters. Use Filterset.G updater, or
see these instructions: basically, retrieve the most recent filter-file from
this directory, and then import it with: Tools->Adblock->Preferences->Adblock Options->Import Filters.
Of course, there is a risk that you might loose too much information from the web page this way!
Custom Keyword Searches
Note that the keyword must not contain a trailing space, but you must leave one between the keyword and the search term. I've chosen the same keywords as konqueror, but there is no other reason to have a colon.
keyword location wp: http://en.wikipedia.org/wiki/Special:Search?search=%s gg: http://www.google.com/search?q=%s gl: http://www.google.com/linux?q=%s dict: http://dictionary.reference.com/search?q=%s
To define a keyword for a bookmark, just fill in the "Keyword" field in the Bookmark's properties. If the bookmarked URL contains a %s,
this will be substituted by your search term. In Firefox 1.5, it is also possible to right click on any search field, and choose "Add Keyword for this Search".
Cute!
In Firefox -> 1.5, you can also click the search bar, and add extra search engines, eg Wikipedia.
Preference tweaks (about:config)
about:config (and usually take immediate effect; no need to restart):- By default, if you middle click in the main browser window, mozilla will treat this as a paste, and attempt to load the URL just visited.
It's a neat feature, but can be terribly annoying if you want to open a link in a
new tab, but just don't quite hit it it! Disable it thus, if desired:
middlemouse.contentLoadURL = false - Network performance can be improved by changing:
network.http.pipelining = true
network.http.proxy.pipelining = true
network.http.pipelining.maxrequests = 40
Other tips
Creating a custom home-page is also extremly useful. It keeps the most frequently-used information close to hand, and doesn't slow down the browser start-up time.
You can also add file:// URLs, Locally hosted ones (for web development), and local documentation (/usr/share/doc. Here is the
page which I use; it may be a useful base. I have the browser home URL set to: file:///home/rjn/public_html/mystartpage.html.
Type-ahead-find is another extremely useful feature. In any web page, just start typing letters, and the first link containing these letters will be highlighted. Start with / in order to search the whole page. F3 and Shift-F3 find the next and previous matches respectively. For example, type /penguin to find the first instance of the word penguin on this page. [To enable, go to Preferences->Advanced->General, and select "begin finding when you begin typing".]
In case you haven't yet discovered it, tabbed browsing is wonderful! Middle-click on any link to open it in the background of a new tab.
Firefox fonts can be optimised in Preferences->Content->Colours: see above. I also recommend setting the background colour to pale-yellow rather than white, since it is easier on the eyes.
about:config
keyword.URL = http://www.google.com/search?ie=UTF-8&oe=utf-8&q=
keyword.enabled = true
For more Firefox tips and tricks, see here and here.
about:config is documented quite fully here.
Extensions
- Extensions I am currently using:
- Adblock and FiltersetG updater - as described above.
- Tab Mix Plus - allows drag-and-drop reordering of tabs and many other features. It includes a session manager to recover from crashes, and allows tabs to be un-closed (by right-clicking the tab bar). My configuration includes "prevent blank tabs when downloading files", "Don't show close icon on each tab". and "Middle-click on tab does *not* close it".
- Image Zoom - right click an image, resize it.
- Web Developer Toolbar - very,very good. All sorts of useful things, including local HTML validation, and editing the HTML/CSS of pages in the sidebar.
- Aardvark - very clever way to see, and edit the individual page elements. Good for printing.
- HTML Validator (locally, using Tidy.)
- CustomizeGoogle - helpful tweaks for Google.
- Update: Image Zoom functionality is now native to Firefox. Consider also
Flashblock,Facebook Disconnect,keyword.URL hack.
- Extensions I like, but am not currently using:
- UrlParams nice - but it intereferes with "add keyword for this search"
- Session Saver - allows retrieval of session after a crash, and un-closing of tabs :-) [But this is duplicated by Tab Mix Plus]
- Colorful tabs - assigns colours to tabs, making it easier to arrange to them.
- StumbleUpon - Serendipitously find other highly-rated websites.
- Firebug - another way to see javascript errors in webpages. Seems powerful - but I can't actually figure it out!
- View Formatted Source (Fx does view the whole page source anyway, but very neat "inline" mode)
- HTML Validator - opens new tab to validate page (with W3C's validator) - nice, but duplicated by Web Developer toolbar.
- Some tools which already exist on Linux, so no extension is needed:
kruler- screen ruler in pixels.kcolorchooser- select html colours.- check-link - check links.
[4] Firefox integration with Thunderbird
To make Firefox and Thunderbird work together, see below.
[5] Migration to/of Firefox
- Download and install the latest Firefox.
- Move
~/.mozilla/firefoxout of the way. Then run firefox, (which now has a clean configuration), and install extensions, plugins and set it up as desired. Close mozilla and firefox. - Make a backup copy of
~/.mozilla. - The Mozilla and Firefox profile contents are described in detail here. The Mozilla profile resides
somewhere like:
~/.mozilla/rjn/a01xhcth.slt/and the Firefox profile resides somewhere like:~/.mozilla/firefox/gkxpc0f1c.default. - Copy bookmarks across, by copying the
bookmarks.htmlfile. - Copy passwords across by copying the
xxxxxxxx.sfile across, and renaming it tosignons.txt. Also copykey3.db. - Copy cookies and history:
cookies.txtandhistory.dat. - Some more details are here.
- For Firefox, simply edit
~/.mozilla/firefox/profiles.ini/ - For Mozilla, create a symlink (
cd ~/.mozilla/rjn/; ln -s a01xhcth.slt a02fhgli.slt)so that Mozilla can find the actual profile by looking where it wants to look. This is necessary, since Mozilla stores absolute paths!
[6] Lightweight browsers
For really fast GUI browsing, try dillo or links-graphic. These are much simpler browsers, but very very fast!
For CLI browsing, try links or lynx. Links is tables-aware, and notices mouse-clicks. Navigate with the arrow keys; press Esc for menu.
Also, use wget to download files, and note that less can view HTML.
[7] Browser Plugins
Except for Java (where the path to the executable must be specified), konqueror will scan for Mozilla/firefox plugins at startup, and will just work. These plugins are installed by default in the commercial Mandriva system, but must be installed by hand in the GPL version. A good test for plugins is the Plugger testing grounds. I do not recommend installing mozplugger.
[7.1] Java
- Make sure Java is installed - see below.
- In Konqueror, just specify the path to the java executable. Usually, this is just "
java". - In Mozilla and Firefox:
- Create the mozilla plugins directory, if necessary:
mkdir ~/.mozilla/plugins. Change into it:cd ~/.mozilla/plugins. - Create a symlink to the correct java executable:
ln -s /usr/java/jdk1.5.0_07/jre/plugin/i386/ns7/libjavaplugin_oji.so . - Restart the browser. Test it here.
- Create the mozilla plugins directory, if necessary:
[7.2] Flash
- Download install_flash_player_7_linux.tar.gz. Note: there won't be a version 8 for Linux; we have to wait for 8.5.
- Untar. Close browsers. Run
./flashplayer-installer. - To test, look at this CSS box model or John Cleese's Institute for Backup Trauma.
- To avoid much irritation with flash adverts, use adblock.
[7.3] Real Audio
cd ~/.mozilla/pluginsln -s /usr/lib/RealPayer10GOLD/mozilla/nphelix.so .
[7.4] All other formats (Mplayer)
urpmi mplayerplugin. If using Firefox in ~/bin and not the official RPM,
it is also necessary to do:
cd ~/.mozilla/pluginsln -s /usr/lib/mozilla/plugins/mplayerplug-in.so .ln -s /usr/lib/mozilla/plugins/mplayerplug-in.xpt .ln -s /usr/lib/mozilla/plugins/mplayerplug-in-wmp.so .- For Windows Media (.wmv) files. (but this is sometimes unstable)ln -s /usr/lib/mozilla/plugins/mplayerplug-in-wmp.xpt .ln -s /usr/lib/mozilla/plugins/mplayerplug-in-qt.so .- For Quicktime (.mov) files.ln -s /usr/lib/mozilla/plugins/mplayerplug-in-qt.xpt .ln -s /usr/lib/mozilla/plugins/mplayerplug-in-rm.so .- For Realplayer (.rpm, rtsp://) files. Or use realplayer.ln -s /usr/lib/mozilla/plugins/mplayerplug-in-rm.xpt
[7.5] VLC
Sometimes (rarely!) there is a file which mplayer cannot play. VLC is a good alternative - although I don't recommend installing the vlc-plugin.
Mail Client (Mozilla, Thunderbird, Pine) configuration
[1] Mozilla mail
The old Mozilla mail suite has worked extremely well for a long time. It is a shame to say goodbye - but the developers, and bugfixes are now mainly with Thunderbird. That said, Seamonkey is still maintained.
[2] Thunderbird
[2.1] Installation
This is very similar to the firefox install. The profile directories to back up are ~/.mozilla and ~/.thunderbird.
Install in $HOME/bin/mozilla.d/thunderbird/1.5.05/ with a symlink from $HOME/bin/thunderbird (which is in your path).
(Note: Mandriva's thunderbird binary has the same name, so be careful with $PATH).
Thunderbird's Import wizard is quite good; otherwise see Migration below.
[2.2] Thunderbird Setup
TODO
[2.3] Thunderbird Extensions
TODO
[2.4] Migration to/of Thunderbird
TODO
[3] Other mail clients (KMail, Pine)
Alternative GUI mail clients include the well-regarded KMail and Evolution.From the CLI, pine is a delight to use.
[4] Other e-mail tips
It's easy to move mail from one client to another: virtually all of them support mbox. For example, each message
folder "Foldername" in Thunderbird has the following files: Foldername (the mbox itself), Foldername.msf (message summary file - this index can be deleted),
Foldername.sbd (subdirectory for sub-folders).
Some clients use maildir too: this is more advanced, but requires efficient storage of small files.
To access hotmail as if it were a POP server, use hotwayd.
Some mail clients can directly import from MS Outlook, however, this isn't so useful if outlook isn't installed on the machine concerned. Instead, convert
email from OE's mailbox file (.dbx) to an mbox (.mbx) file with oe2mbx. This uses liboe, which can be found
here [archive].
For Thunderbird, just move the foldername.mbx file into the Mail/ subdirectory of ~/.thunderbird, renaming it without the .mbx extension. If a previous import
attempt has failed, use thunderbird's Remove Duplicate Messages extension to have just one copy
of each message!
winmail.dat a.k.a. TNEF ("transport-neutral encapsulation format") attachments are Microsoft's proprietary version of MIME. Many configurations of Outlook send attachments as winmail.dat/tnef by default. Here are more details, and the thunderbird bug 77811. The solution is to download tnef. I use this tnef.sh script.
For local mail, using the mail program, and to receive email from daemons and cron-jobs, use postfix: see below.
[5] Firefox + Thunderbird (and other) integration
By default, Firefox and Thunderbird are not paired !!! Clicking a mailto: link in Firefox invokes Evolution, not Thunderbird. This setting is defined in the Gnome-control-panel (despite the fact that we are using KDE, and there is no GUI pref for it in Firefox!). A similar problem applies to Thunderbird. However, it's easily fixed, thanks to this Gentoo tip.
- Go to the URL:
about:config - Right-click, and add a new string:
network.protocol-handler.app.mailto = /home/rjn/bin/thunderbird #or /usr/bin/thunderbird if using the official packages.
- Go to Edit->Preferences->Advanced and Click the "Config Editor" button.
- Right-click, and add new strings:
network.protocol-handler.app.ftp = /home/rjn/bin/firefox      #or /usr/bin/firefox if using the official packages.
network.protocol-handler.app.http = /home/rjn/bin/firefox
network.protocol-handler.app.https = /home/rjn/bin/firefox
[5] Thunderbird
TODO: FIXME
[8] Migration from Mozilla-suite to Firefox+Thunderbird
TODO: FIXME
Non-free Software (Java,Flash,Realplayer)
These are installed by default if you use any of the Club Commercial media. However, the Free distribution doesn't include them, and so they must be downloaded and installed direct from their homepages.
[1] Java
- Download Java from here. I recommend the JDK (Java Development Kit), which includes both the javac compiler and the JRE (Runtime environment). Get the package called "J2SE(TM) Development Kit 5.0 Update 7" (which is 45MB) and not the one with NetBeans (which is 140MB, and doesn't install anyway). Download the Linux RPM in self-extracting file.
- Sun's installation instructions are here.
- Then, as root:
sh jdk-1_5_0_07-linux-i586-rpm.bin, type "yes",urpmi ./jdk-1_5_0_07-linux-i586.rpm. It's now installed, but not in the path. - Remove any old versions (or links to
/etc/alternatives/):cd /usr/bin; rm java javac javadoc javah javap jar - Create symlinks to the new versions:
ln -s /usr/java/jdk1.5.0_07/bin/java* . - See above to install the browser plugin.
[2] Flash
See above for installing the Flash plugin.
[3] RealPlayer
Real Player 10 for Linux can be downloaded (as an .rpm) from here. Note that it doesn't use alsa, but requires an exlusive lock on /dev/dsp
(or use aoss). For the browser plugin, see above. To test realplayer, try the
BBC Documentary Archive.
- To play real audio with
xine/gxine, first install the real audio codecs (urpmi real-codecs. Then tell gxine where they are located: Set the User Interface mode to "expert", then go to File->Preferences->Codecs->Path to RealPlayer codecs. The path should be/usr/lib/real. Then, Firefox can just click on a .ram link. Otherwise, xgine gives the error message "cannot find: /usr/lib/real/cook.so.6.0". - To play the file with mplayer, you have to know which type it is:
- A
.ramfile is a real audio playlist, like a .m3u. It is a short text file containing one or more URLs of a stream. With mplayer, look inside the file, or use use-playlist. - A
rtsp://path/to/stream.raURL is the real audio stream. It may also specify a start position eg rtsp://..../fri.ra?start="90:00". This can be opened directly in mplayer. (I recommend-cache 100for improved startup speed).
- A
- I have written some simple scripts which may be of use: ramplayer.sh (plays .ram/.ra) and real2ogg.sh (saves a stream to ogg).
[4] Acroread
Acrobat Reader can be installed from adobe. However, it is totally unnecessary, and not always stable. Alternatives are kpdf (most full-featured); gv (fastest);
xpdf (most reliable on all files, even those which cause errors for gv). From the commandline, use pdftotext, less, or pdftops.
[5] Skype
Ugh. Just don't do it. Use SIP instead! I wrote a VoIP howto which is here.
[6] Nvidia Driver
Aside for desktop systems: the nVidia driver can be downloaded from here. It works quite well - although it is annoying to have to re-install for every kernel. Note that, on rebooting into a new kernel, Mandriva will "helpfully" break your xorg.conf, and you have to fix that too.
SSH (Secure shell, keys)
SSH is absolutely wonderful! It does all sorts of clever things: encrypted remote logins; passwordless logins with public-key cryptography; file transfers (scp); X11 forwarding; VNC tunneling; port forwarding of any (TCP) protocol.
[1] Installation
Installation is simple: urpmi openssh-clients openssh-askpass-gnome openssh-server sshd-monitor keychain
(Check that the service is on with chkconfig --list sshd). The default configuration is good, but can be altered in /etc/ssh if desired.
It is important to stay current with the security updates on the Mandriva Security announcement mailing list.
/etc/ssh/sshd_config:
Protocol 2
PermitRootLogin no
Remote logins are now easy, and secure. Consider a local user tux sitting at machine iceberg who wants to login (with the same username tux) on host
antarctica. Sitting at iceberg, tux should simply type: ssh antarctica. [Hostnames should be fully-qualified if necessary; the remote
'username@' may be omitted if it is the same as the local one; SSH connections can be nested.]
To copy the herring/ directory from iceberg to antarctica, use scp: scp -r /home/tux/herring/ antarctica:. [Note: the final colon is required!]
The tab name in konsole can include the hostname: see above for .bashrc .
[2] SSH keys
- Firstly, create a public-private key pair. Generate the keys using
ssh-keygen -t rsa. Do set a passphase. This creates a public/private key pair in ~/.ssh: the private key is~/.ssh/id_rsaand the public key is~/.ssh/id_rsa.pub. Do not distribute your private key!. - Keys should always have a passphrase unless you really trust the machine with the private key not to get compromised or stolen. Furthermore, any machine which is running ssh-agent can have its decrypted keys easily accessed by root. This may then grant access to lots of other hosts too! Running ssh-agent on only one machine is preferred: see below.
- Then, any machine which has a copy of the public key will allow passwordless login from any machine containing the private key.
Do this by appending the public key ~/.ssh/id_rsa.pub on iceberg to the list of authorized keys
~/.ssh/authorized_keyson antarctica. This can be done in one step withssh-copy-id. [If necessary, create the directory ~/.ssh and append to an empty file. On older versions of sshd, the authorized_keys file is named~/.ssh/authorized_keys2. The directory ~/.ssh must have permissions of 700, and your home directory must have permissions at least as restrictive as 755.] - Now, we need to make sure that the key is authorised. This uses ssh-agent and keychain to prompt the user (at the first login
after booting) for the passphrase. To set this up, run
keychainone time (as user); it will then be configured to automatically load ssh (and GPG) keys at every future login. keychain will prompt for the passphrase (if there is one) by usingssh-askpassimmediately after the login screen. (The authorized key will now persist until ssh-agent exits i.e. probably until the machine is re-booted) - At login, only the keys with the default names (
identity,id_rsa,id_dsa) will be automatically imported into the keychain. (This is controlled by the variable$KEYSin/etc/profile.d/keychain.sh.) If you have extra keys, these must be added manually with something like this in~/.kde/Autostart/kde-startup.sh:ssh-add /home/rjn/.ssh/id_rsa_NAME </dev/null - You now have to enter your passphrase only once each time you boot the system, and that is it. Extremely easy remote access :-)
For convenience, set up some aliases in
~/.bashrcegalias sshantarctica="ssh tux@antarctica.southpole.com". - Should it ever be necessary to restart keychain, do this:
keychain --stop; keychain; . /home/rjn/.keychain/toffee-pecan.baddiant.org.uk-sh ; ssh-add < /dev/null - Scripts run from cron cannot take advantage of the above, because they do not have $KEYCHAINFILE exported into their environment. To run, for example, a
nightly remote-backup over ssh, do this:
- The backup script must source the relevant keychain file:
. /home/USER/.keychain/`/bin/hostname`-sh - ssh-agent must be running; this means that the user must have logged in at least once since boot, and typed the passphrase. [The user need not still be logged in.]
- [Neither of these is necessary if the ssh key-pair has no passphrase.]
- The backup script must source the relevant keychain file:
- This page at IBM developerworks is very helpful, (but note: it
refers to ~/.ssh-agent whereas Mandriva uses the file ~/.keychain). See also
keychain --helpand note the optionkeychain --clear.
[3] Copying files
scp herrings.txt antarctica:- copy the file herrings.txt in the current directory on iceberg to tux's home directory on antarctica. Note the colon.scp -r /home/tux/world_domination/ puppy@antarctica:secrets- recursively copy tux's world_domination directory into dust-puppy's ~/secrets/ directory on antarctica.
rsysnc -avzS -e ssh pebbles antarctica:nest/- copy tux's pebbles directory on iceberg into the nest directory on antarctica (resulting in /home/tux/nest/pebbles/rock[12345].o).rsysnc -avzS -e ssh pebbles/ antarctica:nest/- copy the contents of the pebbles directory on iceberg into the nest directory on antarctica (resulting in /home/tux/nest/rock[12345].o).
Alternatively, you can ue ssh as a network-transparent pipe. Eg: cat herring.txt | ssh tux@antarctica 'cat > herrings.txt'. The first cat's stdout is piped to the second cat's stdin.
You can also use bash tab-completion of paths on the remote-host with scp/rsync. To do this, you must have passwordless ssh-access to that system, and enable scp tab-completion with COMP_SCP_REMOTE. Put COMP_SCP_REMOTE=true in your .bashrc.
[4] Nested SSH Connections - SSH ProxyCommand (or AgentForwarding)
[tux@iceberg ~]$ ssh ocean
Last login: Thu Apr  6 00:40:13 2006 from iceberg
[tux@ocean tux]$ ssh antarctica
tux@antarctica's password:
Last login: Thu Apr  6 00:40:24 2006 from ocean
[tux@pistachio ~]$
[4.1] SSH ProxyCommand
This is the recommended, and safest method. It also supports single-step scp. We use ProxyCommand with netcat; it is explained in detail here.
~/bin/netcat-proxy-command:
#!/bin/sh
bouncehost=$1
target=$2
ssh $bouncehost nc -w 1 $target 22~/.ssh/config:
Host antarctica
    Hostname antarctica
    HostKeyAlias antarctica
ProxyCommand netcat-proxy-command ocean %h~/.ssh/config:
Host antarctica
    Hostname antarctica
    HostKeyAlias antarctica
ProxyCommand ssh ocean nc -w 1 %h 22nc is installed on the firewall, ocean. [There are 2 variants of netcat (netcat-traditional and netcat-openbsd, which interpret the "-w" option differently. In both cases, -w is a timeout period, but
for netcat-traditional, this only applies to connections and EOFs, whereas for netcat-openbsd, it also (unhelpfully) includes stdin. Ensure that the former is the one that is installed on ocean, not the latter.
Otherwise, SSH will terminate within about 1 second, with "Write failed: broken pipe". If both versions are installed, then /etc/alternatives switches nc from one to the other; or you can explicitly use /bin/nc.traditional ]- SSH directly to antarctica, as though it were on the local network:
[tux@iceberg ~]$ ssh antarctica. - Use SCP:
[tux@iceberg ~]$ scp herrings.txt antarctica:. - Use VNC over ssh and a proxy:
[tux@iceberg ~]$ vncviewer -via antarctica localhost:0.
[4.2] SSH Agent Forwarding
BIG FAT WARNING: SSH agent forwarding exposes your ssh-agent to hijacking unless you
completely trust root on the intermediate machine. ProxyCommand is a much better alternative. See also the ForwardAgent setting in
man ssh_config.
The simplest solution is to enable ssh-agent forwarding on iceberg. Antarctica then authenticates ocean by asking iceberg for the credentials. So ssh-agent forwarding both slightly improves security (ssh-agent only runs on the most trusted machine), and improves convenience (by eliminating the need to type a password the second time).
/etc/ssh_config or ~/.ssh/config:Host *
ForwardAgent yesIn two stages, do[tux@iceberg ~]$ ssh oceanand then run[tux@ocean ~]$ ssh antarcticawithout needing a password on either occasion.In a single leap, you can do[tux@iceberg ~]$ ssh -t ocean ssh antarctica. [The first -t is needed to force it to allocate a pseudo-tty.]The networked pipe equivalent is:cat herring.txt | ssh tux@ocean "ssh antarctica 'cat > herrings.txt'"
[5] Advanced uses
There is even more magic that can be done. It really helps to have passwordless (key-based) logins for this.
[5.1] Direct X forwarding
SSH to antarctica, and launch a GUI application such as xclock. Magically, it appears on iceberg, on your own display! If this does not work, invoke ssh with -X. X11 forwarding
can be turned on always, by adding ForwardX11 yes into your ~/.ssh/config.
- When forwarding X11, you are essentially connecting your screen/mouse/keyboard to the other machine. That machine will now have access to your X display, including being able to run a keylogger. In general, don't use X forwarding unless you trust the other machine.
- ForwardX11 (
ssh -X) uses the X-server security extension to prevent untrusted machines from accessing parts of your X display that they should not. This is relatively safe, (but some older GUI applications will not work.) - ForwardX11Trusted (
ssh -Y) implicitly trusts the other machine. This is potentially unsafe. Remember: "A trusted machine is one that can break your security policy".
[5.2] VNC over SSH
vncserver to start a new X-session, or x11vnc too connect to an exisiting one.:- ssh into antarctica and run either
vncserver, orx11vnc -localhost -display :0as appropriate. [For more on vncserver, see below.] - Start the vnc viewer (tightvnc), using the -via option for an ssh tunnel:
vncviewer -via tux@antarctica localhost:DISPLAYNUM, where DISPLAYNUM is 0 for x11vnc, and is the number quoted to you by vncserver. - Exit the viewer. If using X11vnc, the server will exit, leaving the X-session running as before. If using vncserver, it will continue to run, until
closed with
vncserver -kill :DISPLAYNUM. - Note that, if ProxyCommand is configured, you can have multi-step
-via, useful if there is an intervening firewall as well as a firewall on the target machine.
[5.3] Xpra (screen for X)
- SSH into the server, and run the command:
xpra start :100 --start-child=xterm - From the local machine, run:
xpra attach ssh:serverhostname:100 --encoding=png - Xpra also starts a panel applet in the systray, which allows configuration and includes a nifty bandwidth monitor graph.
- Note that the default Encoding (H.264) is really a video codec. For text editors (eg kwrite), it's much more responsive to use one of the PNG encodings (or Raw RGB + Zlib).
[5.4] GUI Drag'n'Drop
Konqueror uses the fish:// ioslave to allow remote access via the GUI, and drag-and-drop. Just type this as the URL:
fish://tux@antarctica/home/tux/nest/. Note that there is no colon before the path (the syntax is web-like, rather than rsync-like).
sftp:// is similar, but not supported by all ssh servers.
[5.5] Port Forwarding over SSH (-L)
- Tux connects to ocean thus:
ssh -L 8888:antarctica:80 tux@oceanIn addition to the normal ssh connection, ssh opens a tunnel. The far end of the tunnel connects (from ocean) to antarctica on port 80. The near end is port 8888 on localhost (iceberg). - Tux can now browse the remote webserver by connecting to
http://localhost:8888/index.html. - We could run the command
ssh -C -f -L 8888:antarctica:80 tux@ocean sleep 20instead. This compresses the data (-C, and causes the connection to fork into the background, and disconnect if nothing subsequently happens for 20 seconds (-f .... sleep 20). - Use the
-g(GatewayPorts) option to make local port 8888 listen on other interfaces. By default, only local users on iceberg may use the tunnel.
[A real world example: obtaining secure access to Cambridge network from elsewhere, tunneled via the SRCF: we want to use the wwwcache.cam.ac.uk server for HTTP (because we don't necessarily trust the wireless
provider!), we want to send outgoing (SMTP) mail through ppsw.cam.ac.uk (because we are permitted to use this one), and we can just use POP as normal, via TLS.
First, set up the two ssh tunnels: ssh -L8080:wwwcache.cam.ac.uk:8080 -L 8025:ppsw.cam.ac.uk:25 USERNAME@www.srcf.ucam.org
Then, set the konqueror/firefox to use the web proxy: localhost:8080, set thunderbird to have this default outgoing mail server (SMTP): localhost:8025, and
just use POP (incoming mail) via secure connection: TLS (as normal, which doesn't require an extra encrypted tunnel).]
[5.6] Reverse Port Forwarding over SSH (-R)
- Polar bear makes an outbound ssh connection to antarctica thus:
ssh -C -R 8022:localhost:22 polar-bear@antarctica. Antarctica will now accept local connections to port 8022, and will tunnel those connections back to the ssh server on iceberg's port 22. - Tux can now connect to iceberg by doing:
ssh -p 8022 -o UserKnownHostsFile=/dev/null localhost. Then, for example, tux might run x11vnc in order to assist polar-bear. - In this example, the -C is for compression, and the "-o UserKnownHostsFile=/dev/null" is to stop ssh complaining about the key fingerprint not matching for localhost.
Note that, by default, the port 8022 opened on Antarctica will only accept local connections, from another user sitting at Antarctica. (To allow anyone to connect, from elsewhere, enable
GatewayPorts=yesinsshd_config.)
[A real world example, with the same usernames: tux@antarctica (which is publicly accessible), and polar-bear@iceberg (which can only make outgoing connections):
First, tux must create a temporary account on antarctica for polar-bear to log in. Then, polar-bear (sitting at iceberg) uses this to connect to antarctica, opening a 'reverse' tunnel: ssh -C -R 8022:localhost:22 antarctica
Then, tux (at antarctica) connects (via the tunnel) to iceberg: ssh -p 8022 polar-bear@localhost -o UseKnownHostsFile=/dev/null. At this point, he starts up x11vnc:
x11vnc -display :0 which runs on (iceberg's) port 5900.
Then, tux (at antarctica) creates a forwarded tunnel on port 5900 to iceberg's 5900: ssh -L 5900:localhost:5900 polar-bear@localhost -p 8022 -o UseKnownHostsFile=/dev/null
Tux can now start the vncviewer, to connect through this tunnel, and control iceberg:
vncviewer -encodings "copyrect tight" -compresslevel 7 -quality 6 -bgr233 localhost 5900
Notes: TCP tunneled within TCP is technically bad, but usually works ok. We specify vnc-encodings manually, since vncviewer doesn't know that 'localhost' isn't actually local. This is even easier
with ssh-keys.]
[5.7] Dynamic Port Forwarding: Web browsing with SOCKS
Normally, port forwarding only works for a specific server. But ssh -D sets up dynamic forwarding, using the SOCKS v5 protocol, which allows the ssh proxy to relay web-browsing. To do this:
- Configure Firefox to use a SOCKS v5 proxy. In the network preferences, choose "
Manual Proxy Configuration", then "SOCKS Host = localhost:1080" and "SOCKS v5" - Also ensure that Firefox sends DNS requests through the proxy: in
about:config, setnetwork.proxy.socks_remote_dns = true. - Finally, set up the ssh tunnel, with
-D. Theautosshprogram is useful: it can reconnect automatically when the tunnel is closed.
autossh -D 1080 -L 8025:localhost:25 antarctica. This gives him a shell on antarctica, proxies his firefox web browsing/DNS, and allows him to send outbound mail too! Who needs a VPN?
87] UDP over SSH
You can tunnel UDP packets over ssh, using netcat. Here is how.
[5.9] SSH or fish over SSH
#!/bin/bash
#SSH to antarctica via ocean.

#Outer tunnel. [Note that we compress here (-C) but that this is sufficient for all subsequent nested connections.]
if ssh -C -f -L 2222:antarctica:22 tux@ocean sleep 20; then
	#1)  SSH through the forwarded-tunnel.     [NB: avoid using .ssh/known_hosts for localhost, or it will cache the key under the wrong name]
 	#ssh -o UserKnownHostsFile=/dev/null -p 2222 tux@localhost
	#2)  OR, GUI drag and drop with konqueror,fish through the tunnel:
	konqueror fish://tux@localhost:2222
else
        echo "Error: cannot reach ocean" ; exit 1
fi
exit $?[5.10] SFTP (SSH File Transfer Protocol), with a Chroot
sftp application, or a GUI such as FireFTP. It works like normal FTP.However, that gives the sftp-user the same access as an ssh-user. Sometimes it's useful to have a much more restricted setting, allowing access only to a particular directory. Here's how.
- Based on this, enabling chrooted SFTP on a webserver.
- Create a dedicated sftp user. Let's call him "puffin". Then create a chroot within the home directory (this and everything above must be owned by root), and a files/ directory he can use:
useradd puffin

mkdir /home/puffin/chroot/files

chown -R root: /home/puffin/ ;  chown puffin: /home/puffin/chroot/files
- For safety, disable normal logins, by changing the shell to
nologin. This will politely decline an SSH request, even when sftp is disabled:
usermod -s /usr/sbin/nologin puffin
- We could consider just using SFTP only, without a chroot, but this would then grant read-access to the entire filesystem. If this is what you wanted:
usermod -s /usr/lib/openssh/sftp-server puffin #<-- careful!
- Otherwise, edit
/etc/ssh/sshd_config, comment out the lineSubsystem sftp /usr/lib/openssh/sftp-server, and add the following:Subsystem sftp internal-sftp Match User puffin ChrootDirectory /home/puffin/chroot AllowTCPForwarding no X11Forwarding no ForceCommand internal-sftp - Restart sshd (
service ssh restart) - Connect with an SFTP program, eg "sftp" or FireFTP. Open the URL:
sftp://puffin@antarctica/files.
[5.11] Executing complex remote commands
- Simple commands:
ssh antarctica 'cat herring.txt'will run the command 'cat herring.txt' on machine antarctica. The output will be redirected to STDOUT on iceberg, and the exit code $? will be the one from .cat'. - More complex commands need some escaping:
- Wrap the whole command in
"( )". The double quotes protect it (mostly) from the shell on iceberg; the brackets create a new subshell on antarctica which may contain things likeif,;,|,&&. ",`and\should always be escaped singly with another\.'is literal.$is escaped as\$if it is a variable on antarctica, but not escaped if it is to be evaluated on the iceberg before the remote command is run.- To have a literal metacharacter on antarctica, it must be triply-escaped. Eg
\n,>,[, become\\\n,\\\>,\\\[. - For example, rather than write a script on antarctica and then execute it remotely, tux might wish to have all the logic in a single shell script,
running on iceberg. This script tells tux whether he has enough herring in his freezer:
#!/bin/bash #Check (from iceberg) whether there are enough herring in the freezer on antarctica. This is slightly contrived, but note the escaping. ENOUGH=300 ssh tux@antarctica "( $HERRING_COUNT=\`cat herring_stock.txt\` ; if [ \"\$HERRING_COUNT\" -ge \"$ENOUGH\" ] ;then echo \"There are enough herring for the holiday.\" exit 0 else echo -e \"Not enough herring.\\\nTime to catch some fish.\" exit 1 fi )"[download]
- Wrap the whole command in
[5.12] SSHFS - the ssh filesystem
SSHFS allows users to mount a remote directory on a local mountpoint. The only requirement is that they have ssh access to the remote server. There are 2 implementations: sshfs and lufs, both based on the userspace filesystem FUSE. SSHFS is the more recently maintained version, and I have found it to be reliable. Note: sshfs does not work well at all over an unreliable link (e.g. slow Wi-Fi). It doesn't re-try fast enough after failures, resulting in minute-long timeouts!
[5.12.1] SSHFS
- Download from here
- Compile, and install both fuse and sshfs from source.
- (As root)
modprobe fuse. This creates creates /dev/fuse with permissions 666. - Then mount (as a normal user) the ssh filesystem as desired:
sshfs -r -o reconnect tux@antarctica:nest/ ~/mnt/nest. [The -r is for read-only, if desired; the reconnect is useful if the connection fails] - To unmount, do
fusermount -u ~/mnt/nest/ - If the ssh connection dies, the mountpoint will hang, and cannot be unmounted.
killall sshfswill fix it. - sshfs is most useful if you already have key-based authentication.
[5.12.2] LUFS
- Install with
urpmi lufs(only required on the client) - (As normal user),
lufsmount sshfs://tux@antarctica/home/tux/nest/ ~/mnt/nest -fmask=444 -dmask=555 - To unmount,
lufsumount ~/mnt/lufs - Note: if the ssh daemon on the remote end dies, or the network connection fails, this causes serious problems. The local mountpoint will become un-unmountable. A reboot is required to recover from this; furthermore, the machine will not finish shutting down on its own, and will require a reset.
- killall lufsd may help here: I haven't tried it.
[5.13] X2X - share a keyboard and mouse between different systems.
nest, sitting on the same table as a laptop, iceberg.
The laptop is placed with its screen to the right of the desktop's monitor, but its keyboard/mouse are inconvenient to reach. On the desktop machine, nest, run the command:
ssh -X iceberg "x2x -east -to :0.0". Now, you can move the mouse pointer off the right-hand edge of the desktop display, and onto the left-hand edge of the laptop display!
The keyboard will go to whichever window has focus. X2X is available via urpmi, or from here.
More details here.
[5.14] Misc
- Encrypting and decrypting files with SSH (RSA) keys: see here.
- Printing over the network:
cat herringreport.pdf | ssh antarctica lp - Copy clipboard from one machine to another: in ~/.bashrc,
function ccc(){ ssh antarctica "DISPLAY=:0 xclip -o" | xclip -i ; }then type "ccc" to pull the remote clipboard to the local machine. - Tunnelling SSH over HTTP (if behind restrictive firewalls): use corkscrew.
HashKnownHosts- this option in~/ssh/configmakes~/.ssh/known_hostshashed. It's a slight security gain, but makes bash-completion on hostnames less useful.AddressFamily inet- this option in~/ssh/configmakes SSH only use IPv4 to connect. It can be faster, especially if ip6 addresses exist but fail. To test, use the-4option, e.g.time ssh -4 antarctica exit.
Other Tweaks (NTP, Apache, Cron, Postfix, NFS, DVD)
[1] NTP configuration
NTP is the network time protocol, which can synchronise the computer clock to within 10ms of UTC. A more detailed explanation of how NTP works is here.
To configure it, run drakclock and ensure that "enable ntp" is checked. Then, pick a timeserver: ideally, use your own ISP's time server;
otherwise, here is how to use pool.ntp.org. It is also a good idea
to keep the computer's hardware clock permanently on GMT, rather than setting the hwclock back/forward for winter/summer. To test it, allow ntpd a minute or two
to synchronise after restarting, then run ntpstat or ntpq -p.
The system service is ntpd and it is configured in /etc/ntp.conf. See also man ntpd and man hwclock.
Alternatives to ntp include chrony, or htpdate.
[2] Apache setup
The Apache webserver (now with 2/3 market-share!) is very sophisticated, but by default, it "just works". Files placed in
/var/www/html will be served up to the world (firewall permitting). Mandriva splits apache into lots of modules, which may be installed in combinations as desired, for example:
apache-mod_php and apache-mod_userdir.
- Support for user's home directories (
http://localhost/~username), is no longer on by default. To enable it, installapache-mod_userdir. Then, ensure the user has a directory:~/public_htmland that their files within it are readable by apache, and that directories above it may be traversed by apache (i.e. the directories are executable). - .htaccess files are now ignored!!. Directories protected by
.htaccesswill no longer be secure. To re-enable this, do: TODO: FIXME: WHAT?
If using PHP, remember to ensure that register_globals is OFF, and that magic_quotes are ON.
[3] Mail forwarding and Postfix
This explains the setup of postfix, to send email from the local system via the Internet service provider's SMTP server. The result is that mail from daemons, cron-jobs, and apache/php will be delivered to your normal inbox. It does not cover setting postfix to handle incoming mail - just use thunderbird with a pop server, nor does it cover using spamassasin (to identify spam) nor procmail (advanced email processing). [A simpler alternative (aimed primarily at delivering mail from Cron) is sSMTP.]
[3.1] Basic setup required:
- Install postfix:
urpmi postfix. Make sure the postfix service runs by default (chkconfig --list postfix) - Normally, postfix will attempt to directly contact the recipient's mail server. However, some ISPs block port 25, to prevent this (as a spam-mitigation measure for compromised Windows machines).
If the ISP requires that outgoing email (SMTP) is routed via their servers, use a relay-host. Add/edit this line to/etc/postfix/main.cf:relayhost = smtp.example.com #Your ISP's SMTP server. [Frequently this is authenticated by knowing that your IP address belongs to the ISP..] - If the relayhost requires username/password authentication, first
urpmi libsasl2-plug-login libsasl2-plug-plain, then add these lines to/etc/postfix/main.cf:and create a password maps file (owned by root, and with mode 600):smtp_sasl_auth_enable = yes smtp_sasl_password_maps = hash:/etc/postfix/sasl_passwd smtp_sasl_security_options =/etc/postfix/sasl_passwd:smtp.example.com username:password #Where smtp.example.com is the relayhost in main.cf - Define the default email addresses for mail sent from local users. Add this line to
/etc/postfix/main.cf:and then create the file:sender_canonical_maps = hash:/etc/postfix/canonical #Mapping from local username to email address./etc/postfix/canonicalcontaining:rjn richard@example.com #email from local user 'rjn' will have the sent-from address richard@example.com root richard2@example.com - Where should local mail (from one user/daemon to another local user) be delivered? If you want it to remain on the local system, just access it directly, with
pine. Alternatively, it can be forwarded to another address, defined in that user's~/.forwardfile. This file contains a single line, with the destination email address. It must have permissions 600 (and your home directory must only be writeable by you). E.g.:forward_my_mail_to_this_address@example.com #Incoming or local mail to this user will be forwarded. - Root's mail is forwarded differently: edit
/etc/aliasesand change :# Person who should get root's mail. This alias must exist. # CHANGE THIS LINE to an account of a HUMAN root: rjn - For security, ensure that Postfix only listens to localhost (unless you need to do otherwise). In
/etc/postfix/main.cfset :inet_interfaces = loopback-only #Only deliver mail sent on localhost (don't accidentally be an open relay!) - For outbound encryption, we can set up opportunistic TLS. When Postfix acts as an SMTP client (connecting to other servers) and the other server supports it, we can encrypt the message. This setting falls-back to plaintext
if the server can't do TLS. [Inbound mail encryption is somewhat harder, requiring some SSL certificates. See here]. A useful test for encrypted TLS is provided by
checkTLS.
smtp_tls_security_level = may #Encrypt outbound, iff possible. - Make sure that the security administrator for
msecis defined (withindraksec). This user gets the output from the nightly security checks. - Restart postfix and check that email is sent:
mail rjn@example.com(finish with Ctrl-D, or a single '.' on a line by itself). Or:echo "hello world" | mail -s "hello" rjn@example.com - To have the server notify on reboot, add this to your crontab:
@reboot echo "Rebooted: were you expecting this?" | mail -s "[servername] rebooted" rjn-servername@example.com
[3.2] Advanced setup: SMTP forwarding for a NAT'd subnet
- Configure postfix to listen on the internal interface, and accept mail for forwarding from the relevant machines on the subnet. Edit
/etc/postfix/main.cf:inet_interfaces = localhost, 192.168.0.1 #which network interfaces to listen on. mynetworks_style = host #Ignored, since mynetworks is present. mynetworks = 127.0.0.1, 192.168.0.0/16 #which IP addresses to accept mail from. - Make sure shorewall allows connections to port 25 from within the subnet: edit
/etc/shorewall/rulesand add:#Internal network may access postfix ACCEPT masq fw tcp 25 -
[3.3] Some email debugging tips.
- If postfix fails to start, run
postfix check. Remember to restart (or reload) postfix to apply changes. - Errors will be logged to
var/log/mail/errors. - To test sending mail, use the
mailcommand e.g.echo "hello" | mail -s test recipient@domailor interactively (Ctrl-D ends the text input), and look atvar/log/mail/info. - To read local mail (which should probably be forwarded to your normal email account), just use
mail("q" to quit). - To send email from the command-line with attachments, use
mailxormutt(more). - To check the queue status, use
postqueue -pand to try to flush it, usepostqueue -f. - To debug SMTP, try telnetting to the smtp server. Instructions are here. Simple version:
telnet smtp.example.com 25 HELO hostname.mydomain.com MAIL FROM:<sender@example.com> RCPT TO:<sender@example.com> DATA <the message, terminated by a single dot on its own line.> . - To debug POP, try telnetting to the pop3 server. Instructions are here. Simple version:
telnet pop3.example.com 110 USER username +OK now send password PASS password +OK Mailbox open, 5 messages QUIT - Postfix's configuration is documented here.
- Mandriva's postfix start script runs
postmapandpostaliasautomatically. Not all distros do this. (Egpostmap /etc/postfix/canonical; postmap /etc/postfix/sasl_passwd);
[4] Cron Jobs
- Cron, (the crond service) is a periodic job scheduler. It does:
- System housekeeping every night (
updatedb,msec,rpm -Va) These run at 4am, and take about 30 minutes. - Anything the user scehdules, eg nightly backups.
- System housekeeping every night (
- To configure jobs, use
crontab -e; see alsoman cronandman 5 crontab. - For one-offs, use
at, andatdinstead. - If the machine isn't always on, use the
anacronservice to run skipped cron-jobs shortly after the machine has booted. - Note: Msec's messages (from cron jobs) go to the user specified in
draksec.
[5] NFS (Network FileSystem)
NFS is the Network File System. It is designed to allow remote mounting of a share on a fileserver. NFS is capable of many things, including encrypted connections, access-control and read-write file-locking, for which, see the howto. Alternatives are Samba (designed for Windows), and SSHFS (in userspace, via FUSE), but NFS is in kernel-space, and therefore has much higher performance. Here is how to set up a basic read-only, world-accessible NFS share, useful for example, as a central "jukebox" repository for music within a house.
- On the SERVER, install and enable the following services:
portmap,nfs-common,nfs-server - Consider that we want to export the directory /home/public/music. Place the following entry into
/etc/exports:This exports the directory /home/public/music to all hosts, i.e. '*', read-only, and 'squashes' file-ownerships. See also/home/public/music *(all_squash,anonuid=65534,anongid=65534,sync,insecure,subtree_check,ro)man exports. You can also use thedraknfsGUI. - NFS has multiple daemons, which dos not always run on a pre-defined port, and it is necessary to 'pin' the server's NFS daemon to a known port, if we also want to make it firewall-able. This howto explains what to do; here is a summary, suitably modified for Mandrake rather than Fedora....
- Force statd to run on port 4001, and lockd to 4002. (There's nothing very special about these port numbers, except that they are unused in /etc/services. Edit
/etc/sysconfig/nfs-commonand set:STATD_OPTIONS="--port 4001" LOCKD_TCPPORT=4002 LOCKD_UDPPORT=4002 - Force mountd to run on port 4003. Edit
/etc/sysconfig/nfs-serverand set:RPCMOUNTD_OPTIONS="--port 4003" - Pin rquotad to 4004, if used, by adding this to
/etc/services:rquotad 4004/tcp # rpc.rquotad tcp port rquotad 4004/udp # rpc.rquotad udp port - [The portmapper service always runs on port 111, and the nfsd service always runs on 2049, so we needn't change this.]
- Restart the portmap, nfs-common, and nfs-server services. Check they are permanently enabled with
chkconfig. - Now, we have well-defined ports for NFS, we can enable the firewall. Make sure the firewall permits both TCP and UDP access to the following ports:
111, 2049, 4001, 4002, 4003, 4004. (4004 itself may not be required, if you don't use rquotad.). In
/etc/shorewall/rules, add:ACCEPT net fw udp 111,2049,4001:4004 - ACCEPT net fw tcp 111,2049,4001:4004 - - The following diagnostic tools are useful:
showmount- show what remote clients have currently mounted which directories.rpcinfo -p- list the ports currently used by the various RPC (remote-procedure-call) daemons.exportfs- show what directories are currently available to be exported.exportfs -fa- tell the NFS daemon that /etc/exports has been modified, without needing to restart it.
- On the CLIENT, everything is much easier. If you want to have locking of files, then you need to install and run the
portmapservice, but it is not necessary; the alternative is to mount with-o nolock. For a read-only mount, that is perfectly sufficient. Thus, you can mount the share directly with:Or you can add this tomount -t nfs -o nolock,soft servername:/home/public/music /mnt/music/etc/fstab:There is also a GUI for this,servername:/home/public/music /mnt/music nfs nolock,soft,user,noauto 0 0diskdrake -nfs. - The mount options are explained in detail in
man (5) nfs. The important things are that nolock is useful for read-only mounts; that soft is important if you want the client to be "interruptible" in case of network errors (otherwise, if the server goes down, the client application cannot be terminated, even with kill -9); and that servername can be a hostname or IP address, (but must be an IP address if the mount happens early in the boot process, before the system has working DNS)
[6] DVD playback (and creation)
- A DVD of the correct region to match the drive. Actually, in most cases, Linux ignores the region-coding on the disc. However, if the region of the drive has never been initialised, it may refuse to play. So, set the region using regionset.
- To play most commercial DVDs, it is necessary to break the CSS encryption.
Install
libdvdcss2from the PLF. At least some of these packages are also required:libdvdread3, libdvdread-utils, libdvdnav4, libdvdcontrol9, vlc-plugin-dvdnav. - Then, to play the DVD, use either VLC, mplayer, xine, or ogle. (plf versions). You can even back it up with
mencoder.
- Tools: kino, cinelerra, mplayer, transcode, mplex, spumux, dvdauthor, growisofs, xine, gimp. Usually worth downloading/compiling latest versions.
- Capture from firewire mini-DV camera with kino, edit with cinelerra: tutorial.
- Note: cinelerra really works better if you have 2 drives: source footage on one, background-rendered output on the other.
- Create final .mov, then check with mplayer.
- To avoid "mice teeth", I recommend de-interlacing the final file before making the DVD.
- Conversion to mpeg, burning to DVD, DVD-menus: see here (very detailed).
My 'incantation' was:
transcode -i finalversion.mov -V -x mplayer,mplayer -y mpeg -F d -Z 720x576 --export_fps 25 --export_asr 2 -E 48000 -b 224 -J smartdeinter -o outputmpeg, which results inoutputmpeg.m2v(the video; play with mplayer) andoutputmpeg.m2a(the sound; play with mpg123). Then, mplex the files:mplex -f 8 -S 0 -o movie.mpg movie.m2v movie.mpa. dvdauthorhandles converting to the max 1GB filesize on DVD without a problem, even if the .mpgs exceed this. In total, a standard, single-sided "4.7GB" DVD can take 4.3 GB of video (a little over an hour); discrepancy is 230vs. 109.- DVD cover: use xfig, then export to pdf.
- See also: tutorial, discussion, Linux-Journal.
- Use DVD-R (rather than DVD+R) for greatest compatibility.
Useful Applications
In case of dataloss (example: heavy-handed use of the delete key!), TestDisk and PhotoRec are extremely useful. TestDisk allows undeletion of files; PhotoRec allows lower-level recovery (even after a format, but without the names).
In case of faulty media (usually dying hard drives), DD-Rescue is excellent. There are 2 similarly named tools, with the same purpose but different authors: GNU ddrescue and dd_rescue.
Wine (MS Windows Applications)
- Run a Linux-native application. Many applications exist under Linux anyway. Some are cross-platform (eg Firefox, OpenOffice), and many are Linux-native. Often, the Linux-native applications are better than their non-Free Windows equivalents.
- Use Wine. Wine is a Free implementation of the Win32 API [Wine Is Not an Emulator!], now at version 0.9.11 and works very well.
It is available for download from WineHQ.com, or in a supported commercial version from Codeweavers.
WineTools is sometimes a helpful addition, but is increasingly no-longer necessary. Winehq provide Mandriva
RPMs which are more recent, and work better than the official ones. Office97,Photoshop,and even InternetExplorer work well. [OK, even on Windows, Internet Explorer
can't really be said to work "well", but Wine allows us to check web design for bug-compatibility. :-)] Generally, older or simpler Windows binaries are more likely to
work perfectly. Usually, hardware drivers won't work, but I did have success with a serial-port PIC Programmer.
If you just need to read MS document files (and OpenOffice can't cope), you can download the free (beer) MS Office viewer or Lotus KeyView. - If you still have access to an obsolete Windows box, put VNC on it. Then leave the Windows box on the network, (suitably NAT'ed please!), run vncserver on it, and view the application on your local display. To maximise server performance, disable all animations, disable show content in moving/resizing windows, and set a plain colour for wallpaper; maximise viewer performance by optimising -encoding. We run MarketEye this way (on an old 770Z PII,300, Win98). Advantage: VNC is free, and works brilliantly. Disadvantage: you need an old Windows machine.
- If you have access to a Windows install disk, or an image of the old hard disk, you can emulate it with
QEMU. QEMU is brilliant! It will run any (x86) operating system from within any other; it is free, and it is
fast. [Performance is about 5x slower than real life]. You can also try other Operating Systems, eg the latest Knoppix direct from the disk image. Either create
a new disk image, boot it in QEMU and install Windows, or (with luck) you may be able to boot a pre-existing image. There is also
KQEMU which uses a kernel module to accelerate to near native (about 1/2) speeds.
KQEMU is now GPLd (it used to be only free-as-in-beer). QEMU will not (yet) allow you to run hardware devices such as (most) USB or sound input, although you have access to sound
output, network, video, disks.
Note QEMU disk images are sparse files. (A guest OS may have a mainly empty 10GB virtual disk, which takes only 200MB on the host). To copy these, you must usecp -aorrsync -aSto do it, or you will loose the efficient packing! - Another (GPL) option is virtualbox. [I haven't tried this yet.]
- VMWARE is the commercial equivalent of QEMU. It is essentially the same, and although expensive, it works well. [There is also now a free VMWare player, but someone else would have to create the VMWare image.] Sound input works, and they say that USB devices can be made to work with Windows drivers. We run Dragon Naturally Speaking this way.
- ReactOS is very promising alternative to Windows, especially if combined with QEMU. However, it isn't quite ready yet.
Stopping it "rattling"
find / -mmin -2 -print | grep -v proc- The worst is mailman, so remove it with
urpme mailman. - Uninstall process accounting - it's rather pointless on a single-owner laptop! It also causes disk writes every 15 seconds. Remove with:
urpme psacct. - Shorewall should not write out the logfile to disk to often. Edit
/etc/shorewall/shorewall.confto have:LOGRATE=1/hour LOGBURST=5 - Check for (and remove) spurious cron jobs. [By default, a whole lot of security checks run at 4:00 am, and take about 30 minutes of constant activity. If the machine isn't always on, anacron will also run these shortly after the machine has booted.] Some of these aren't absolutely necessary. However, updatedb is really useful.
- sshd-restarter runs every 5 minutes by default. Change this to every 30 minutes in /etc/cron.d/sshd-monitor.
- Stop CUPS regenerating its certificate every 5 minutes: once every 2 hours will do! Change
/etc/cups/cupsd.confto haveRootCertDuration 7200 - Mozilla should not check for new messages more than about once per 5 minutes, since this also causes disk activity.
Shell Scripts and Files
TODO: FIXME
Advanced uses of Urpmi (and RPM)
Urpmi is Mandriva's package manager. It is "User-RPM", and is intended to make some RPM tasks more friendly. (It is similar in functionality to Debian's apt.)
[1] Introduction to RPM/ and Urpmi
- Adding and removing package repositories:
urpmi.addmediaandurpmi.removemedia. See above. - To install a package:
urpmi PACKAGENAME, egurpmi mplayer. Urpmi will automatically resolve dependencies, and fetch the package from the repository. If you already have the package downloaded, use ./ egurpmi ./mplayer-1.0-1.pre7.20060plf.i586.rpm. Or, you can userpm -i mplayer-1.0-1.pre7.20060plf.i586.rpm. Multiple packages may be installed in one command. You can tab-complete on packagenames. - To uninstall a package:
urpme PACKAGENAME, egurpme mplayer. Or, userpm -e mplayer-1.0-1.pre7.20060plf. Note that, the packagename does not include the .i586.rpm which is appended to the filename. RPM is unnecessarily fussy about this! - GUI equivalents for urpmi/urpme are
rpmdrakeandrpmdrake-remove. - To find out what package contains a certain file:
urpmf FILENAMEegurpmf libogg.so.0. - To find the description of a package:
urpmf --description PACKAGENAMEegurpmf --description mplayer. Or,rpm -qi mplayer. - To find out whether a package is installed:
urpmq PACKAGENAMEorrpm -q PACKAGENAMEorrpm -qa | grep PACKAGENAME - To apply package updates: Update the package list from the mirror, then select the updates. The easiest way is this, which downloads all the packages
first, and only then prompts you fwhether to go ahead:
urpmi.update -a; urpmi --auto-select --force -- test; urpmi --auto-select. Note that, with the 2006-Official distribution (as opposed to 2006-Community), the first part isurpmi.update updates. The kernel is a special case, and must be dealt with manually. To update the entire distribution, see below. - To verify installed packages: use
rpm -Va(see below.) - To install self-compiled packages, use checkinstall. This is important, since it means that you don't bypass the RPM package database.
As a result, you can prevent collsions, and can easily uninstall again. So, instead of the usual
./configure && make && make install./configure && make && checkinstall; this generates an rpm, which you can install as usual. - To list unnneeded libraries:
urpmi_rpm-find-leaves. This prints a list of all packages which are currently installed, but on which no other package depends. These packages are "leaves" on the rpm "tree", and their removal will not break anything else. Many of these packages will be the applications (eg Firefox) which you actually want, however, old libraries, which nothing uses, can be removed in this way. Alternatively, userpmdrake-removeand select "Leaves only". - To prevent a package from being selected for automatic upgrade: add it to
/etc/urpmi/skip.list. - To downgrade a package to an earlier version: remove the newest version (without removing its dependencies!)
rpm -e --nodeps NEWPACKAGE; then manually download the older version from the mirror (withlftp), then install it from the downloaded rpmurpmi ./OLDPACKAGE.rpm, then add PACKAGENAME to/etc/urpmi/skip.list, so that it is not automatically upgraded again! Check that the system is self-consistent again withrpm -Va. - Various RPM queries: to list the files in an RPM, use
rpm -ql package.rpm(or useless package.rpm). To list the requirements of an RPM, userpm -ql package.rpm. To list all installed packages, sorted by size:rpm -qa --qf '%{SIZE} %{NAME}\n' | sort -nr - Source RPMS. A
.src.rpmis NOT a normal package, but a bundle of the program source, some patches, and a specfile. If you install (rpm -i) a .src.rpm, it will unpack the tarball+specfile onto your system; to uninstall, just userm -rf. To rebuild an rpm in such a way that it can be installed on your system, dorpm --rebuild bar-2.2.2.mdk.i586.src.rpm - Building RPMS: an excellent introduction is here.
- Troubleshooting: see below if urpmi complains of an invalid package, or if rpm hangs.
- For further information on rpm, see www.rpm.org.
[2] How to upgrade the Distribution
[2.1] Introduction
It is possible to directly upgrade from one version of Mandrake to the next. You can use the installer on the CD, or can do so directly by using urpmi. This process works very well, although you will occasionally have to fix breakages. The easiest way is to log in via ssh from another computer (so you can have multiple tabs in konsole, cut/paste, and web access).
This should be safe, but back up your data! For ultimate safety, copy the entire filesystem onto a different partition, and have Knoppix handy. Then, boot into the copy, and modify that. (see below.) Important: keep a note of any warnings, and which, if any packages are removed. Also, check for sufficient disk capacity, especially in /var.
WARNING: PostgreSQL databases will be lost - or become unusable. Make sure you back them up (pg_dump) first!
[2.2] Performing the upgrade
- Log in as root, go to runlevel 3.
init 3. It may be easier to do this from another computer, via ssh. - Save the list of currently installed packages, just in case.
rpm -qa > oldpackages.txt - Remove anything from
/etc/urpmi/skip.listif you put it there. Think why it was there. Otherwise, the upgrade won't complete. - Remove the old urpmi media:
urpmi.removemedia -a. [You may want to back up /etc/urpmi.cfg first.] - Add the new urpmi sources. [Decide: community, or official. Add main; contrib; updates (if appropriate); plf (if desired)].
- Upgrade urpmi itself:
urpmi --test urpmi[test whether urpmi's upgrade works.]urpmi urpmi[do the upgrade - if you get no errors in previous step.]
- Upgrade the distribution and packages:
urpmi --auto-select --test 2>&1 | tee urpmi.log[test whether the upgrade of the distro will work.]urpmi --auto-select 2>&1 | tee urpmi.log2[do the upgrade - if you get no errors in previous step.]
- Look for, and remove obsolete libraries.
urpmi_rpm-find-leaveswill print a list of all packages which are not depended-on by any other package. These are either:- Very important packages which we explicitly want. (Eg apache)
- Independent packages with no interrelation to others (eg nc)
- Obsolete libraries which have not been removed.
urpmi_rpm-find-leaves | grep -E '^lib' | xargs urpme. - Upgrade the kernel:
urpmi kernel[upgrade the kernel: you will get a choice; pick the one you like. (uname -aprints the currently running kernel.) Note that the kernel is not upgraded automatically by urpmi.]- Edit
/etc/lilo.confto make the new kernel the default, and then run/sbin/lilo. - Reboot into the new kernel. Watch the log messages on the console.
[2.3] Fixing and re-configuring the new system if needed
- Are there any kernel-issues? This is especially relevant if migrating from kernel 2.4 to 2.6. For example, udev replaces devfsd, and
Serial-ATA disks become /dev/sdX rather than /dev/hdX. Have any of the kernel modules changed? If so, we may need to
edit
/etc/modules.confand/etc/modprobe.preload. - Look at the system's error messages:
dmesg,/var/log/boot.log,/var/log/messagesand/var/log/kernel/* updatedb; locate .rpmsave .rpmnew[re-build the locate database, then locate all the changed configuration files.] There are 3 possibilities for package foobar, configured with /etc/foobar.config:- If a package's configuration file was never modified by the user, then the new package will be installed over it. Otherwise, depending on the package:
- The old config-file will be kept (as /etc/foobar.config), and the new one saved as /etc/foobar.config.rpmnew
- The new default config-file will be used (it becomes /etc/foobar.config), and the old one will be backed up as /etc/foobar.config.rpmsave
difforetc-updatewill help here.)- Read the Release Notes (2006) and Errata (2006) again - check for gotchas.
- Check the configuration files of important packages, especially apache and sshd.
- Are there any new or obsolete system services which should/shouldn't be running? Use
chkconfig --list(ormcc). - Look for newer packages which may have bcome available and which you might like to install. (
rpmdrakeis most useful.) - Remove any old, unwanted kernels with
urpme. (Don't do this until you are happy with the new one!) - Upgrade any non-distribution packages if desired/necessary.
- Non-free: java, shockwave-flash (maybe acroread, realplayer ...)
- Binary drivers (ugh!) eg the nvidia 3D driver.
- Custom-compiled packages built from source. (remember, use
checkinstallinstead ofmake install.)
- Recompile anything which depends on the kernel source. eg: ltmodem, kqemu, vmware, nvidia-driver.
- Re-add packages to
/etc/urpmi/skip.listas necessary. [Saving the kernel-source package is a good idea.] - Fix any other breakage! There shouldn't be any, but keep an eye out!
[2.4] Explanations and troubleshooting
- You have used "rpm --force" at some point to install packages.
- You have installed rpms from an untrusted origin.
- You have installed rpms not specific for Mandrake.
- You have installed from source with "
./configure && make && make install" (which bypasses the RPM database) as opposed to using instead of using "./configure && make && checkinstall" (which RPM is aware of).
- It downloads all needed rpm-packages.
- It tests the installation and provides quite clear error messages.
- It does not delete downloaded rpm-packages. (Note: this does mean that you need plenty of space in /var; if necessary, temporarily replace
/var/cache/urpmi/rpms/by a symlink to a directory with a few GB of space.) - It does not change your current programs.
- When happy and you do not use "--test", as all the packages are already downloaded, your upgrade takes less time.
If you get a message like "Package foobar cannot be installed because it conflicts with file /usr/lib/foo-bar-0.1.2.so.3", remove the package with the offending
file. To discover which contains offending file, use rpm -qf /usr/lib/foo-bar-0.1.2.so.3 and remove the package with urpme offendingpackage.
After completing the upgrade, install a new version of the package (urpmi offendingpackage) if needed.
- Use
teeand log files so that you have a convenient record of what you did! - Urpmi caches downloaded files in
/var/cache/urpi/rpms. So you can install RPMS directly from there. - You can use --force with urpmi: this means "Answer yes to all questions". This can be dangerous, but if you have already used --test, and been happy, it may save time. [Note: urpmi's "--force" is much less potentially hazardous than rpm's "--force". ]
[2.5] Cloning the distribution
/ (hda1), /spare (hda6), /swap (hda5), /home (hda7) and we wish to clone / onto /spare.
This is easily adaptable:- Have a destination partition (or partitions) ready.
fdiskandmkfs.reiserfsiff necessary. - Bring the source system into runlevel 1:
init 1. Start networking if required. - The directories in
/are:bin/ boot/ dev/ etc/ home/ initrd/ lib/ mnt/ opt/ proc/ root/ sbin/ share/ spare/ sys/ tmp/ usr/ var/ - On the target, these directories should be created empty:
cd /spare; mkdir home mnt sys proc tmp - Copy these directories across:
cp -a /bin /boot /dev /etc /initrd /lib /opt /root /sbin /usr /var /spare. (Or, usersync -avz -e ssh). - Recreate the mountpoints in
/spare/mnt. - Fix
/spare/etc/fstaband/spare/etc/lilo.confto reflect the new partition arrangement. - Also edit
/etc/lilo.confto add the kernel in the new root, and runlilo. - Reboot. In case you need to fix your bootsector, use Knoppix: see below. (This step is required if the destination is a different hard disk.)
[3] How to verify the system with RPM
- Verify all the packages, using
rpm -Va. In particular, look for "missing","5", and "Unsatisfied":rpm -Va | grep -Ei 'missing|5|unsatisfied'. - Note, some errors are usual, eg a modified config file, or permissions which have been changed by
msec. - If a file is definitely damaged, find out which package it is in:
urpmf FILENAME - Repair the file by forcibly uninstalling its package, then re-install:
rpm -e --nodeps PACKAGENAME; urpmi PACKAGENAME.
[4] Troubleshooting
rpm or urpmi break (the symptom is that they just sit there doing nothing), this is probably because of a stale rpm lock file.
This can be caused if rpm is somehow killed while running (eg by power failure, or a kill -9). These lock files usually serve to prevent more than one instance of rpm accessing the
same database simultaneously, and are deleted after the rpm process terminates normally. This is what to do: - Check rpm isn't currently running (use
ps aux | grep rpm) - Remove stale lock files by doing
rm -f /var/lib/rpm/__db*as root. - Rebuild the RPM database using
rpm --rebuilddb
It is also a good idea to delete partially downloaded/corrupt files from /var/cache/urpmi/rpms/ if urpmi complains that they are invalid.
Also, make sure not to run out of space on /var! A 1GB /var partition will cause problems with urpmi --auto-select --test,
especially if there is also a have Postgres database in /var/lib/pgsql. The solution is to temporarily replace /var/cache/urpmi/rpms by a symlink
to a directory elsewhere (eg /home) which has more space.
Mandriva Kernels (intro)
- Mandriva kernels usually include support for all hardware, and are compiled with almost everything as modules. This means that practically every device will be supported, but then in-memory portion of the kernel is not bloated. I have never yet found it necessary to compile a kernel!
- Mandriva kernels usually have quite a few patches applied (often backports from development kernels). However, the kernel-linus package
is available if you want an unpatched one. The kernels come with various options. For example:
- kernel-2.4.28.0.rc1.5mdk - kernel 2.4 (default)
- kernel-2.6.12.14mdk - kernel 2.6 (default)
- kernel-i586-up-1GB-2.6.12.14mdk - kernel 2.6 compiled for i586 (Pentium 1 only) with uniprocessor and support for upto 1GB RAM
- kernel-i686-up-4GB-2.6.12.14mdk - kernel 2.6 optimised for i686 (Pentium 2,3,4) with uniprocessor and support for upto 4GB RAM. Use this on the A22p.
- kernel-smp-2.6.12.14mdk - kernel 2.6 for SMP (multiprocessor). Most High-end Pentium 4s are dual-core, which counts as SMP.
- kernel-linus-i686-up-4GB-2.6.15.rc7.4mdk-1-1mdk - Unpatched copy of Linus's kernel tree.
- kernel-source-2.6 - kernel source for the most recent 2.6 kernel.
- kernel-source-stripped-2.6 - stripped kernel source. You can compile against this, but cannot read the source code.
- To update the kernel, first install the kernel that is desired with urpmi. The new kernel will automatically be added into lilo.conf. Then, if desired, edit lilo.conf and set the "default" field to that kernel. Then run /sbin/lilo to write the boot sector. Easy.
- After updating the kernel, it is necessary to recompile/reinstall any binary drivers or custom kernel modules. Eg ltmodem, kqemu, vmware, nvidia
- A gotcha: urpmi will install multiple versions of the kernel without difficulty. However, it will only install one version of the
kernel source. Urpmi --auto-select will update the kernel source, but not the kernel. So, if you regularly update packages with urpmi, you can end up
with a kernel source package which does not match your currently running kernel. This means that, should you need to compile extra modules, you cannot do so.
Solution: either upgrade the kernel, or downgrade the kernel-source, or compile extra modules sooner! It is worth adding
kernel-sourceto/etc/urpmi/skip.listin order to stop urpmi doing this automatically!
- modprobe - insert/remove modules and dependencies. Eg
modprobe pcspkr;modprobe -r pcspkr - lsmod - list currently loaded modules.
- modinfo MODULENAMEM - get information about a module and its parameters.
- dmesg - view kernel messages.
- uname -a - print name of currently running kernel
- Look at the contents of /proc - the kernel's status information. Eg
/proc/cmdline - Look at the contents of /var/log/kernel/* - kernel information and errors.
Upgrade to Kernel 2.6.16 (Kernel Compilation)
[1] Upgrading the kernel
There are 2 compelling reasons to upgrade the kernel from 2.6.12 (as shipped) to 2.6.14 or greater. The trackpoint sensitivity patch is in the official tree, as of 2.6.14, and there is also the improved disk scheduler, which means that interactive processes get priority for disk access. [Also, if desired, s2ram requires 2.6.17] We can do this in 2 ways.
[1.1] Upgrading the kernel to cooker kernel 2.6.14-0
Normally, it is a very bad idea to mix packages from cooker and a stable release. However, the kernel package is essentially independent, and in this case, it
is ok. Look on the cooker mirrors (in /devel/cooker/i586/media) to find a suitable kernel. I downloaded kernel-multimedia-2.6.14-0.mm.5mdk-1-1mdk.i586.rpm
and kernel-multimedia-source-2.6.14-0.mm.5mdk.i586.rpm from contrib. N.B. Save the RPMS, since once they are superseded, they will be gone from
the mirrors. Install with urpmi, edit lilo.conf to make it the default, run /sbin/lilo and reboot. Re-compile the Modem driver.
psmouse to be in modprobe.preload (it is added by the rpm install script). A consequence is
that udev rules cannot include DRIVER="psmouse". I can find no documentation for this, but experimentally, I found the following for
/etc/udev/rules.d/10-local.rules. Even more weirdly, 2 reboots are required for the changes to occur.
#We are trying to create a symlink /dev/input/trackpoint -> /dev/input/mouseX

#This works with the normal mdk kernels, but NOT if psmouse is in modprobe.preload
#BUS=="serio", kernel=="mouse*", SYSFS{description}=="i8042 Aux Port", DRIVER=="psmouse" NAME="input/%k", SYMLINK="input/trackpoint"

#Works with the multimedia kernel, which has psmouse in modprobe.preload.
BUS=="serio", kernel=="mouse*", SYSFS{description}=="i8042 Aux Port", NAME="input/%k", SYMLINK="input/trackpoint"
BUT...this kernel is not very stable: 3 simultaneous scp processes can panic it. For a more recent one, you have to compile it...read on.
[1.2] Compiling the latest kernel (much easier than I thought!)
- Save the results of
lsmod(and maybe lspci -vvv) somewhere. This tells you which modules you need! - Download the newest kernel from www.kernel.org/. Get the full version, not the patch. I downloaded 2.6.16.20.
- See This FAQ on compiling.
- Untar, or unzip the source.
- Configure the kernel with
make xconfig. I changed these values from the defaults:- Processor type and features -> Build arch: PentiumIII. Timer= 1000Hz
- Do enable /proc/acpi/sleep (deprecated in favour of /sys/power/state)
- The kernel configuration is saved in
.config. Note that we loose Mandriva's bootsplash patch. make. Wait a few hours. Then, as root, install the kernel:make modules_install- Install the kernel modules into /lib/modules/kernel-2.6.16.20/cp arch/i386/boot/bzImage /boot/vmlinuz-2.6.16.20- Install the kernel itself.cp System.map /boot/System.map-2.6.16.20mv linux-2.6.16.20 /usr/src ; chown -R root:root /usr/src/linux-2.6.16.20/- move the source into /usr/src/, so other modules can be built against it.cd /lib/modules/2.6.16.20/ ; rm build source ; ln -s /usr/src/linux-2.6.16.20/ build ; ln -s /usr/src/linux-2.6.16.20/ source- correct the build and source symlinks.
- Mandriva uses an initrd, so we need to create one:
mkinitrd /boot/initrd-2.6.16.20.img 2.6.16.20 - Edit
/etc/lilo.confand copy one of the existing stanzas. Here is mine:image=/boot/vmlinuz-2.6.16.20 label="2.6.16.20" root=/dev/hda5 initrd=/boot/initrd-2.6.16.20.img append="inotify resume=/dev/hda6 splash=verbose panic=60" vga=794 read-only - If desired, change the default="" line at the top to match the new label="" line.
- Then, run
/sbin/liloand reboot. Check everything works. - If you forgot a module, re-run
make xconfig, make; make modules_install. If just adding a module, the compile will be very quick, and you shouldn't need to reboot. If you change a built-in driver, you need to rerunmkinitrdandlilo, then reboot.
With the new kernel, it's necessary to recompile any necessary drivers. These are either the non-free drivers (eg ltmodem, kqemu, vmware, nvidia-driver), or
the development ones which aren't yet in the official kernel (eg rt2500). If necessary, run depmod after compiling them.
[2] Enjoying the new kernel
[2.1] Trackpoint Sensitivity
Kernel ≥ 2.6.14 provides /sys/devices/platform/i8042/serio0/sensitivity which allows the trackpoint sensitivity to be adjusted. (See above.)
Also, my udev rule for the trackpoint was broken by 2.6.16.20, and it is easier to just use /dev/psaux in /etc/xorg.conf than to fix it!
[2.2] Disk I/O priorities
- background program:
sudo nice -n 19 updatedb - important program:
bashorsudo su
Troubleshooting and diagnostics
Sometimes, inevitably, things sometimes go wrong. This section might help...
[1] Symptom: Applications are slow to start
- Timeouts caused by the wrong hostname. If the machine doesn't have an entry for its own hostname and for
localhostin/etc/hosts, then it will be unable to resolve its own name. This will result in a DNS timeout (about 10 seconds) before the application continues. This affects all X applications. This problem can also sometimes be caused by changing the hostname from within an X-session, whether manually, or by a daft (default) DHCP option. - Many applications are now built with support for HAL/DBUS. If they are built against the wrong library, they will speak the "wrong" protocol, and the HAL error will take about 25 seconds to time-out. See above.
- Note that some applications, notably OpenOffice are just very "heavy", and are just rather slow to start - but you will see the CPU load being 100%.
[2] Symptom: X config is messed up (e.g. mouse buttons misbehave)
If anything causes X to fail to start up, Mandriva will very "helpfully" re-write the xorg configuration with a default. This is usually manifest in the mouse-buttons reverting
to defaults, (i.e. no emulate-wheel), or the horiz/vert scrolling being interchanged. Solution: keep a backup copy of your xorg.conf, and replace the broken version. Then restart the
dm (display manager) service. (Close your applications first, since stopping the dm will instantly kill KDE!). See also /var/log/Xorg.0.log.
[3] Symptom: daemons fail to start
When the system starts, or you restart a service with service SERVICENAME start, it is extremely unhelpful when it just says "Starting SERVICENAME...[FAILED]"!
Often, the error is in a configuration file (if you just changed it), and there will be a helpful message in /var/log/daemons/errors or /var/log/messages.
If this fails, look at the startup script in /etc/init.d, and then run this command manually, without the redirection of stderr to /dev/null. Sometimes, the man page for the daemon
will have an option to not fork into the background; this will ensure that messages are printed to the console.
[4] Symptom: 3D performance is really poor
tuxracer/ppracer),
fancy screensavers (helios) and astronomy tools (stellarium). There are (at least!) 2 ways to mess this up:- Don't run at 24 bit colour. There isn't enough graphics memory (so it seems) to run at 24-bit, with acceleration, and it will cause
glxgearsto drop to only 160 fps. Approx 780 fps is achievable when running at 16-bit. This is controlled by theDefaultColorDepthsetting inxorg.conf. - Don't install Mesa. Mesa allows you to do indirect rendering of OpenGL in software: excellent when there is no hardware support, but far less powerful than raw hardware.
Interestingly, this won't seriously affect the performance of glxgears, but ppracer/stellarium will be totally unusable (2fps!).
glxinfoprovides some debugging information; this excellent page on DRI Troubleshooting has more details. If hardware acceleration is available, you should not haveLibMesaGLinstalled. So, uninstall theMesa-5.0.2-11mdkandlibMesaGL1-5.0.2-11mdkpackages.
[Note: thelibMesaGLU1-5.0.2-11mdk,libMesaglut3-5.0.2-11mdkandlibMesaGLU1-devel-5.0.2-11mdkpackages are innocent.]
service dm restart) to make changes take effect. I recommend using IceWM for speedy restarts.
[5] Symptom: Software breakage
- If it was working, and then you broke it:
- For system packages, try verifying the installed packages with
rpm -Va. See above. If necessary, uninstall (withrpm -e --nodepsand immediately re-install. - If it is an application, try removing
$HOME/.applicationrcor$HOME/.application/. (Copy it first).
- For system packages, try verifying the installed packages with
- If it was broken to begin with:
- Check the package's bugzilla, and google, in case it is a known bug. Otherwise, file a bug report (both upstream with the author, and with mandriva).
[6] Symptom: Hard disk errors and poor performance
- If the hard disk is slow, it is possible that DMA (direct memory access) is not enabled. Use
hdparm /dev/hdato check the status. hdparm can also measure file-transfer performancehdparm -tT /dev/hdaor change DMA settingshdparm -d 1 /dev/hda. - Check the hard disk for errors. Smartctl is part of the SMART System monitoring and reporting tool system for Hard drives. These can detect impending failure, and hopefully warn you.
smartctl -l selftest /dev/hda- print the self-test log from the drive.smartctl -a /dev/hda- print all information that the drive knows about itself.smartctl -t long /dev/hda- begin a long selftest (about an hour). This can be run without unmounting the drive.- To set up automated monitoring, see here (and check that "mail root" is delivered to a human).
- There is also a graphical utility, gsmartcontrol
[7] Symptom: Wrong file permissions for devices
pam_console_apply to change the ownership of various devices to the first locally logged-in user. For example, when I am logged in, the sound device has
these permissions:
crw-rw---- 1 rjn audio 14, 3 Jun 12 20:47 /dev/dspecho -n "rjn" > /var/run/console.lock #Note, the -n to prevent trailing newline.
pam_console_apply #Change the owner to the user given above.[8] Symptom: It won't boot (i.e. the boot sector is messed up)
- Installing another OS (eg Windows) on a different partition, and it messed up the bootloader.
- Ugrading the kernel without running lilo [but Mandriva normally does this automatically, when you use urpmi, so this is rare]
- Copying the hard disk (eg with rsync) onto a different disk or a new machine.
- Boot the damaged system up from CD with knoppix. Become root. (
sudo su) - Mount the hard disk (
mount -o dev /mnt/hda1). The "-o dev" is very important; it is not the default for Knoppix. - If necessary (it usually isn't), copy over knoppix's /dev directory. ONLY do this if /mnt/hda1/dev is empty. (
cp -a /dev/* /mnt/hda1/dev/) - Chroot into the target system. (
chroot /mnt/hda1) - Edit the target's lilo.conf if needed: (
nano /etc/lilo.conf) - Run lilo: (
/sbin/lilo) - Reboot.
lilo -C /mnt/hda1/etc/lilo.conf -b /dev/hda would work. For some reason, it doesn't!Note2: See also the Knoppix Rescue FAQ.
[9] Symptom: KDE menus get messed up, and are missing entries
There are (confusingly) several different inconsistent ways to edit the KDE/GNOME/ICEWM menu. Some 3rd-party installers mess it up, leaving most entries missing!
To regenerate the KDE menu correctly, run update-menus as root.
[10] Symptom: random crashes or kernel panics
Dodgy RAM can cause all sorts of problems. These range from I/O and network errors, to randomly segfaulting processes, to kernel panics. It depends which part of kernelspace/userspace gets corrupted. These errors are often weird, and sometimes, but not always repeatable (if you retry immediately, the kernel may re-allocate the same memory page).
Even expensive RAM can go bad, and once-working RAM can die after a few months/years, especially if the computer is running warm, and the warranty has just expired. The problem is quite a lot more common than one might expect.
The way to test it is to install memtest86+. Then, reboot the machine, and choose memtest from the Lilo prompt. (Or, run memtest from Knoppix).
Usually, memtest will detect faulty RAM within minutes. However, to get a "clean bill of health", let it run for at least 12 hours. Memtest's report will identify the faulty memory range(s), which should identify the faulty DIMM.
[11] Symptom: Data corruption, or partition cannot be mounted (hard disk error)
TODO: FIXME
Use ddrescue , reiserfsck, then throw disk away
[12] General troubleshooting tips
- Look at the log files:
dmesg,/var/log/boot.log,/var/log/messages,/var/log/kernel/*,/var/log/daemons/errorsetc. - the kernel messages, dmesg are particularly helpful.
- If it is a hardware problem, try compiling the latest kernel. If it's an application bug, try the latest version.
- Run the application from a terminal, so that the error messages (stderr and stdout) are visible. These are invisible when starting from the GUI (though they are appended to
~/.xsession-errorsinstead.) - If necessary, you can watch what the program is doing with
strace(print system calls), andltrace(print libary calls). - To see what process is using a particular file, use
fuserandlsof. (as user root). - To identify what processes are using the most CPU, use
top. (keys: M - sort by memory usage (explanation); P by processor use; S cumulative CPU use.) vmstatreports memory usage, and swap/disk io bandwidth.- Other useful tools include ps, pgrep, nice, ionice, netcat, lshal, lsusb, and digging around in /proc.
- Look at the source code. (A surprising number of programs are actually scripts).
- Look in the application's bugzilla, or google's Linux pages. (Google for the exact error message; Kdialog lets you select text, for this reason).
- Remember, once found, to document what you did, and file a bug report if relevant.
Documentation
- Mandriva or Thinkpad Specific:
- Mandrake Security Announcement list - for email notification of updates.
- Mandriva 2006 Documentation - online (or install mandriva-doc-*)
- Linux-Thinkpad.org - Linux on Thinkpads (in particular the excellent mailing-list)
- ThinkWiki - Wiki with lots of Thinkpad information
- Linux on Laptops:
- Linux-Laptop.net - Linux on laptops
- TuxMobil.org - Linux on laptops
- General Linux information:
- The Linux Documentation Project - all the HOWTOs.
- Rute User's Tutorial and Exposition - detailed explanation of Unix internals.
- A Mandrake 9.1 Howto - (old, but still useful).
- IBM developerworks - lots of good tutorials.
- Linux Home Networking
- Linux News:
- Linux Weekly News - detailed technical news about Linux.
- Linux Magazine - archived articles can be freely downloaded as .pdfs
- Linux Gazette - free, online magazine with some tutorials.
- Search:
- Miscellaneous:
- Knoppix - bootable Linux demo/rescue CD
- My other computing links, including humour.
To Do
- Figure out how to use the S-Video input and output that the Thinkpad has.
- Get IrDA to work without crashing.
Bugs
- PC Speaker not working: Bug 13627. Trivial, finally fixed in 2008.1
- Prism54 firmware: Bug 17797. Not really a bug, just an irritation.
- X - EmulateWheelTimeout doesn't do anything: Bug 4291. Fixed in Xorg CVS. Fixed in 6.9.0
- X - Broken R128 driver: Bug 17958. Solution: use the ati driver instead.
- X = Must restart dm to make xorg changes take effect: Bug 18022. This is "Not a bug".
- Encryption - bug in initscripts (rc.sysinit) : Bug 17931. Still not fixed.
- Swapon race condition (need sleep in rc.sysinit): Bug 17802. Still not fixed.
- Swapon needs specific /dev/loopX: Bug 17803. Probably a kernel bug. Not fixed.
- Apm: suspend causes crash: solution is sync,chvt,kill -STOP X: Bug 17930. Still not fixed.
- /etc/bashrc (unset i): Bug 17799. Trivial, not fixed.
- /etc/profile fails to prevent core-dumps: Bug 19822. Fixed in Jan 2007.
- lircmd service starts after the dm service, so it can't be used as an IR mouse. Bug 20771. Fixed March 2007.
- Timidity-init doesn't play nice with alsa: Bug 17160. Complicated
- Irdadump panics kernel: Bug 20443. Being worked on. Fixed upstream.
- Kdialog converts \n to \n\n: Bug 111388. Trivial, not fixed. May be deliberate.
- Mozilla has wrong shortcut keys: Bug 18024. Default behaviour; not a bug (although I think it's a misfeature).
- Need to accept 2 different MAC addresses with WG511: Bug 21840.
- KDE Removable storage - dynamic devices with udev rules, permanent entries in fstab: Bug 126208
Annoyances
TODO: FIXME
Summary
This A22p is (still, after 5 years) an excellent laptop. It's my 3rd ThinkPad, and I shall soon buy a 4th. It works well under Mandriva, although there is quite a lot of configuring to do. I'd be more than happy to help anyone else if I can: please do contact me if you have any questions, would like help, or alternatively, if you want to point out a glaring error in the above!
Copyright
This page is copyright Richard Neill, 2006. It is intended to be helpful to the community who have given me so much of their help, and is hereby released under the GNU Free Documentation License; the code snippets are additionally released under the GNU GPL.
Redistribution, translation, copying, wiki-fying etc is encouraged. If you wish to link back to this page, please link to: http://www.richardneill.org/a22p-mdk11-0.php.
Footnote: Linux® is a registered trademark of Linus Torvalds. However, in most cases above I am using the word as shorthand for GNU/Linux.
| Top | Home | Contact |
|